Actions/Context menu
Let's take a closer look at the actions you can perform on the Active Submissions page.
More:
Send
Select this option to send a selected submission to Bacs. The submission must be validated and signed before you can send it, so you will be prompted to do this if you have not already done so. Please refer to the section entitled Validate and Sign for details of how to sign a submission.
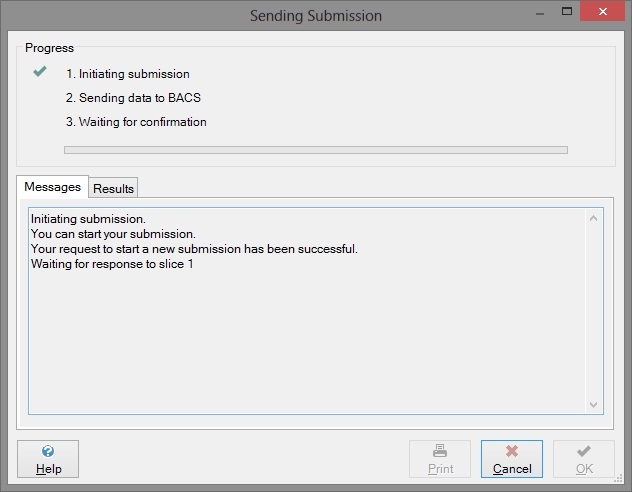
Once the submission has been signed and you click the Send option, you will see the following dialog:
This shows you the progress of the connection to Bacstel-IP. If you are not logged onto Bacs, or your previous session has timed out, you will be prompted to logon to Bacs, using your smart card and PIN.
As the Send operation progresses, you will see the black arrow in the Progress section move down to the next step, and a green tick will appear alongside the previous step if it completed successfully.
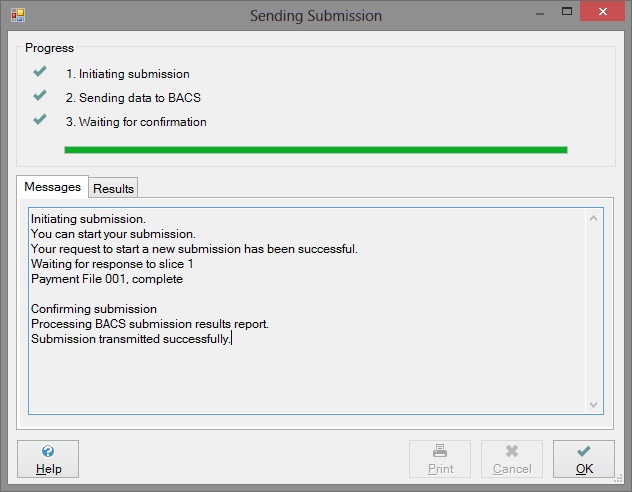
When you have connected to Bacs and the file has been sent, you will see the results of the transmission, on the Results page tab of this dialog, as shown in the example below:
The important thing to be checked here is the Submission Status. In the example above, the Status is “complete”, which means that the submission was received by Bacs.
The Results page contains a summary of the submission and each payment file within it. You can print the contents of the Results page, as a report, by clicking the Print button.
If you look at the Messages page tab, you will see a running commentary of what went on during the transmission, as shown in the example below:
To return to the Active Submissions page, click the OK button. You will see that the submission you just sent now has the status “Sent, awaiting processing”.
Validate and Sign
Select this option in order to validate and sign a submission. You will need to have the appropriate security permission, a smart card and reader, and a PIN number to perform this function. SmarterPay will validate the data content of the submission before you sign it.
N.B. This option can be used by someone without a smart card, simply to validate and correct a submission if necessary. In this case, the Sign buttons will not be enabled. Once validation and correction has been completed, click the OK button to return to the Active Submissions page.
The Validate and Sign option also allows you to sign the payment file(s) within the submission if required. Whether or not individual payment files must be signed will be determined by the Service User configuration.
For a submission whose individual payment files do not need to be signed, the Sign button appears only with the Submission Summary details. For a submission whose individual payment files may be signed, the Sign button appears with the Submission Summary details and with each set of Payment File Summary details.
Successful validation
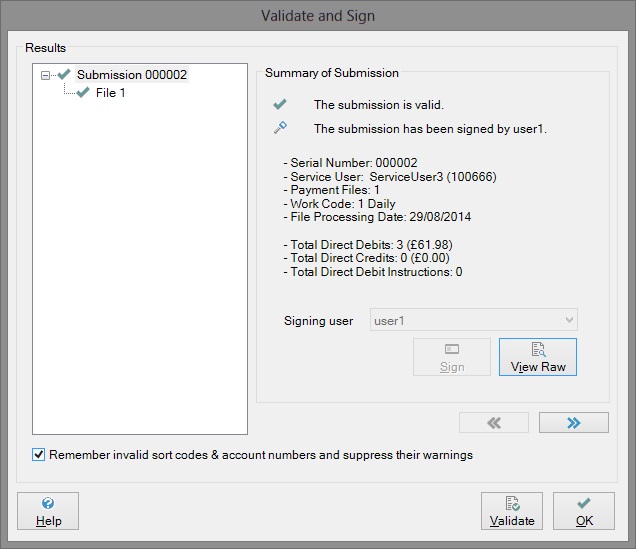
An example of a successful validation is shown in the dialog below:
The tree view on the left shows the submission and all the payment files within it (in the example there is only one payment file).
The Submission Summary on the right shows details of the submission.
By using the Forward and Back buttons you can make your way through the submission and payment files in the tree view and view their details on the right. You should read all the Summary details for the submission and payment files to check that they are correct.
N.B. For payment files that may be signed, you will notice that each set of Payment File Summary details warns you that the payment file has not been signed. They should be signed before you sign the submission itself (remember to select the appropriate signing user from the dropdown list first). A Sign button appears with each set of Payment File Summary details to allow you to sign each payment file. If you accidentally sign the submission before signing the payment file(s), you can return to the Active Submissions page, reset the status of the submission, and then go through the Validate and Sign process again.
After checking the summary information, the most important thing to note is the green tick against the submission and the file in the tree view, the “submission is valid” message in the Submission Summary, and the warning triangle telling you that the submission has not been signed.
Since the submission is valid, you may ignore the Validate button and continue with the signing of the submission. Before you do so, you may, using the dropdown arrow, choose from any of the listed Signing users to sign the submission.
Please note that, if you click the OK button at this point, you will simply be returned to the Active Submissions page without having signed the submission.
You can now click the Sign button to move on to the next part of the Validate and Sign option, first making sure that your smart card is inserted in the card reader.
Unsuccessful validation
If the validation is unsuccessful, the Validate Submission dialog will show you details of the validation errors that should be corrected before you send the submission to Bacs.
An example of an unsuccessful validation is shown in the dialog below:
The Submission Summary again shows details of the submission, but this time it also tells you that the submission is not valid. You should try to correct each error before you sign and send the submission. However, the SmarterPay software will not force you to correct the errors. You will be able to sign and send the submission even though it contains errors, but errors may be returned by Bacs if it is unable to process the files in which they are found.
In the tree view section of the Validate and Sign dialog, you can see the structure of the submission. The example above shows that the submission contains one payment file. This file contains errors at payment file level (File Message 1 etc). Other files may have errors at payment instruction level (Data Message 1 etc).
You can use the tree or the Forward and Back buttons to move between the submission, payment files and payment instructions shown in the tree view. As you highlight each Data Message or File Message, the right-hand side of the dialog will highlight the field in error and give a description of what has caused the validation to fail.
The example below shows the details of an unknown destination sort code.
It is the user's responsibility to decide whether and how to correct any errors.
You may send the submission containing errors, but Bacs may inform you that they are unable to process the payment instruction containing those errors.
At payment instruction level, any of the six fields shown in the example below may be invalid for one reason or another. However, the only errors you will be able to correct are those relating to an invalid Destination Sort Code, invalid Destination Account Number, Processing Date or Amount.
If the Processing Date at this level is invalid, you will be able to amend it by using the dropdown arrow at the right-hand side of the Processing Date field and selecting a new date from the calendar that is presented to you. When you click on another field or button, the new date will be validated before you can continue.
SmarterPay can be set to suppress account number and sort code validation errors if required. In a small number of cases, account numbers and sort codes do not conform to the banks’ validity rules. If you are processing payment files that contain accounts you know to be valid, but which fail the validation tests, you can tick the check box near the bottom of the dialog, labelled Remember invalid sort codes & account numbers and suppress warnings. Ticking this box has two effects:
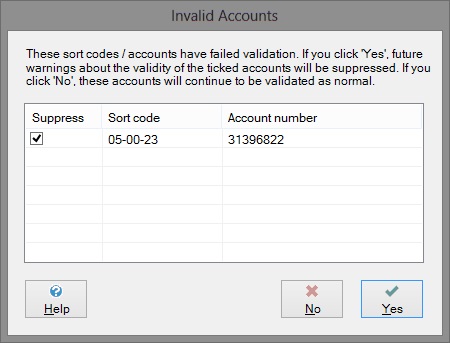
- If the validation process finds account errors, a dialog box will be displayed that lists the sort code and account number pairs that are in error. You will then have the option to suppress further warnings about these accounts in the future. If you choose to suppress warnings, the accounts will be added to an internal list of exclusions.
- After validation, errors detected in accounts that are on the exclusions list are not displayed. So once an account has been added to the list, no further warnings about it will appear.
If the check box is not ticked, then you will not be offered the option to add accounts to the exclusions list, and all validation errors will be shown, regardless of whether accounts have been added to the list already.
The exclusions dialog is shown below:
When this dialog is shown, click Yes to suppress future warnings about the listed accounts with ticks next to them, or No to continue to receive warnings.
At payment file level, the currency or the payment file processing date may be invalid. If the processing date is invalid, you will be offered an alternative, valid, date. This will be the next available valid processing date after the current date. It will be shown on the right-hand side of the Validate Submission dialog, as shown in the example below.
You may choose a different date if you wish, by using the dropdown arrow at the right of the date field and choosing a date from the calendar presented to you. More simply, you can choose to use the date suggested to you, by clicking the Accept button.
When you have been through all the errors in all the files, you can click the Validate button to re-validate the submission.
If you want to ignore the errors and continue to the signing process, you must return to the Submission Summary of the Validate and Sign dialog, by highlighting the Submission node at the top of the tree view.
View Submission / payment file Data dialog
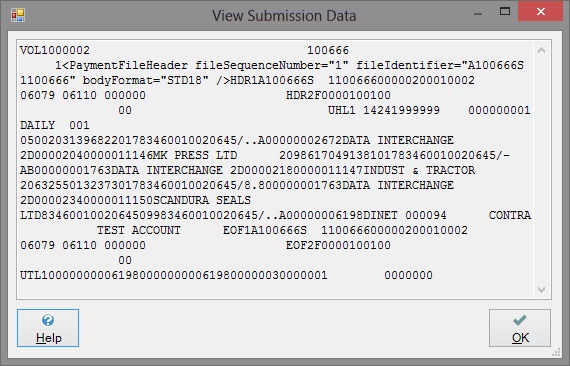
If you want to see the data within the submission or payment file, select the “View data” tickbox before clicking the Sign button. This will bring up the View Data dialog, shown below.
If you do not select the “View data” tickbox, you will be taken straight to the Enter PIN dialog when you click the Sign button.
This dialog allows you to see the raw data that you are about to send to Bacs. It is in Standard 18 format, so you may need to consult the Bacs Standard 18 specification if you want to know exactly what the data means.
When you have viewed the data, click the OK button to proceed to the Enter PIN dialog.
Signing
HSMs
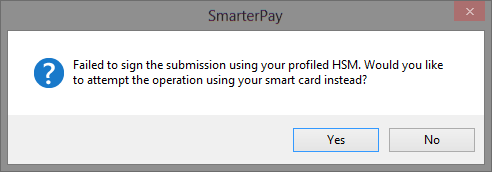
If the current user is linked to a HSM profile, no PIN entry will be required as this already forms part of the HSM profile. If your HSM is unreachable, you may see the following option:
This will allow you to use your profiled smartcard as a “backup” to your HSM.
Enter PIN dialog
From the Validate and Sign dialog or from the View Data dialog, the next step in the Validate and Sign process is the Enter PIN dialog:
On this dialog, type in your PIN number. When the PIN number is correct, the OK button will become enabled. Click OK to complete the signing process, or click Cancel to leave the payment file unsigned.
If the smart card in your reader is not associated with the signing user you have selected, instead of the Enter PIN dialog you will see the following message box:
This tells you that the data could not be signed. Please check that your smart card is inserted correctly and ensure that you have selected, on the Validate and Sign dialog, a signing user that is associated with this card.
Unable to sign challenge from Bacs
Signing can also fail for one of the following reasons:
- The smart card reader is not correctly installed. Check the documentation of your bank's chosen signing solution to ensure it is properly installed.
- The smart card is not ready to be used for signing. Some cards are shipped with a “Transportation” or “Initialisation” PIN number. This PIN must be entered, and a user PIN number set up before the card can be used for any purpose.
- The smart card is not correctly inserted. Try removing the card and re-inserting it slowly.
Completion of validate and sign
If you completed the signing process, you will be returned to the Validate and Sign dialog, on which the Sign button is now disabled, and where the Submission Summary states who has signed the submission, as shown in the example below:
If you came to the Validate and Sign dialog from the Validate and Sign option, click OK to return to the Active Submissions page, where you will see that the Status of the Submission has been changed to “Signed”.
If you came to the Validate and Sign dialog from the Send option, click OK to initiate the Sending procedure. For details of the Send procedure, please refer to the section entitled Send.
Authorise
This option allows an unauthorised submission to be authorised. All submissions must be authorised before they can be sent to Bacs, this can occur either before or after signing. If submissions do not require authorisation (a configuration under the submitting service user), then they will be authorised by default. Only a system user with the correct permissions is able to authorise a submission.
Change Submission Type
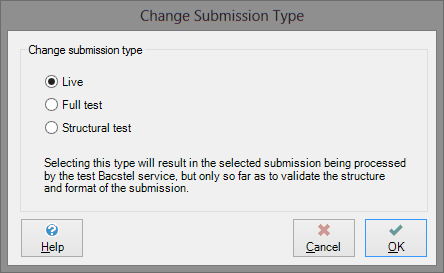
This option allows you to change the type of the submission to Live, Full Test or Structural test. When a submission is first created it uses the default submission type of the service user who created it (this can be changed in the SmarterPay administrator) however it may be the case that a user would like to create a one off test submission to be validated by Bacs.
Selecting this menu option will bring up the following dialog which will let you change the submission's type and provide descriptions of what each type means.
Remove
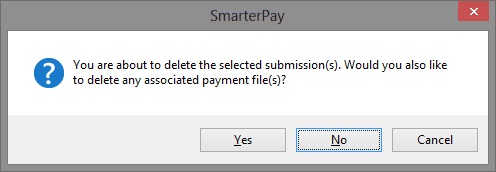
This option allows you to remove a submission from the list. The payment file(s) contained in the removed submission will still be present on the Payment Files page, unless you choose to delete them. The following message box gives you the opportunity to delete or keep the payment files related to the submission.
Click Yes to delete the associated payment files, No to keep them, or Cancel to keep both the submission and the related payment files.
Archive
This option allows you to archive one or more submissions manually. You do not need to archive submissions manually, since each successfully processed submission will be archived automatically, after the number of days specified in the Retention Periods section of the Administrator, once the associated Input report (from Bacs) has been read. Only processed or withdrawn submissions may be archived using the Archive option. The result will be that the submission is removed from the Active Submissions view and inserted in the Archived Submissions view.
Please note that SmarterPay will not prevent you from manually archiving submissions before reading the associated Input report, but it is your responsibility to check the Input report in order to check for any failures.
Reset Status
This option allows you to reset the status of a submission once it has been signed and before it has been sent to Bacs. You may therefore use the Reset Status option on the statuses listed below, which will have the effect of resetting the status to Prepared. If your service user requires submissions to be authorised, the authorised flag will also be reset. You must then go through the process of validating and signing the submission again before you send it to Bacs.
Resetting the status of a submission also has the effect of changing its serial number, as Bacs require that each submission should have a unique serial number.
- Signed – the submission has been signed but not yet sent
- Sending to Bacs – the submission is in the process of being sent to Bacs
- Aborting – the user has prematurely terminated the process of sending the
- submission to Bacs, and the termination is still in progress
- Aborted – the user has prematurely terminated the process of sending the submission to Bacs
- Failed – the submission failed to arrive at Bacs
- Withdrawn – the submission was sent to Bacs but a system user requested the destination bank to withdraw the submission
If you try to reset any other status, you will see a message box telling you that the software is unable to reset the status of the submission because of its current status.
Refresh Status
Once a submission has been sent to Bacs, its status will change according to the contents of the Bacs reports sent to you to indicate its progress through the Bacs system.
This option allows you to refresh the status of one or more submissions by downloading the latest reports from Bacs.
If you do not have the necessary privileges to download Bacs reports, you will not be allowed to use this option.
Export to CSV
Select this option if you wish to export a summary of your submissions data to a CSV file. The CSV file will output the following details (in this order),
- Submission Serial Number
- Payment File Service User
- Payment File Service User Bacs Number
- Payment File Service User Group
- Submission Status
- Transmitted Date
- Submission filename
- Original Payment File filename
- DDI Count
- Credit Count
- Credit Value (Pence)
- Debit Count
- Debit Value (Pence)
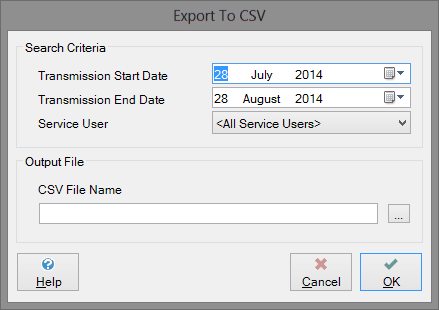
You will be presented with the following dialog which allows you to enter search criteria and specify the output filename:
Search Criteria
Transmission Start Date
Use the calendar to select the transmission start date. Any submissions that have been transmitted after this date, but before the transmission end date will be retrieved.
Transmission End Date
Use the calendar to select the transmission end date. Any submissions that have been transmitted before this date, but after the transmission start date will be retrieved.
Service User
This drop down list is populated with all the available service users for the current system user. If you wish to filter your submission results to a single service user, you should select them from the list. Leaving <All Service Users> selected will return submissions from all service users.
Output File – CSV File Name
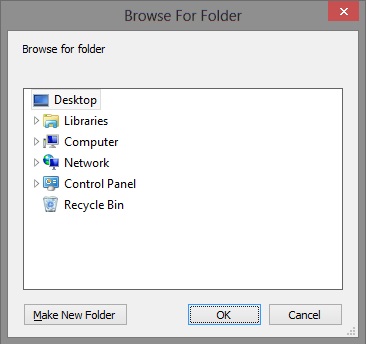
You should enter the full path and filename into this area to specify the save location of your CSV file. If you would prefer to browse for a folder rather than typing the full directory path, you can click the button to the right which will open up the following dialog:
Once you have found the directory where you wish to put your file, click OK and enter the filename.
Alternatively, if you omit the path name and just provide a file name, then the CSV file will be saved to the same directory as the SmarterPay client executable.
View Summary Report
This option allows you to view a summary report of one or more selected submissions. You can then print the report from the preview screen. The summary report is produced by the SmarterPay software, not by Bacs.
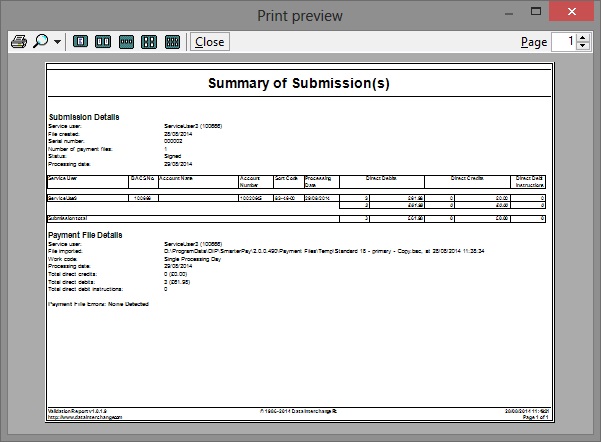
Select one or more submissions in the data area, then select this option in order to view a summary report containing the details of the selected submissions. A sample summary report is shown below:
This report shows a summary of the submission details, including:
- the service user associated with the submission
- the date the submission was created
- the current status of the submission e.g. Processed
- the processing date
- The number of payment files in the submission.
The summary section is followed by a table showing, the following details:
- The service user associated with the submission
- the number of Direct Debits and their value
- the number of direct credits and their value
- the number of Direct Debit instructions
- the earliest processing date in the payment file
- the work code i.e. whether the file covers a single processing day or a multi-processing day
A summary of payment file information is also shown for each file within the submission, including:
- The payment file service user
- The payment file work code (single or multi).
- Total counts and amounts of direct debits, credits and debit instructions.
- Any validation errors.
- A list of each payment instruction in the file.
View Audit Trail
This option allows you to view a report of the audit trail for one or more selected submissions. You can then print the report from the preview screen.
The audit report shows you who did what, and when they did it.
Bacs Reports
This option allows you to view the available Bacs reports for a selected submission. Bacs reports are available for each stage of the Bacs processing cycle. As you obtain each report, the status of the associated submission will be updated on the Active Submissions page to reflect the particular stage it is at in the processing cycle.
