iConnect Full User Guide
Table Of Contents
| 1. | Logging in to iConnect |
| 1.1 | Forgot Password |
| 2. | Creating and signing a new submission |
| 3. | Sending your submission to BACS |
| 4. | Download Reports |
| 5. | Submissions History |
| 5.1 | Exporting Submission History |
| 6. | Utilities |
| 6.1 | Sort Code Checker |
| 6.2 | Change Password |
| 6.3 | Data Entry |
| 6.4 | Support |
| 7. | Administrator |
| 7.1 | User Details |
| 7.2 | Add User |
| 7.3 | Account Manager |
| 7.4 | Service User Numbers |
| 7.5 | Configure Profiles |
| 7.6 | Activity Logs |
| 7.7 | Delete Payment Files |
| 7.8 | Unblock Submission (Bureau Only) |
| 7.9 | Full Submission History |
1. Logging in to iConnect
Open Internet Explorer and browse to: https://iconnect.aptbacs.co.uk/
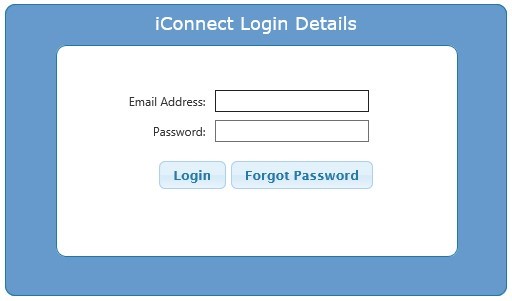
Enter in your Email Address and Password to Login.
1.1 Forgot Password
If you have forgotten your password, click on the forgot password button.
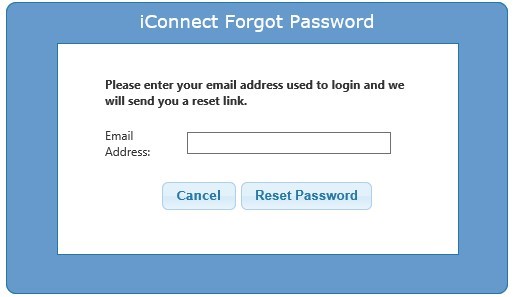
Enter your email address, and a reset password link will be sent to your email address.
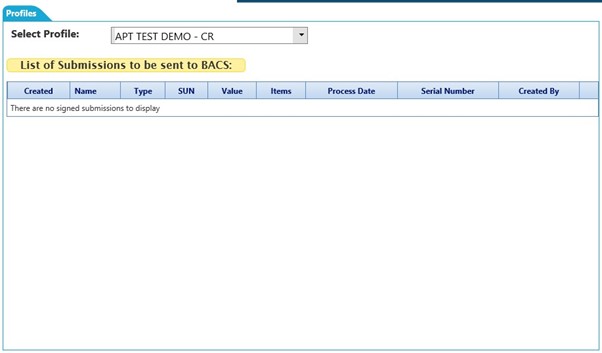
Below is the ‘Home’ screen, once you have logged in, you can click the drop down menu and Select a Profile
2. Creating and signing a new submission
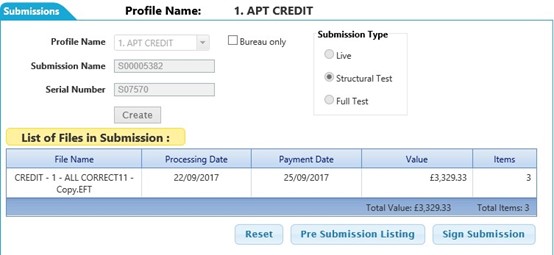
From the home screen, select the relevant profile you would like to create a submission for.
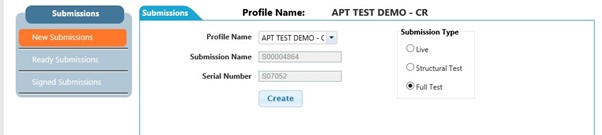
Browse to Submissions> New Submissions
Click on Create
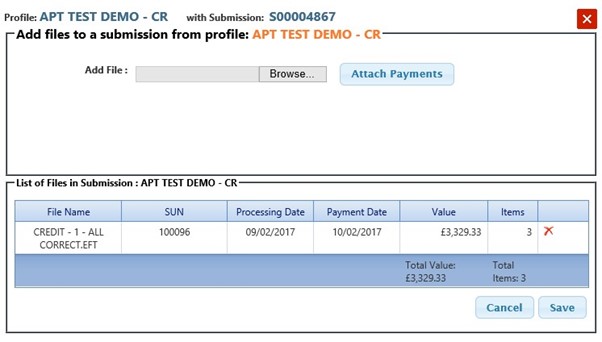
Click the Browse Button and Select a file by double clicking on the file
Click on Attach Payments

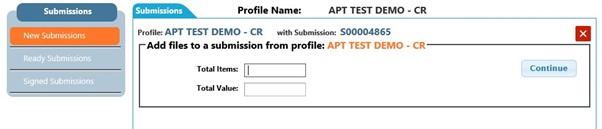
Enter the total Items and Value the file contains (if required)
Click Continue
Enter Processing Date (if required)
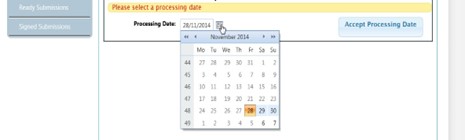
Click on Accept Processing Date
Accept the Invalid Records (If Required)
iConnect has a built in Modulus check so where needed, this page will display any sort codes and/or account numbers that may be potentially invalid. This could be due to miss typing, or it could just be a brand new account which is not included on the Industry Sort Code Directory at time of submission. You can either ‘Continue with Invalid Records’ which will add the file to the submission, or you can skip file, which will delete the file from the submission. You can also click on the ‘Download Report’ button, which will download a report of all of the listed invalid records.

Click ‘Save’ to add the file to the submission.
(Please Note:) In order to cancel or reset a submission, you MUST click on the ‘Cancel’ button, or the ‘Red Cross’ button - thus giving you the ability to add the same file in again.
The submission is now saved, but not yet signed.
Click Pre-Submission Listing to view a listing of the submission, to ensure all the details are correct. Any new records that were previously flagged by the integrity checker will be displayed in RED font. Any amended records will be displayed in RED ITALICS. Any accounts that failed the modulus check, will be in BLACK BOLD font.
Or click Sign Submission to continue with the submission process.
Once the Sign Submission button has been clicked the Display shows the total Credits, Debits and DDI’s in a summary view for you to double check
Tick that you have checked the total and that they agree. Click ‘Sign BACS File’

You will now get the Gemalto prompt, ready for you to Sign, by entering your Smartcard Pin Number.
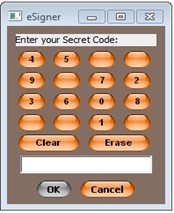
Enter your Smartcard Pin number and Click the OK button
You will then see the following message
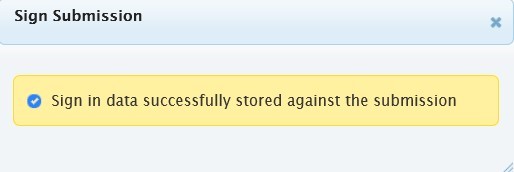
The Submission has now been successfully Signed – Ready to send to BACS.
3. Sending your submission to BACS
You can now send the submission to BACS, in order to do so - Click ‘Send to BACS’

You will then get the following Warning message:
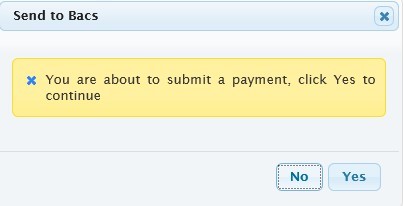
If you are happy to proceed – Click Yes to continue
You will then get the following Sign Prompt – Click the ‘Sign’ button
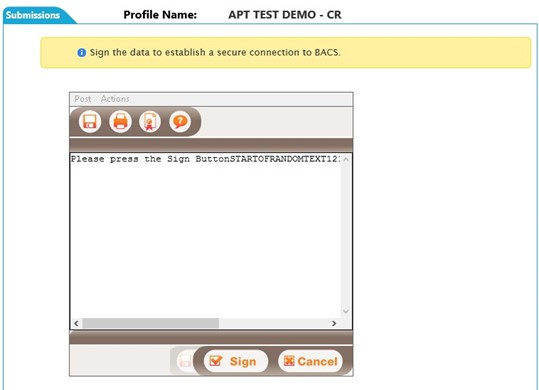
Enter the ‘Pin Number’ for the Smartcard and Click OK

This will now start to send your submission to BACS.

The submission will then Send, then log you off and it take you back to the front screen of the software.
The Bacstel-IP Submission Summary Report then opens up in a new window.

This is confirmation, that your BACS file has been sent to BACS Successfully.
4. Download Reports
To download your BACS reports - select the Profile you want to download the reports for and browse to Reports
Select Download Reports

Ensure you have your BACS Smartcard, in the Smartcard Reader
Click the ‘Sign’ Button
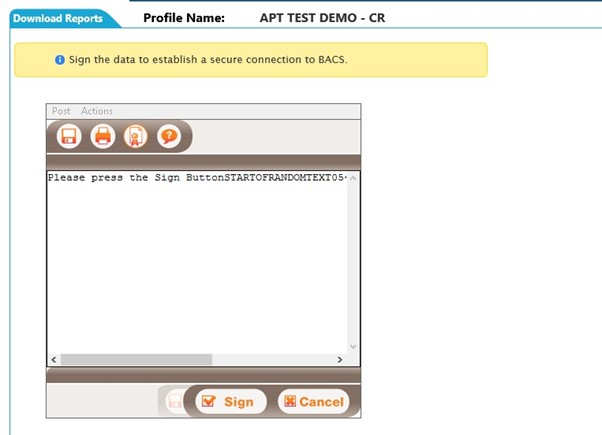
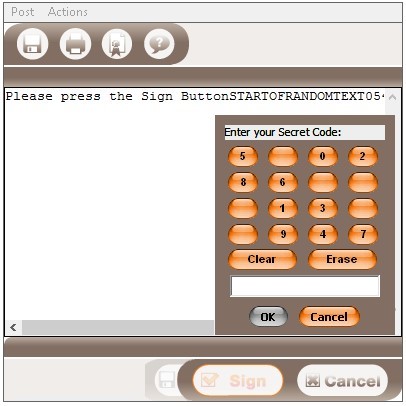
You will then be prompted to enter the Pin Number, for your BACS Smartcard
Once you are connected to BACS:
Select the Report Type (You can select ‘All Reports’ as shown, or the drop down will show a list of individual Reports to download)
Enter the SUN (Service User Number) you want to download the Reports for (Optional)
Reports Since will allow you to select how far back you want the report retrieval to go. You can select any amount from 1 – 31 (days). You can also hit the Set Default button so it remembers your selection for next time!

Click the Retrieve Reports button
The Reports are available in two formats (HTML & XML)
In order to download the Reports, tick the Square Box to the left of Report Type under HTML and/or XML, Select the Report/s you would like to Download and click Download Reports
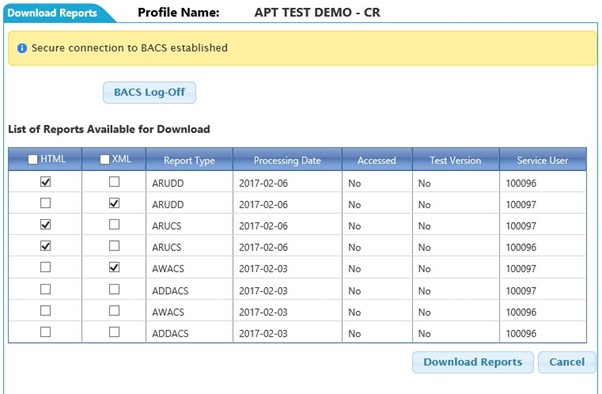
This will then Download the Reports and log off from BACS automatically.
You will have two options.
1) A Pop-up will app ear to allow you to save these reports locally onto your PC.

2) You can use the tab ‘View Reports’ to view and print the reports.
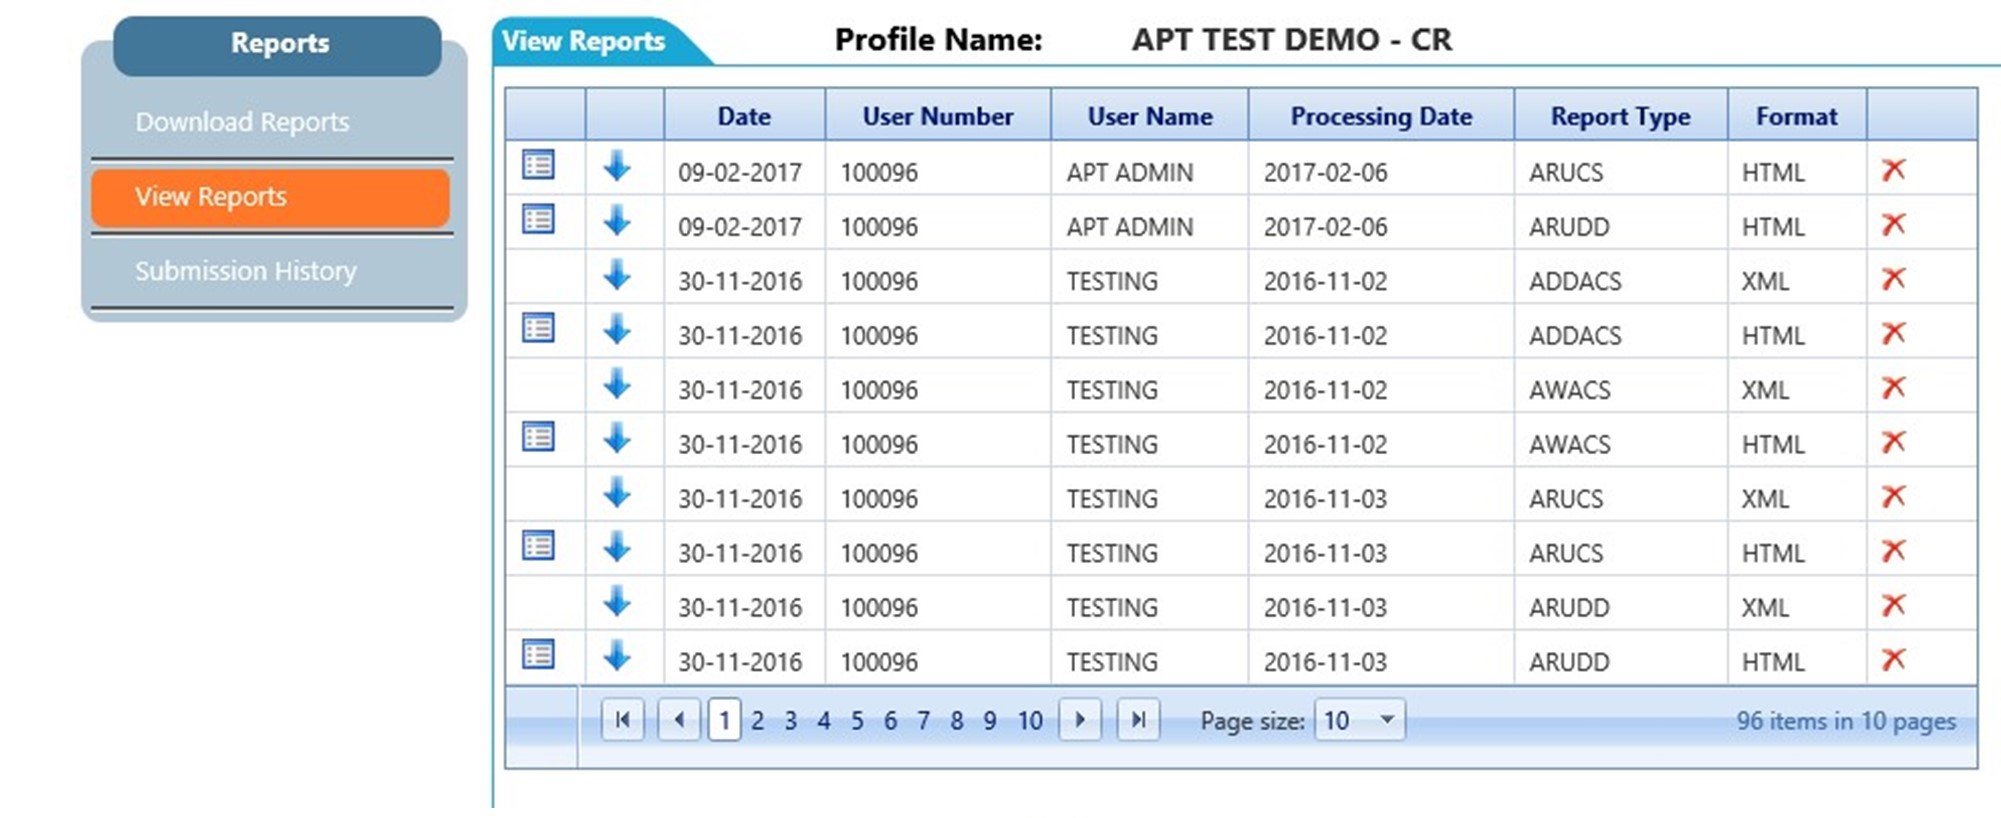
You then click on the Blue Square Report icon on the left to View the Reports
These reports are stored indefinitely on iConnect unless you delete them manually using the red cross on the right.
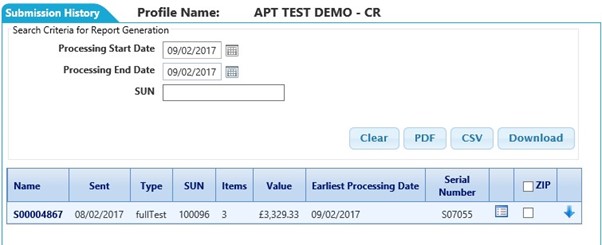
5. Submissions History
This shows the history of all submissions under that profile.

To view the pre-submission history of a line, click on the name
To view the confirmation receipt from BACS, click on the report icon on the right.
If the line is in red, it means that there was an error when sending the submission to BACS and it has failed.
To export a comma delimited text copy of a submission that has been made, tick the ‘ZIP’ box on the right-hand side of the relevant submission and click the blue arrow. This is only available for one week after the submission has been sent.

You can then click Open to open the comma delimited text file.

5.1 Exporting Submission History
You can export the submission history page into either a PDF document or into a comma delimited text file.
Enter a specific Processing Start Date (the files processing date you want the extraction to start at)
Enter a specific Processing End Date (the files processing date you want the extraction to end at)
You can enter a SUN (Optional)
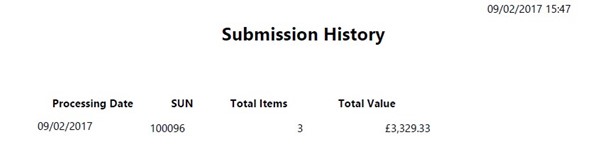
If you opt to export the history in a PDF document, hit the ‘PDF’ button, where you will then get a prompt to open or save. The document will look similar to below:
If you opt to export the history in a Comma Delimited text document, hit the ‘CSV’ button, where you will then get a prompt to open or save. The document will look similar to below:

6. Utilities
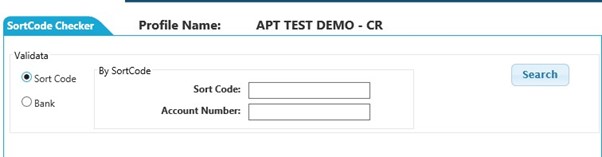
6.1 Sort Code Checker
Checks and individual sort code or account number
6.2 Change Password
Changes user password. Enter your old password in the top box, and then create a new password following the criteria on the right-hand side.

6.3 Data Entry
Data Entry is an add on to the iConnect software, which can be used to generate bacs files within the software, ready for submission. For more information on Data Entry, please contact our support team support@smarterpay.com.
6.4 Support
SmarterPay may need to log onto your PC, if so, please download the TeamViewer from ‘Utilities’ and ‘Support’. You can then give us a call and we can assist you.

7. Administrator
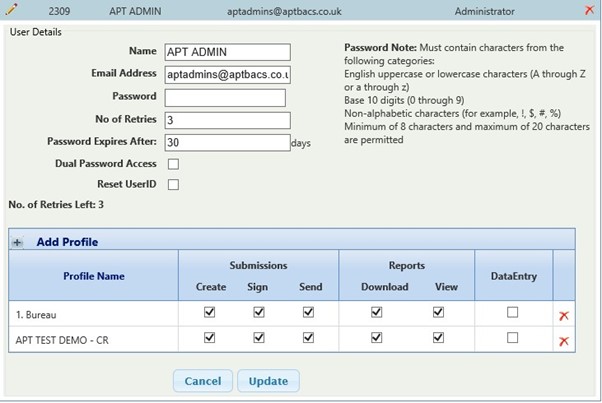
7.1 User Details
Any Administrators must be setup by SmarterPay.
To setup a new user or to amend an existing user go to Administrator > User Details

Here you can add a user or click on the pencil to edit an existing user.
7.2 Add User
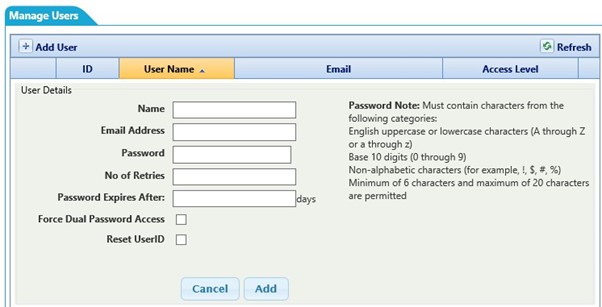
Once you have filled out these credentials, click add
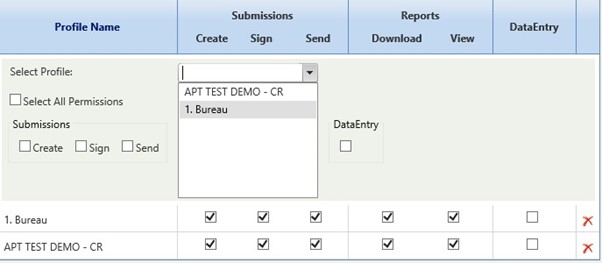
You can now click on add profile to add a profile to a user or amend privileges. This is the same view if you click on the pencil on a user to edit.
7.3 Account Manager

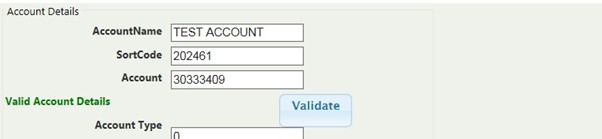
To add a new Account click on add new individual account or to edit click on the pencil of the account you wish to edit.
Enter the account name, sort code and account number and validate the account to check the details have not been transposed, then update.
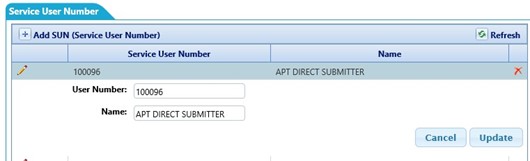
7.4 Service User Numbers
To add a new SUN click on add SUN, to edit click on the pencil of the account you wish to edit.

Enter the SUN and SUN name and click update
7.5 Configure Profiles
To add a new Profile, click on add new profile or to edit select the profile from the dropdown menu

When you have either selected a current profile, or created a new profile you will be presented with 4 separate screens. Please see each below:
User permissions – You can add an existing user to the profile or change user’s permissions

File details – Here you will need to add the SUN, bank account and template details if required. Here you can also add a contra narrative that appears on your bank statement.
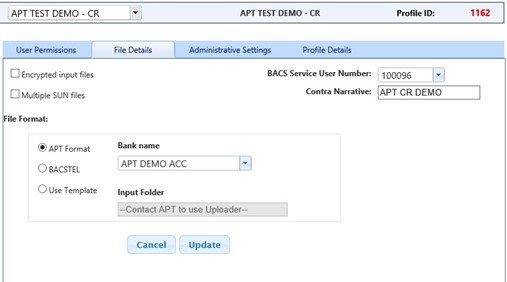
Administrative settings – Add or remove functions for the profile. E.g. allowing to prompt for total items and value. If you are unsure, copy the settings from another profile.

Profile Details – if you require the profile name to be changed or the type of transactions need to change.

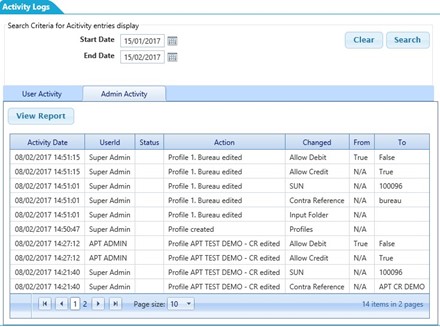
7.6 Activity Logs
The activity log has 2 logs, a user activity log and an admin activity log.
To view the user activity log set a start and end date and search. It then brings up all user activity.

To view the admin activity log set a start and end date and search. It then brings up all admin activity
7.7 Delete Payment Files
If users are getting a ‘This file already exists error’ you can delete any background payment files so that users can re upload. This error happens if a user has uploaded a file, and not delete the submission or completed the submission.
If the user just navigates away form the screen, or closes the screen down, the next time they upload a file with the same name, the software will throw that error.

If any files are stuck in the background, they will be listed in the drop down, where you can either delete a single file by selecting the file name and clicking the ‘Delete this file’ button, or all files at once by clicking the ‘Delete All Flies’ button.
7.8 Unblock Submission (Bureau Only)
If users have blocked their bureau submissions, you can unblock these here.
A submission becomes blocked if the submission has not been saved correctly or cancelled if no longer needed. Only one user can add to a submission at any one time.

If there are any blacked submissions, use the drop-down list which will show you the blocked submissions name where you can then hit the ‘Unblock’ button. The update button will refresh the list of blocked submissions if needed.
7.9 Full Submission History
Exporting submission history via the submission history tab, only allows you to export this per profile.
‘Full Submission History’ allows you to export the submission history across all profiles on the software during a given period.
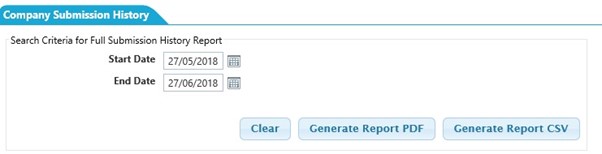
You can either generate this as a PDF or as a CSV file. Just select your start date, and end date and then click on either the PDF button, or CSV button.