Installation
The following provides a set of steps that will get you setup to use the Smarterpay Cloud for Salesforce managed package with the default settings. An explanation of these settings and more customisation options can be found under the 'Additional Settings' section.
Prerequisites
- An active SmarterPay Cloud client account in UAT and/or Live. (Please contact SmarterPay to acquire this).
- SmarterPay for Cloud Salesforce managed package installation URL and password.
- If your organization has multi-currency enabled, be aware that the CurrencyIsoCode field in SmarterPay records will default to GBP (British Pound). Ensure to review and update the currency settings as necessary to match your organization’s requirements.
- In Salesforce you must navigate to Setup > Lightning Email Templates and enable Folders and Enhanced Sharing this is required to install the package.
Instance Setup
- Login to your Salesforce instance and install the SmarterPay Cloud for Salesforce managed package.
- So the package knows which SmarterPay Cloud instance to use, we need to activate an Instance.
To do this go to: Setup → Custom Metadata → SmarterPay Instance - Select Edit on the instance you want to use (UAT or Live). Click the Active checkbox and press save. We will come back to this record later.
API Setup
Step 1
SmarterPay Cloud API communication uses Named Credentials.
Go to Setup → Named Credentials → External Credentials
Select 'Smarter Pay Cloud UAT' or 'SmarterPay Cloud Live' depending on which instance you are configuring.
Step 2
For this step you will need to get your API Key from your SmarterPay Cloud account. This can be found in the SmarterPay Cloud System Settings area.
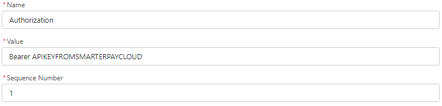
In the External Named Credential, click the 'New' button on the 'Custom Header' section. Here we are entering the API Key that will be used to communicate with SmarterPay Cloud. Populate this custom header with the details below, using your API Key.
Custom Header:
Name: Authorization
Value: Bearer [Your SmarterPay Cloud API KEY]
Sequence Number: 1
Warning
Ensure there is only one space between the word 'Bearer' and your API Key.
Step 3
You must now tell Salesforce which users can use the Named Credential.
Simply assign the in-built 'SmarterPay Admin' or 'SmarterPay User' permission set to enable access.
Webhook Setup - OAuth
Using OAuth to authenticate the webhook connection is the recommended method for the SmarterPay package.
Prerequisites
You will need to generate a webhook key with a length of up to 45 characters. We would recommend a 128bit or 256bit key length. There are several free services that can do this for you. Keep this key handy, we will need it later. This key is used to verify that the webhook is coming from SmarterPay Cloud.
Step 1
Go to the SmarterPay Setup tab in Salesforce under the SmarterPay App. Enter the webhook key that you created under the 'Webhook Private Key' field and click save next to the input field. Note: To maintain security, you will only be able to update this value in Salesforce and will not be able to see what is currently set.
Step 2
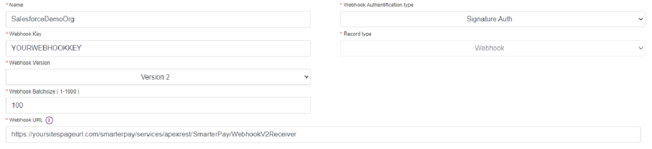
Open SmarterPay Cloud and go to Subscriptions in the Setup area. Click 'New Subscription'. See the screenshot below for the recommended settings.
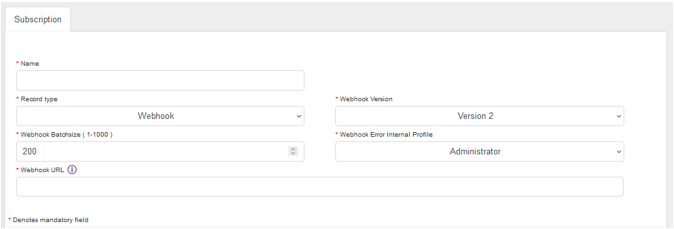
In the security section choose 'OAuth' which should provide you with the following fields:
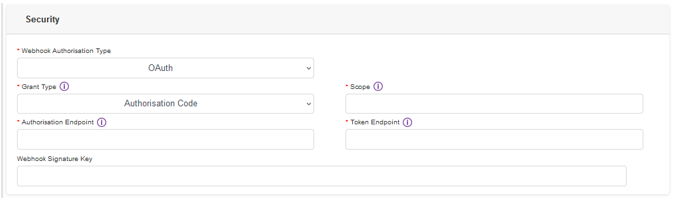
Populate the following fields using the format below:
| AUTHORISATION ENDPOINT | https://salesforcedomain.my.salesforce.com/services/oauth2/authorize |
| WEBHOOK URL | https://salesforcedomain.my.salesforce.com/services/apexrest/SmarterPay/WebhookV2Receiver |
| TOKEN ENDPOINT | https://salesforcedomain.my.salesforce.com /services/oauth2/token |
| WEBHOOK SIGNATURE KEY | Webhook Key generated in step 1 |
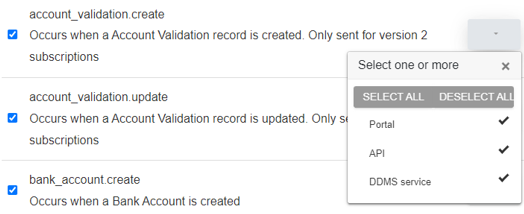
Under 'Events' select all events with all sources.
Once done, click 'Save'. You will now see your new SmarterPay Cloud subscription. Please note, these new settings can take up to 30 minutes to propagate to our backend systems.
Step 3
To activate the subscription you will need:
- Salesforce Integration user username
- Salesforce Integration user password
Click 'Setup Auth' to start the activation process. This will ask if you want to be forwarded you to the relevant endpoint for Authorisation. Confirm by clicking 'Ok'.
You will now be forwarded to the Salesforce login screen. Enter the username and password of the user you wish to use for the integration.
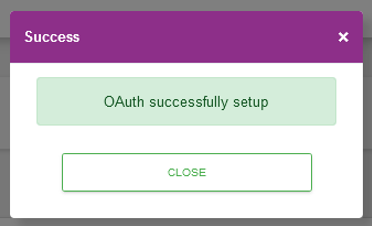
On successfully setting up the OAuth you'll be redirected to Cloud which will show the following message:
Webhook Setup - Public REST Endpoint using Salesforce Sites
Warning
SmarterPay does not recommend this approach and should only be used as a fallback if your organisation is unable to accommodate OAuth connections.
Prerequisites
You will need to generate a webhook key with a length of up to 45 characters. We would recommend a 128bit or 256bit key length. There are several free services that can do this for you. Keep this key handy, we will need it later. This key is used to verify that the webhook is coming from SmarterPay Cloud.
Step 1
Go to the SmarterPay Setup tab in Salesforce under the SmarterPay App. Enter the webhook key that you created under the 'Webhook Private Key' field and click save next to the input field. Note: To maintain security, you will only be able to update this value in Salesforce and will not be able to see what is currently set.
Step 2
Now we need to create a Salesforce Site. Once saved, make a note of the full URL. Setup → Sites → New You can create a site with the any details you want, but we would recommend the following:
- Site Label: SmarterPay
- Site Name: SmarterPay
- Default Web Address: smarterpay
- Active: True
Finally, we need to give access to the Webhook Receiver apex class. To do this, click 'Public Access Settings' and scroll down to 'Enabled Apex Class Access'. Click 'Edit' and select 'SmarterPay.WebhookV2Receiver'.
Step 3
Open SmarterPay Cloud and go to Subscriptions in the Setup area. Click 'New Subscription'. See the screenshot below for the recommended settings. You will need to enter your webhook key and Salesforce Sites URL you made earlier.
Under 'Events' select all events with all sources.
Once done, click 'Save'. You will now see your new SmarterPay Cloud subscription. Please note, these new settings can take up to 30 minutes to propagate to our backend systems
Step 4
Additional details of SmarterPay Clouds Webhooks 'Signature' Subscriptions can be found in our wiki: https://wiki.smarterpay.com/smarterpaycloud/webhooks/signature
Multiple Service User Numbers
Cloud can handle multiple Service User Numbers; these must be configured in the Custom Metadata to ensure that the records are set up against the corresponding SUN.
- If you have not already done so, please provide the SUN and Client Bank Account details to SmarterPay so that theses can be configured in your SmarterPay Cloud Account.
- SmarterPay will return the corresponding record Ids for the SUNs and related Client Bank accounts.
- Create the Service User Number Records and populate the lookup to the Instance Record
- Create the Client Bank Account Records and populate the look up to the Service User Number Record.
Run API and Webhook Platform Event Under A Different User
When API Queues and Webhook Queues are processed via a Platform Event by default it is executed in the context of the 'Automated Process' user. Most of the time this is absolutely fine, however there may be instances where you wish to change the running user to another user in the system, such as an Administrator. Typically this is required when some additional automation is run, via a Trigger or Flow, that requires additional permissions that the Automated Process User is unable to have.
To change the running user for the Platform Event we can add a PlatformEventSubscriber record.