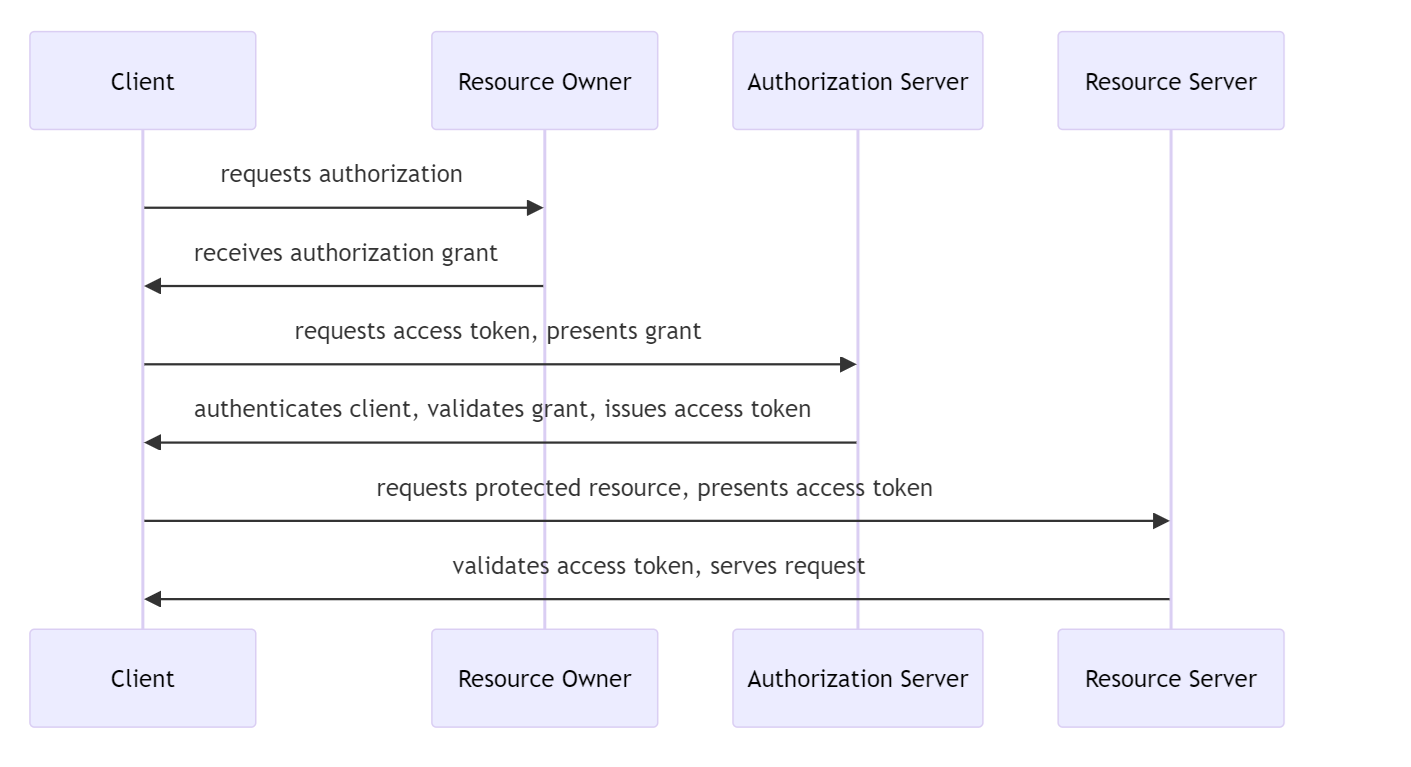
OAuth 2.0 in SmarterPay Cloud API
Before OAuth 2.0 can be used in the API a Connected Application record needs to be setup in SmarterPay Cloud.
This record holds the “Client ID” and “Client Secret”, which will be used by the Client in order to identify and authenticate itself when requesting an Access Token.
SmarterPay have included the following Grant Types in the implementation.
- Authorization Code - The Authorization server returns a single-use Authorization Code to the Client, which is then exchanged for an Access Token. This is the best option for traditional web apps where the exchange can securely happen on the server side.
- Client Credentials - Used for non-interactive applications, for example automated processes. The application is authenticated by using its client id and secret.
Note
If you have UAT facilities with SmarterPay, please replace “auth.smarterpaycloud.com” with “uat-auth.smarterpaycloud.com”, and “api.smarterpaycloud.com” with “uatapi.smarterpaycloud.com”, to access the testing environment.
Authentication Flow - Authorization Code
The Authorization Code Grant flow is used to obtain an authorization code and exchange it for an access token. This is typically used by applications with user interaction.
Optional Step: For PKCE
PKCE (Proof Key for Code Exchange) provides additional security, especially for public clients (e.g., mobile and single-page applications).
Generate a Code Verifier
The code verifier is a high-entropy cryptographic random string. It should be a URL-safe string with a length between 43 and 128 characters. You can use any method to generate this random string.
Generate a Code Challenge
The code challenge is a base64-url-encoded SHA256 hash of the code verifier. This can be created by computing the SHA256 hash of the code verifier and then base64-url-encoding the resulting hash.
Step 1: Obtain Authorization Code
Redirect the user to the authorization endpoint
Send the user a link to, or redirect them to, the authorization endpoint (“https://auth.smarterpaycloud.com/authorize”), with the following query parameters:
- 'response_type': Set this to 'code'.
- 'client_id': The client ID you received when you registered your application.
- 'redirect_uri': The URL to which you want the authorization server to redirect the user after granting authorization.
- 'scope': (Optional) A space-separated list of scopes you want to request, Currently only “offline_access” supported.
- 'state': (Optional) A random string to prevent CSRF attacks.
- For PKCE add the additional query parameters:
- 'code_challenge': The code challenge generated above.
- 'code_challenge_method': Set this to 'S256'.
Note: To use the refresh token flow the offline_access scope must be included in the request.
Example URL
https://auth.smarterpaycloud.com/authorize?response_type=code&client_id=YOUR_CLIENT_ID&redirect_uri=https://yourapp.com/callback&scope=offline_access&state=YOUR_RANDOM_STATE
User Logs In and Grants Permission
The user logs in and grants your application the requested permissions. The authorization server redirects the user back to your 'redirect_uri' with an authorization code and the 'state' parameter (if provided).
Example Redirect URL
https://yourapp.com/callback?code=AUTHORIZATION_CODE&state=YOUR_RANDOM_STATE
Step 2: Exchange Authorization Code for Access Token
Make a POST request to the token endpoint
Make a POST request to the token endpoint (“https://auth.smarterpaycloud.com/token”), with the following parameters in the request body (use “Content-Type application/x-www-form-urlencoded”):
- 'grant_type': Set this to 'authorization_code'.
- 'code': The authorization code you received in the redirect.
- 'redirect_uri': The same redirect URI you used in the initial request.
- 'client_id': Your client ID.
- 'client_secret': Your client secret.
- For PKCE add the additional query parameter:
- 'code_verifier': The code verifier generated above.
Example Request
POST https://auth.smarterpaycloud.com/token
'grant_type=authorization_code'
'code=AUTHORIZATION_CODE'
'redirect_uri=https://yourapp.com/callback'
'client_id=YOUR_CLIENT_ID'
'client_secret=YOUR_CLIENT_SECRET'
Receive the Access Token
The response will contain an access token, which you can use to authenticate API requests.
For PKCE: If the code_verifier doesn't match a 400 error will be returned.
Note: To use the refresh token flow the “refresh_token” will need to be stored.
Example Response
{
   "access_token": "ACCESS_TOKEN",
   "token_type": "Bearer",
   "expires_in": 3600,
   "refresh_token": "REFRESH_TOKEN"
}
Authentication Flow - Refresh Token
The Refresh Token flow allows an application to obtain a new access token using a refresh token. This is useful for long-lived access without requiring user interaction.
Step 1: Obtain Refresh Token
To obtain a refresh token, you must include the offline_access scope when requesting an access token. This can be done during the Authorization Code Grant flow.
Step 2: Exchange Refresh Token for New Access Token
Make a POST request to the token endpoint
Make a POST request to the token endpoint (“https://auth.smarterpaycloud.com/token”), with the following parameters in the request body (use “Content-Type application/x-www-form-urlencoded”):
- 'grant_type': Set this to 'refresh_token'.
- 'refresh_token': The refresh token you received when initially obtaining the access token.
- 'client_id': Your client ID.
- 'client_secret': Your client secret.
Example Request
POST https://auth.smarterpaycloud.com/token
'grant_type=refresh_token'
'refresh_token=REFRESH_TOKEN'
'client_id=YOUR_CLIENT_ID'
'client_secret=YOUR_CLIENT_SECRET'
Receive the Access Token
The response will contain an access token, which you can use to authenticate API requests.
Example Response
{
   "access_token": "ACCESS_TOKEN",
   "token_type": "Bearer",
   "expires_in": 3600,
   "refresh_token": "REFRESH_TOKEN"
}
Authentication Flow - Client Credentials
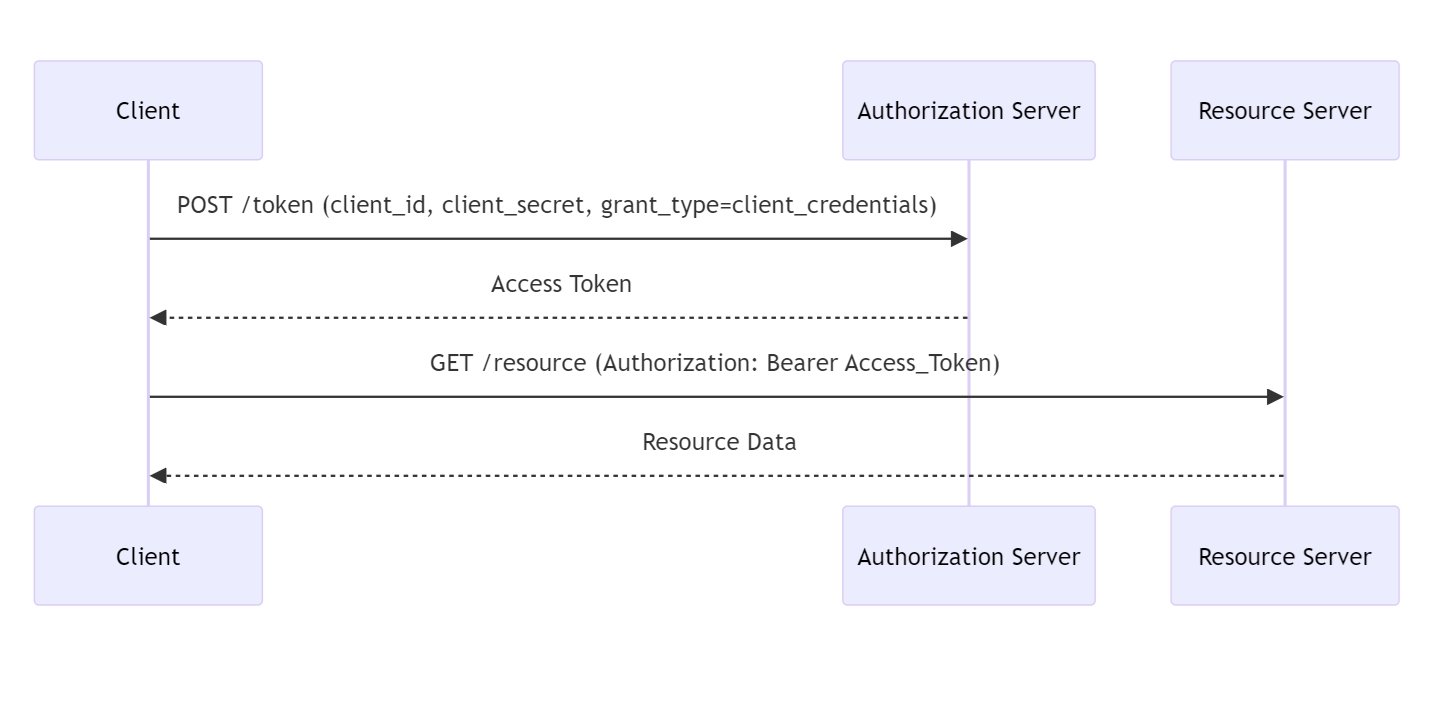
The Client Credentials Grant flow is used for machine to machine authentication where no user interaction is possible.
Step 1: Obtain Access Token
Make a POST request to the token endpoint
Make a POST request to the token endpoint (“https://auth.smarterpaycloud.com/token”), with the following parameters in the request body (use “Content-Type application/x-www-form-urlencoded”):
- 'grant_type': Set this to 'client_credentials'.
- 'client_id': Your client ID.
- 'client_secret': Your client secret.
Example Request
POST https://auth.smarterpaycloud.com/token
'grant_type=client_credentials'
'client_id=YOUR_CLIENT_ID'
'client_secret=YOUR_CLIENT_SECRET'
Receive the Access Token
The response will contain an access token, which you can use to authenticate API requests.
Example Response
{
   "access_token": "ACCESS_TOKEN",
   "token_type": "Bearer",
   "expires_in": 3600
}
Making Authenticated API Requests
Once you have an access token, you can make authenticated requests to the API by including the 'Authorization' header with access token prefixed with 'Bearer '.
Example Request
GET https://api.smarterpaycloud.com/service.svc/endpoint
'Authorization: Bearer ACCESS_TOKEN'
Token Expiration
Tokens issued by the authorization server have a limited lifetime after which they expire and cannot be used for authentication.
Access Tokens
Access tokens have a lifetime of 1 hour. After this period, the access token will expire, and the application must obtain a new token to continue making authenticated API requests.
Refresh Tokens
Refresh tokens are longer-lived and can be used to obtain new access tokens without requiring user interaction.
Refresh tokens typically last for 15 days, however, it's important to note that refresh tokens become invalid upon use.
This means that each time you use a refresh token to obtain a new access token, the refresh token itself is invalidated, and a new refresh token is issued along with the new access token.
Handling Token Expiration
To handle token expiration gracefully, applications should implement logic to detect when an access token is close to expiration, or has expired, and automatically use the refresh token to obtain a new access token.
When an access token expires a 401 status code is returned.
If both the access token and refresh token have expired, the user will need to re-authenticate to obtain new tokens.