Customers
SmarterPay Cloud builds a focus on customer management through making the customer the centre piece to the process. By creating customer records, you can link all payments, both in and out of your business, through Mandates and Credits, to be able to see a complete overview of all activity to ensure you have complete transparency of all actions performed.
Access to this Object is controlled using Record Permissions in Profiles.
List View
Clicking on the “Customers” item, on the left-hand menu, will bring you to the list view and you will be shown a screen like the one below:

Actions
Available actions, subject to permissions, are:
| Action | Description |
|---|---|
| “NEW” Button | To Create a new record click on the “NEW” button. |
| ID of the Record | To view the record Detail click on the Id of the record. |
| “EXPORT” Button | Creates a CSV file from the list of available records, subject to any filtering that has been applied. Note: Only available when a filter is applied to the list. |
List Filtering
When checking through list views on any of the menu items on the left-hand side menu, you have the ability to add additional filtering to make the information displayed more focused to your needs.
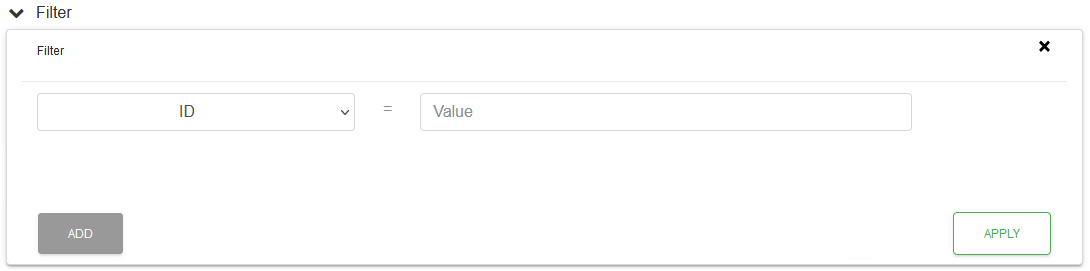
To access the list filtering options, you will need to select the “> Filter” area at the top of the list, which will display the Filter tool:
NOTE: Clicking the filter area again, or filter tool top X, only closes the filter tool, it doesn't apply or clear the filter.
Field Selection
Using the Dropdown list you select the field for the filter line and then enter a value for the filter.
Each field has an operator, or how the value will be searched for, applied to it, and this changes when the field is changed in the list.
Exact Match (=)

The value will be searched for exactly as entered in the text box. Leading and trailing spaces will be removed from the search.
Contains (LIKE)

The value in the text box will be searched for as part of a wider search. For example, “test” will be found in “This is a test sentence”. Leading and trailing spaces will be removed from the search.
List Of Set Values
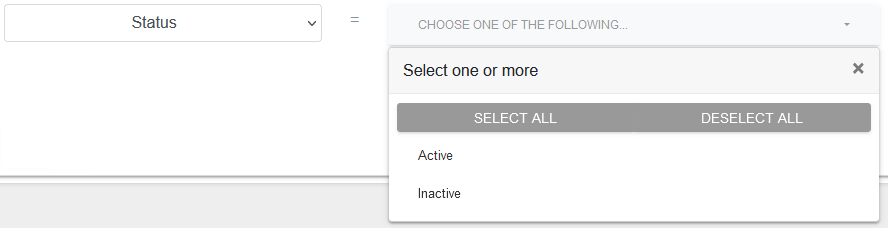
One, or more, values can be selected from a list and they will be searched for in an “OR” way. For example, the result will contain value 1 OR value 2, etc.
Dates
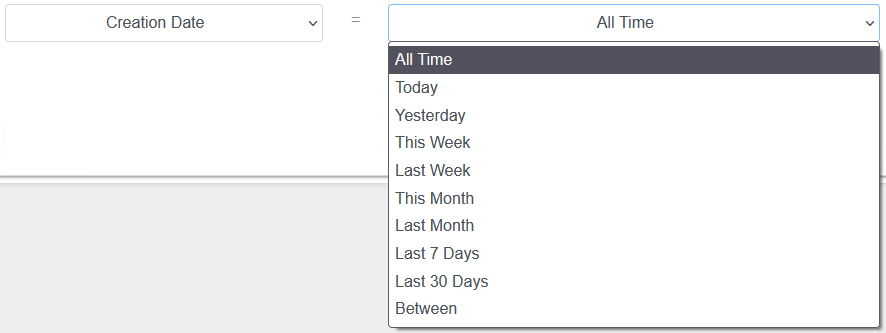

Dates can be searched for either by using one of the preset time periods, as can be seen in the dropdown list options, or using the “Between” option and defining the date range.
For the “Between” option, the “From” date and “To” date can be used in combination with each other or separately. For example, just providing a “From” date will search from that date onwards, but adding a “To” date will search between the two dates provided.
Additional Filter Lines
Additional filter lines can be added to the filter by clicking the “ADD” button.
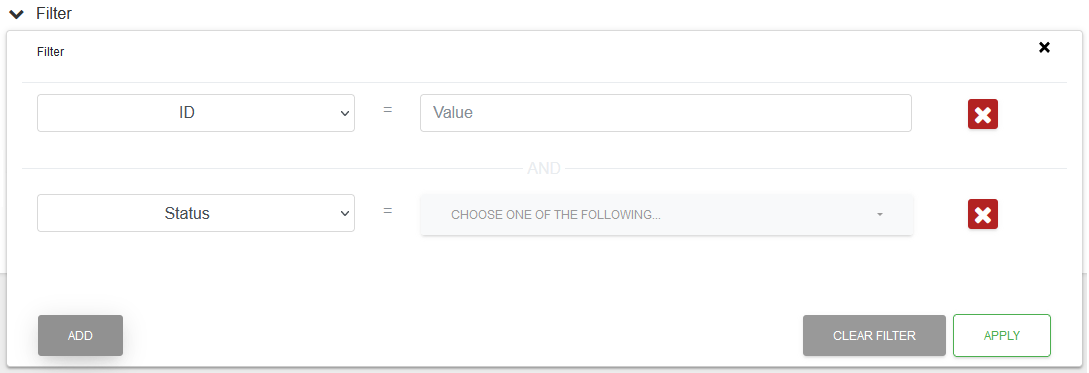
Each additional filter line is used in the overall filter in an “AND” way. For example, “status = active” AND “email = fred.bloggs@email.com”.
Any filter line can be removed by clicking the ![]() button against it.
button against it.
Applying The Filter
Once the filter has been assembled as required it is applied by clicking the “APPLY” button.
Clearing the Filter
To clear the filter click the “CLEAR FILTER” button.
Customer Account Filter Fields
| Field | Description |
|---|---|
| ID | ID of the record. Search on the exact ID provided. |
| Status | Status of the record. Search for one of the selected values. |
| Custom Reference | Custom reference in the record. Search containing the value provided. |
| Company | Company Name in the record. Search containing the value provided. |
| Email in the record. Search containing the value provided. | |
| Name | Name in the record. Search containing the value provided. |
| Billing Postal Code | Billing Postal Code in the record. Search containing the value provided. |
| Creation Date | Date the record was created. Date search with either a fixed or “Between” range. |
List Ordering
By default, the list is ordered by the first column.
Clicking on any of the selectable column headers will sort the entire list by that selected column (There is no sub-sorting) A-Z (Earliest first).
Clicking on the same column header again toggles between the A-Z and the Z-A ordering.