Creating A Payment Schedule
From the Mandate Detail View, of the Mandate that you want to attach the schedule to, click the “CREATE PAYMENT SCHEDULE” Button.

You will be taken to the “Setup new scheduled payment” screen.
Use the dropdown list to select the type of Schedule that you want to create.
Options are:
Ongoing Schedule Setup
Step 1

Use the dropdown to select “Setup Ongoing Payment” and click the “NEXT” button.
Step 2

Enter information for the Schedule into the fields, as detailed below. Once complete click the “PREVIEW” button.
Fields
| Field | Mandatory | Type | Description |
|---|---|---|---|
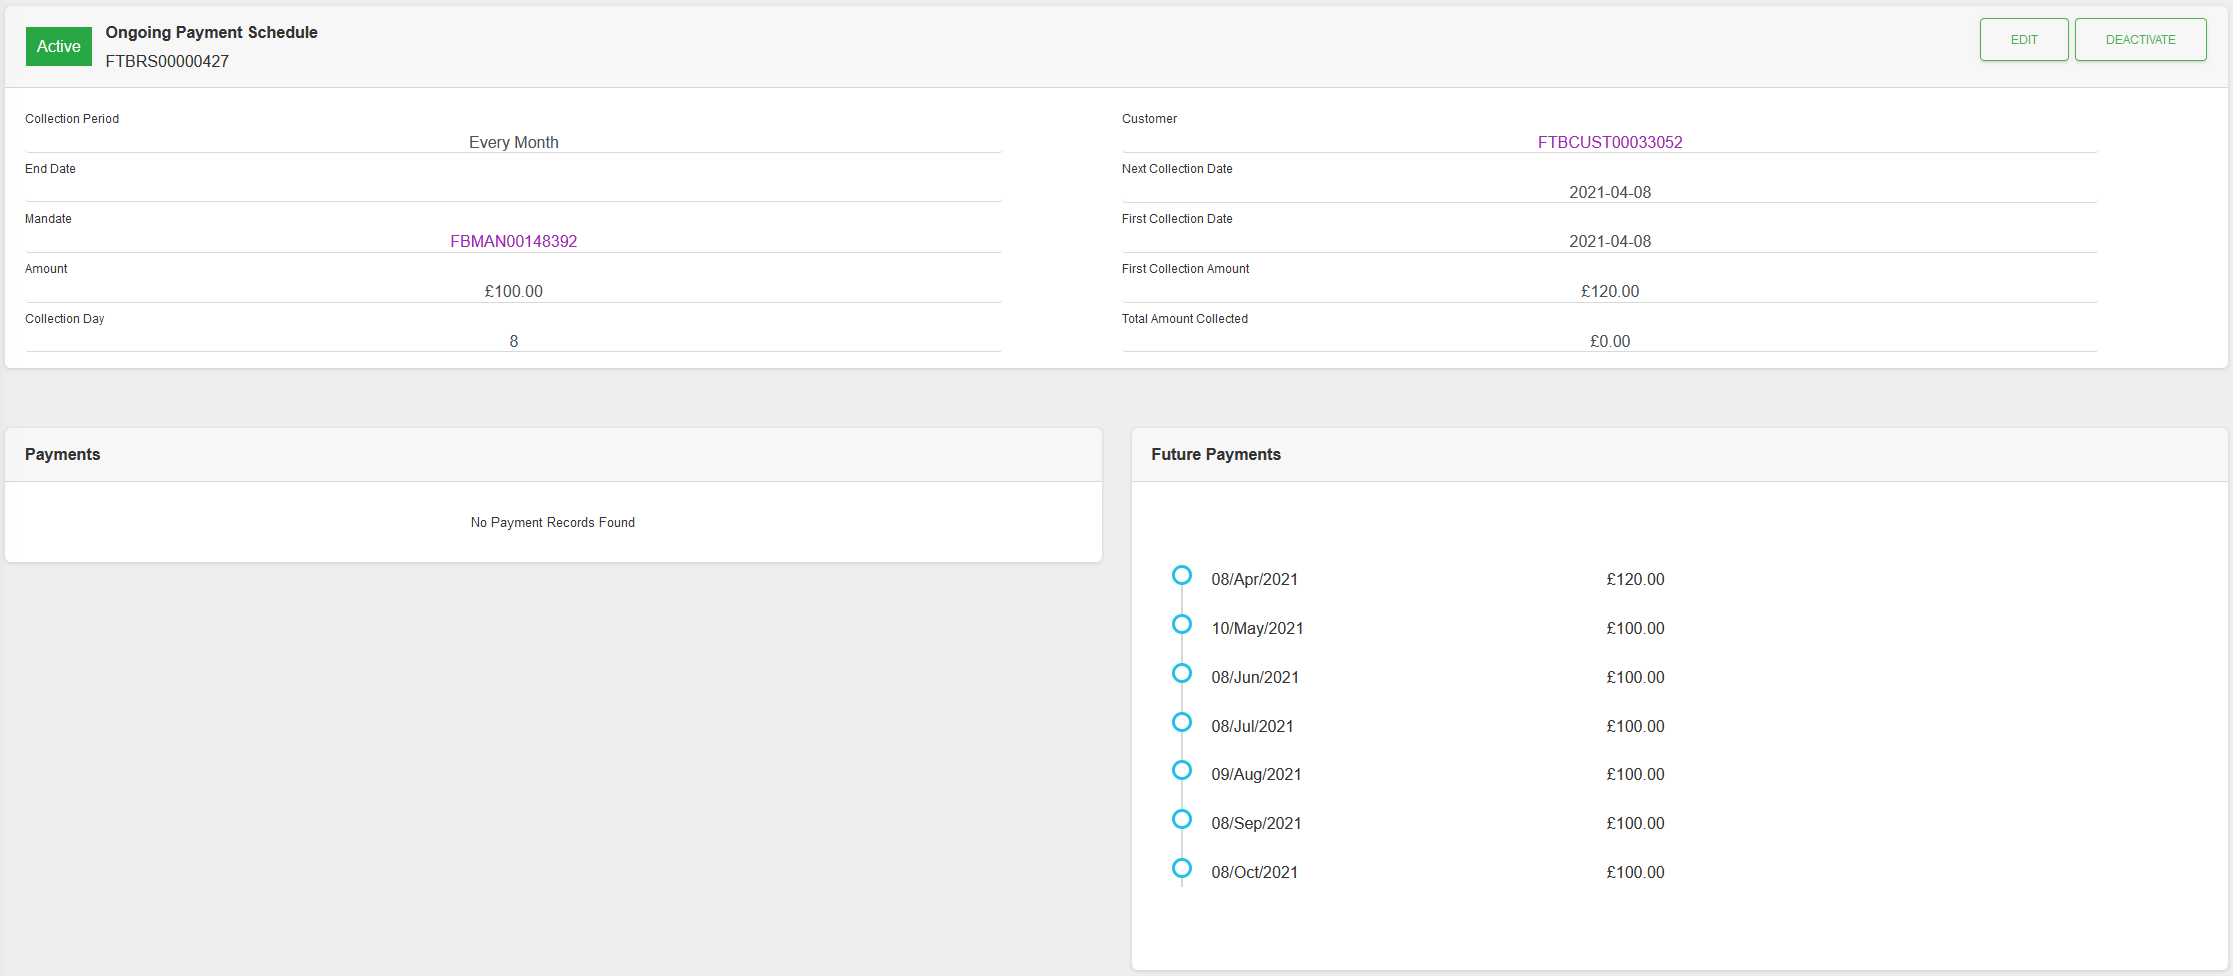
| Collection Period | Yes | Dropdown | This is used to define the period to use for the schedule. This field is used in conjuction with the “To Collect Over” field for the frequency of the Schedule. Options are: “Monthly”, “Weekly” & “Yearly”. |
| To Collect Over | Yes | Dropdown | This is used in conjuction with the “Collection Period” field for the frequency of the Schedule. Options are: “Every” - “Every 12” of whatever the “Collection Period” field is set to, for example “Every 3 weeks”. |
| First collection Date | Yes | Text Box | Date format is YYYY-MM-DD. You can use the Calendar icon to pick a valid date in the future. This is the date the first collection will be taken on. |
| End Date | No | Text Box | Date format is YYYY-MM-DD. You can use the Calendar icon to pick a valid date in the future. This date is used to mark the end of a schedule. Leave blank for an ongoing schedule. |
| First Collection Amount (GBP) | Yes | Text Box | Amount format is a decimal value for ££.pp (10.99). This will be the amount taken on the first collection of the Schedule. |
| Ongoing Collection amount (GBP) | Yes | Text Box | Amount format is a decimal value for ££.pp (10.99). This will be the amount taken after the first collection of the Schedule (Second collection onwards). |
| Collection Day | Yes | Dropdown | This is a dropdown box used to define the day of the Month to use for the schedule. For a Collection Period set to Weekly this field is ignored, as the next run will be 7 days after the last run. Collection days are altered to the next banking day when they fall on a non-banking day. Options are: “1” - “28” & “Last Day”. |
| Custom Reference | No | Text Box | This is a text field (Maximum 50 characters) which can be used, optionally, to give a Custom Reference to the schedule. This value, if populated, will be passed to the Payments that get created from the Schedule. |
| Description | No | Text Box | This is a text field (Maximum 44 characters) which can be used, optionally, to give a description to the schedule. This value, if populated, will be passed to the Payments that get created from the Schedule. |
Step 3

The next 7 payments are generated and displayed in the “Future Payments Preview” panel.
Click the “SAVE” button to save the new Schedule, with is future payments.
Step 2 can be repeated if the future payments are not as expected.
Step 4
Payment Plan Setup
Step 1

Use the dropdown to select “Setup Payment Plan” and click the “NEXT” button.
Step 2
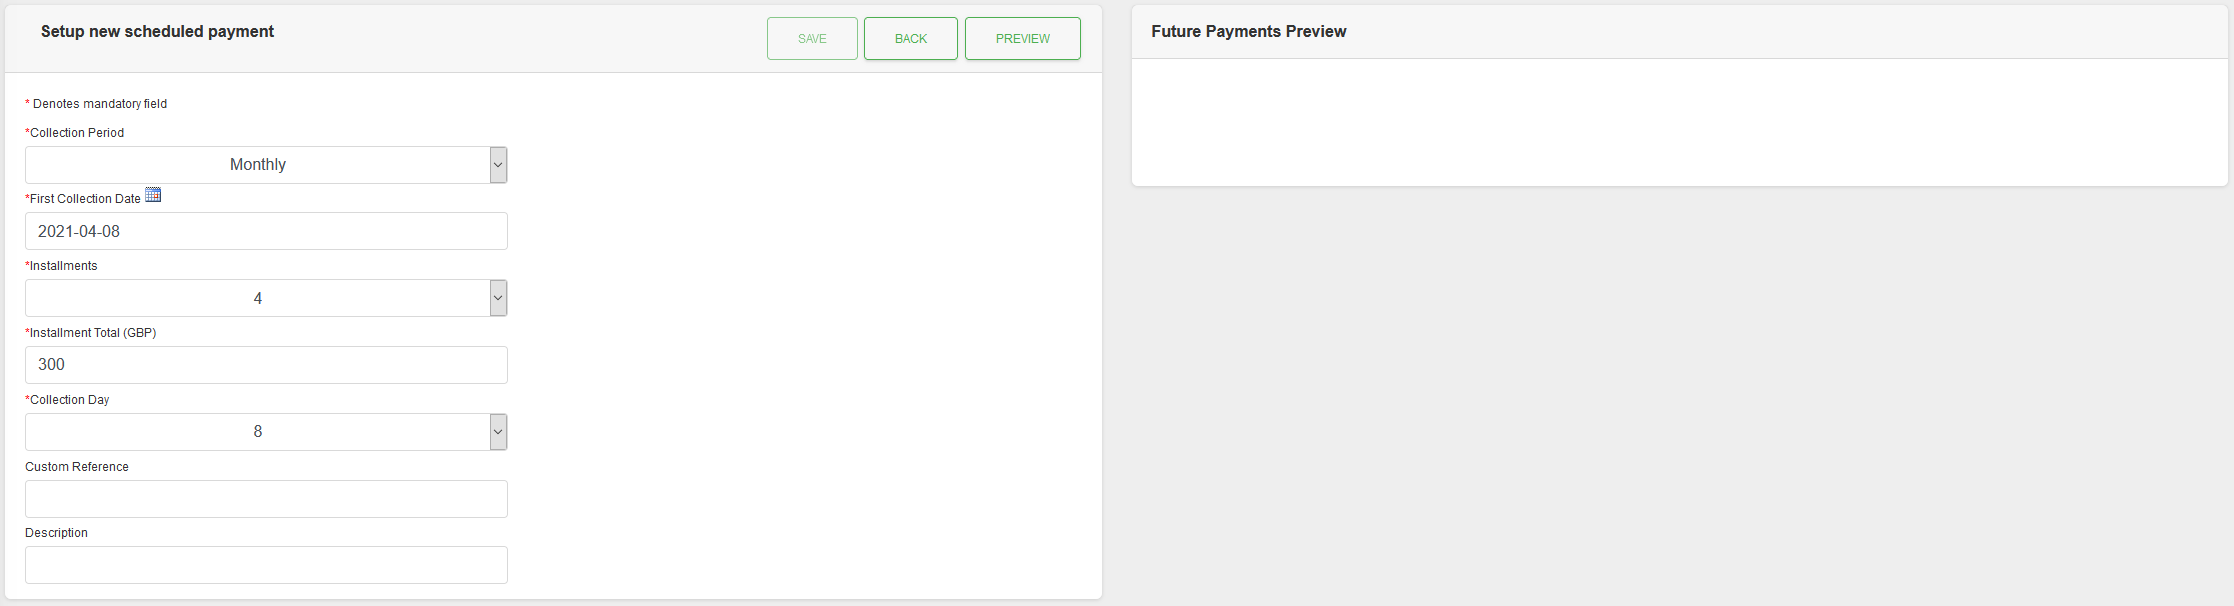
Enter information for the Schedule into the fields, as detailed below. Once complete click the “PREVIEW” button.
Fields
| Field | Mandatory | Type | Description |
|---|---|---|---|
| Collection Period | Yes | Dropdown | This is used to define the period to use for the schedule. Options are: “Monthly”, “Weekly” & “Yearly”. |
| First collection Date | Yes | Text Box | Date format is YYYY-MM-DD. You can use the Calendar icon to pick a valid date in the future. This is the date the first collection will be taken on. |
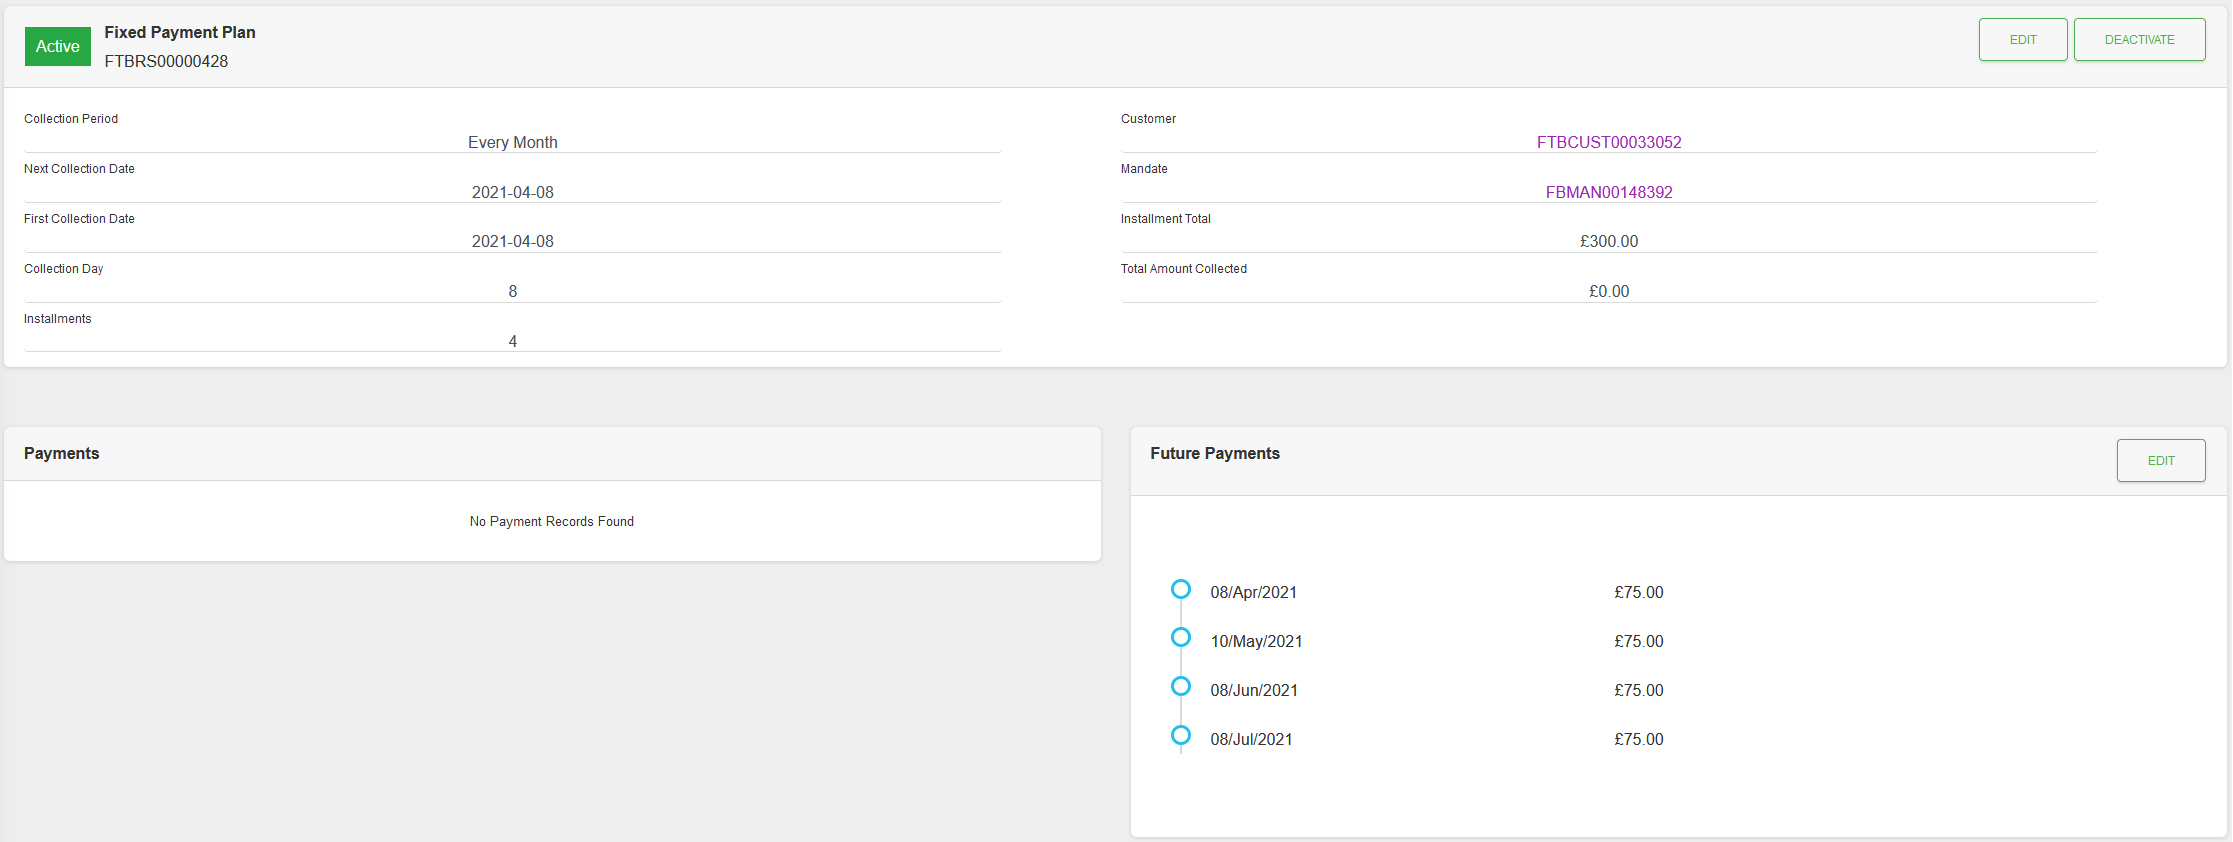
| Installments | Yes | Dropdown | Number of installments for the Installment total to be paid over. Options are: “1” - “12”. |
| Installment Total (GBP) | Yes | Text Box | Amount format is a decimal value for ££.pp (10.99). This is the total amount to be paid. This is used in conjunction with “installments” to calculate the payment amounts. |
| Collection Day | Yes | Dropdown | This is a dropdown box used to define the day of the Month to use for the schedule. For a Collection Period set to Weekly this field is ignored, as the next run will be 7 days after the last run. Collection days are altered to the next banking day when they fall on a non-banking day. Options are: “1” - “28” & “Last Day”. |
| Custom Reference | No | Text Box | This is a text field (Maximum 50 characters) which can be used, optionally, to give a Custom Reference to the schedule. This value, if populated, will be passed to the Payments that get created from the Schedule. |
| Description | No | Text Box | This is a text field (Maximum 44 characters) which can be used, optionally, to give a description to the schedule. This value, if populated, will be passed to the Payments that get created from the Schedule. |
Step 3
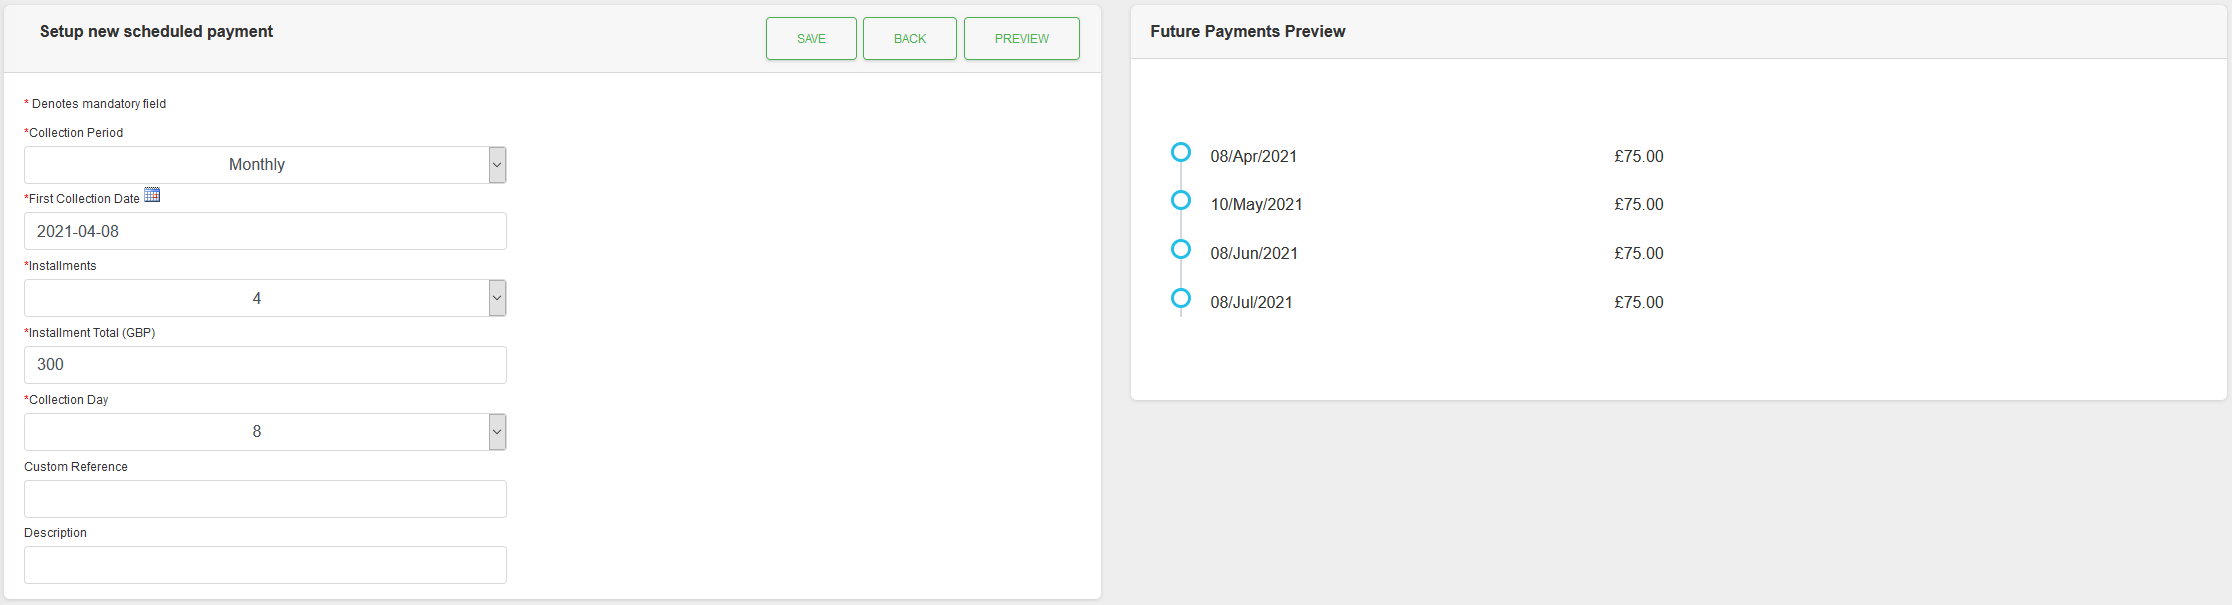
The payments are generated and displayed in the “Future Payments Preview” panel.
Click the “SAVE” button to save the new Schedule, with is future payments.
Step 2 can be repeated if the future payments are not as expected.
Step 4