Editing A Payment Schedule
The steps to edit a Payment schedule will depend on the type of Schedule what you are editing.
Follow the steps for Ongoing Schedules.
Follow the steps for Payment Plans.
Follow the steps for Future Payments.
Ongoing Schedules
Step 1
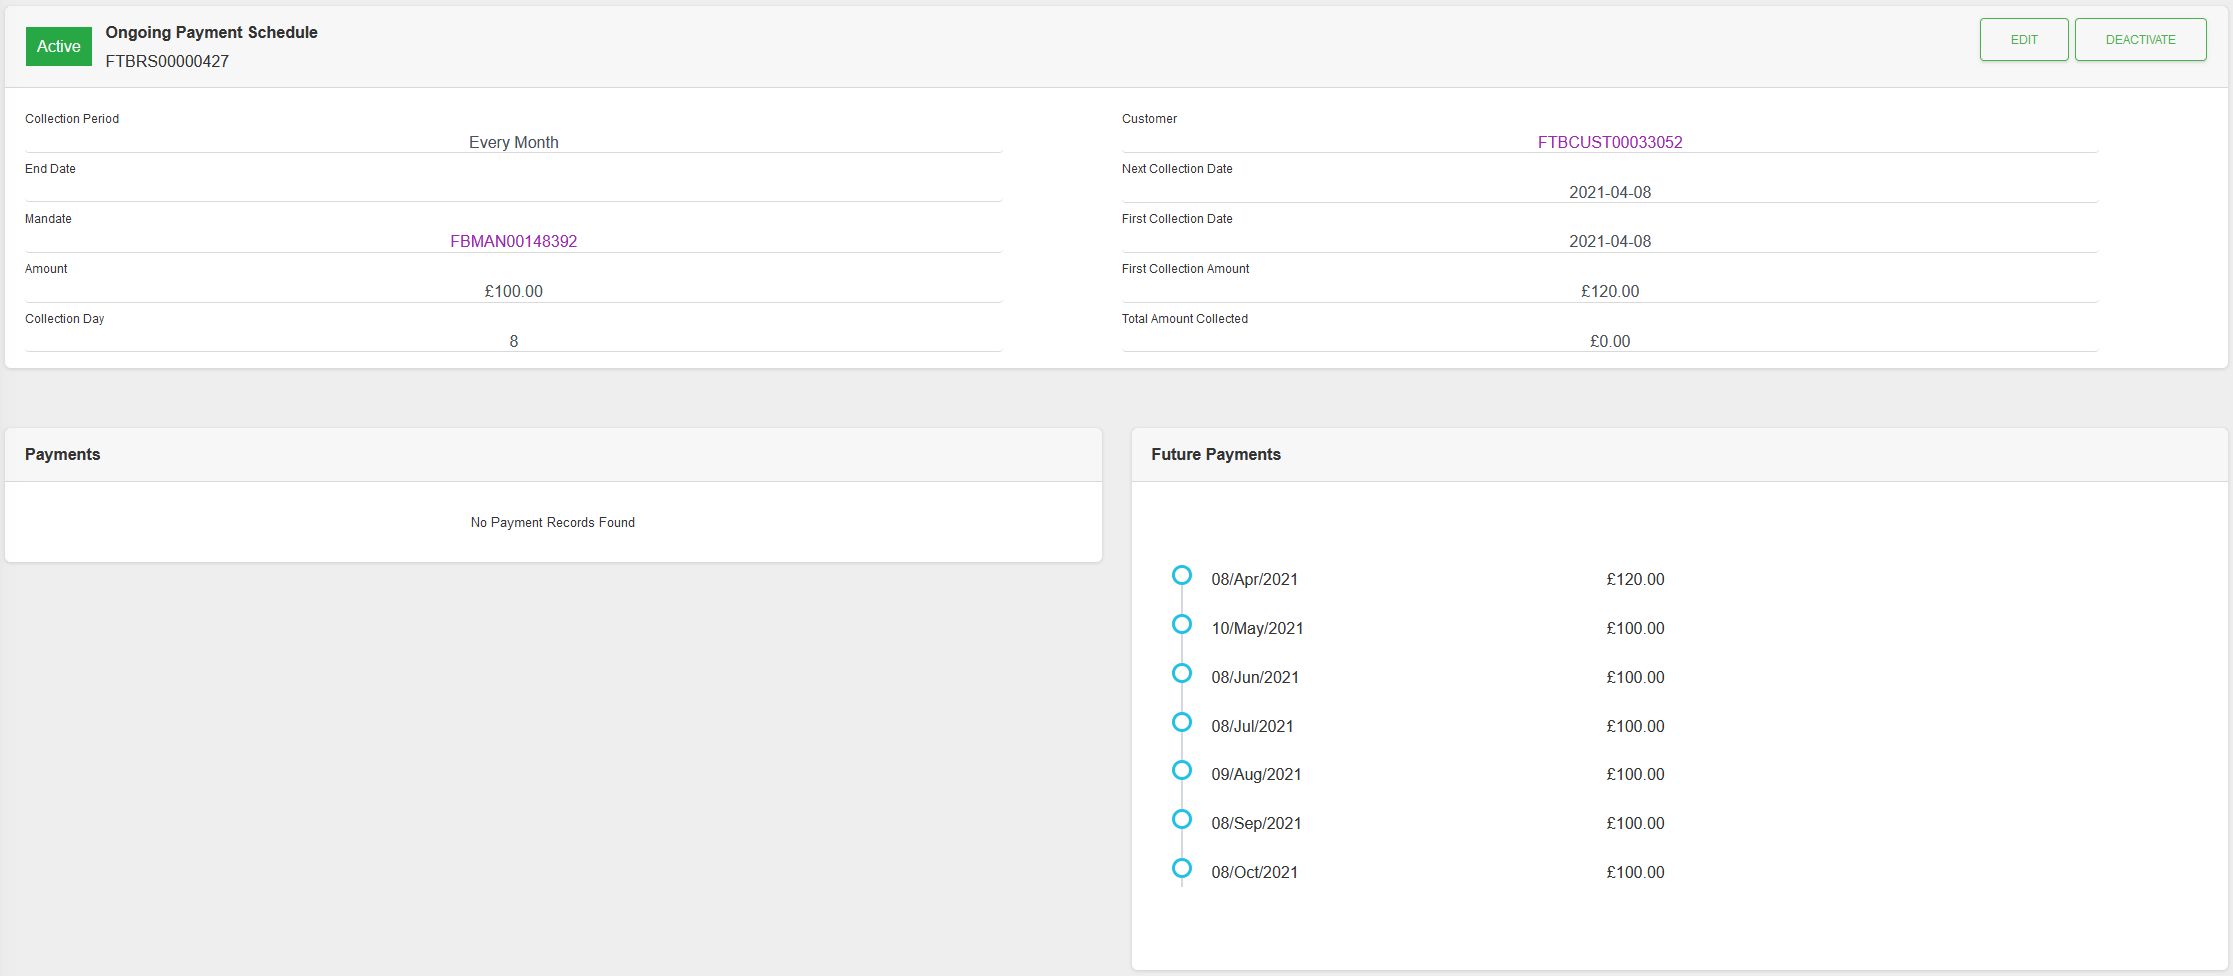
From the Payment schedule that you want to change click the “EDIT” button on the header of the record.
Step 2

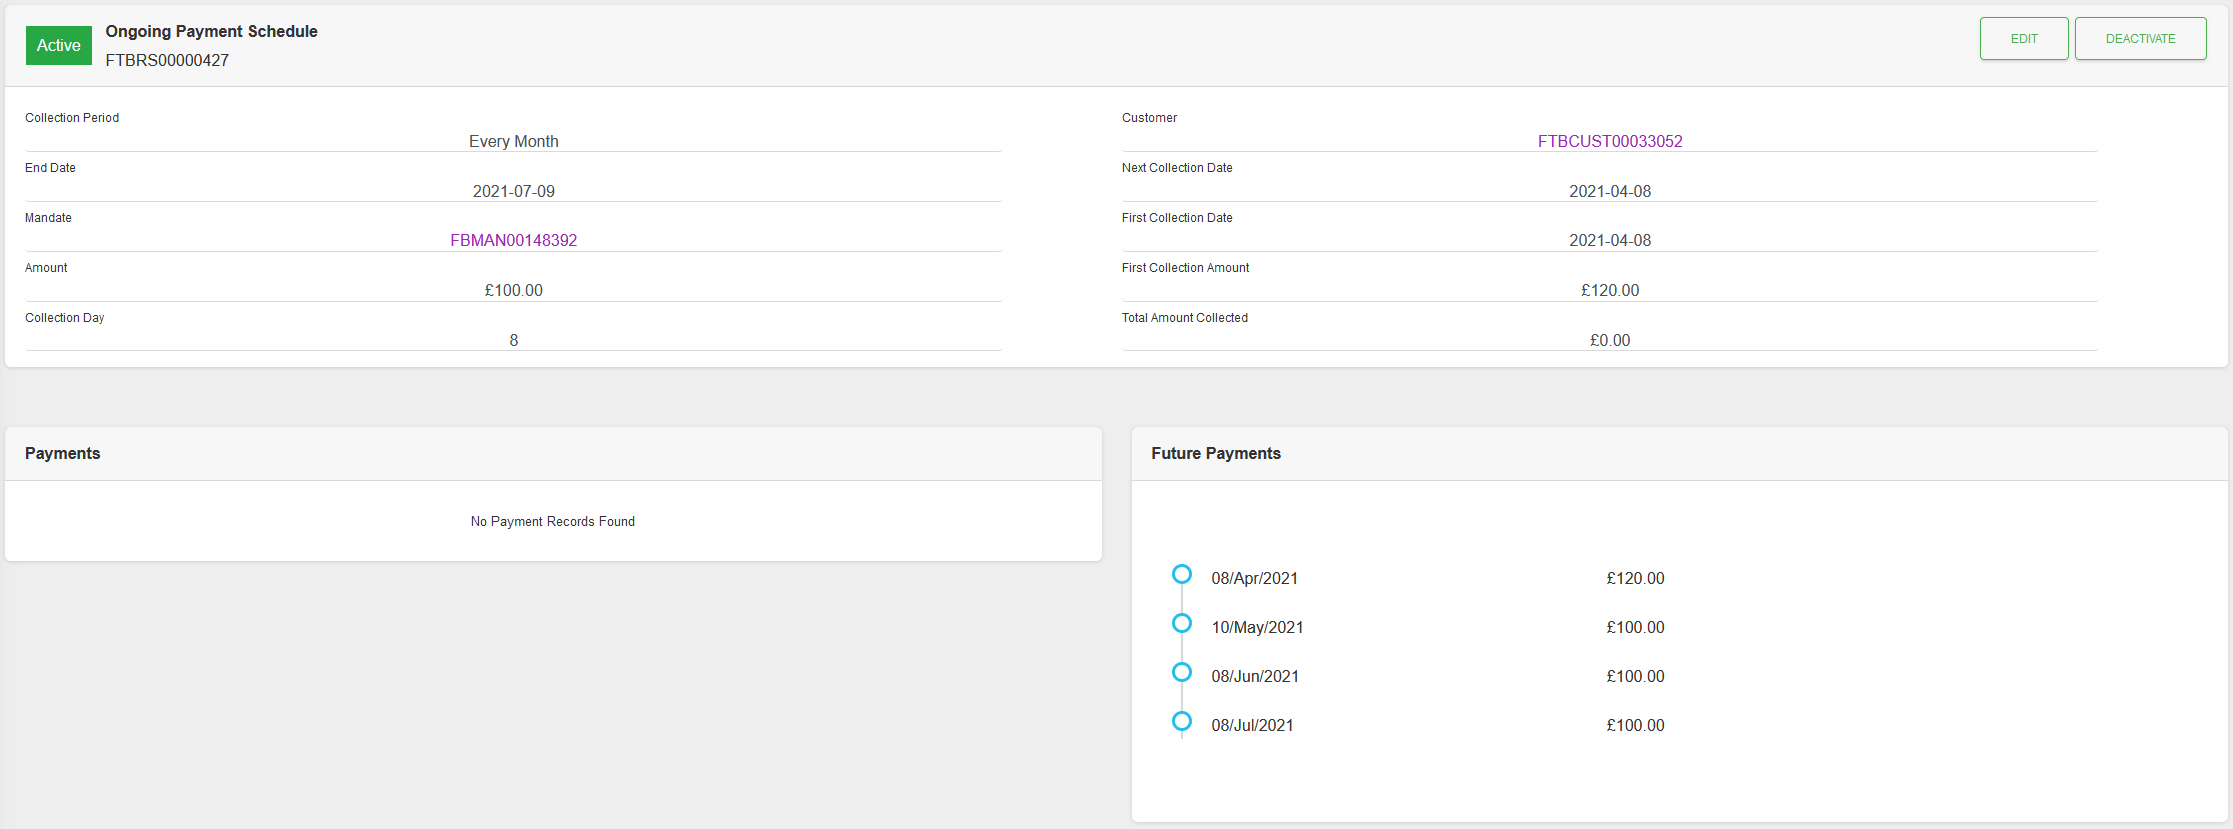
Enter the updates for the Schedule into the fields, as detailed below. Once complete click the “PREVIEW” button.
In this example the End date has been set.
Fields
| Field | Mandatory | Type | Description |
|---|---|---|---|
| End Date | No | Text Box | Date format is YYYY-MM-DD. You can use the Calendar icon to pick a valid date in the future. This date is used to mark the end of a schedule. Leave blank for an ongoing schedule. |
| Custom Reference | No | Text Box | This is a text field (Maximum 50 characters) which can be used, optionally, to give a Custom Reference to the schedule. This value, if populated, will be passed to the Payments that get created from the Schedule. |
| Description | No | Text Box | This is a text field (Maximum 44 characters) which can be used, optionally, to give a description to the schedule. This value, if populated, will be passed to the Payments that get created from the Schedule. |
Step 3

The “Future Payments Preview” panel is populated based on the updated information. Click the “SAVE” button to save the changed Schedule.
Step 2 can be repeated if the future payments are not as expected.
Step 4
Payment Plans
Step 1
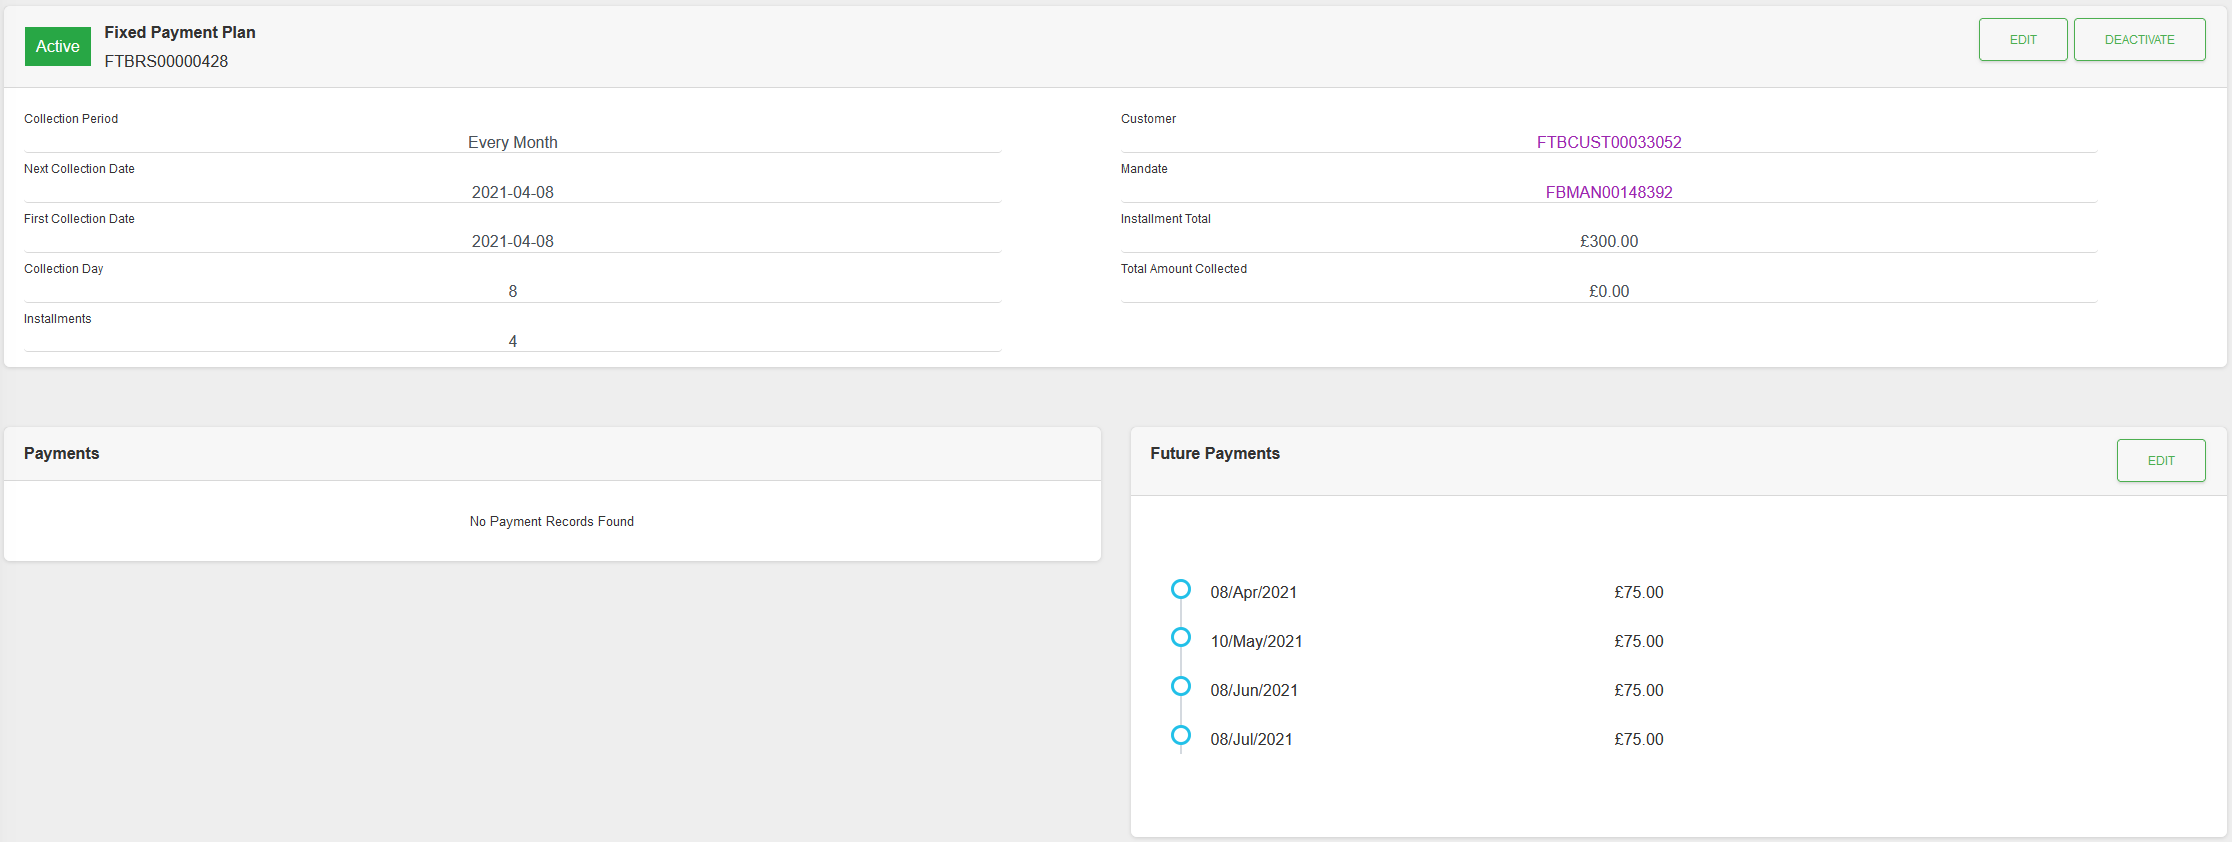
From the Payment schedule that you want to change click the “EDIT” button on the header of the record.
Step 2

Enter the updates for the Schedule into the fields, as detailed below. Once complete click the “PREVIEW” button.
In this example the installments have been changed from “4” to “5”.
Fields
| Field | Mandatory | Type | Description |
|---|---|---|---|
| Installments | Yes | Dropdown | Number of installments for the Installment total to be paid over. Options are: “1” - “12”. |
| Installment Total (GBP) | Yes | Text Box | Amount format is a decimal value for ££.pp (10.99). This is the total amount to be paid. This is used in conjunction with “installments” to calculate the payment amounts. |
| Description | No | Text Box | This is a text field (Maximum 44 characters) which can be used, optionally, to give a description to the schedule. This value, if populated, will be passed to the Payments that get created from the Schedule. |
Step 3
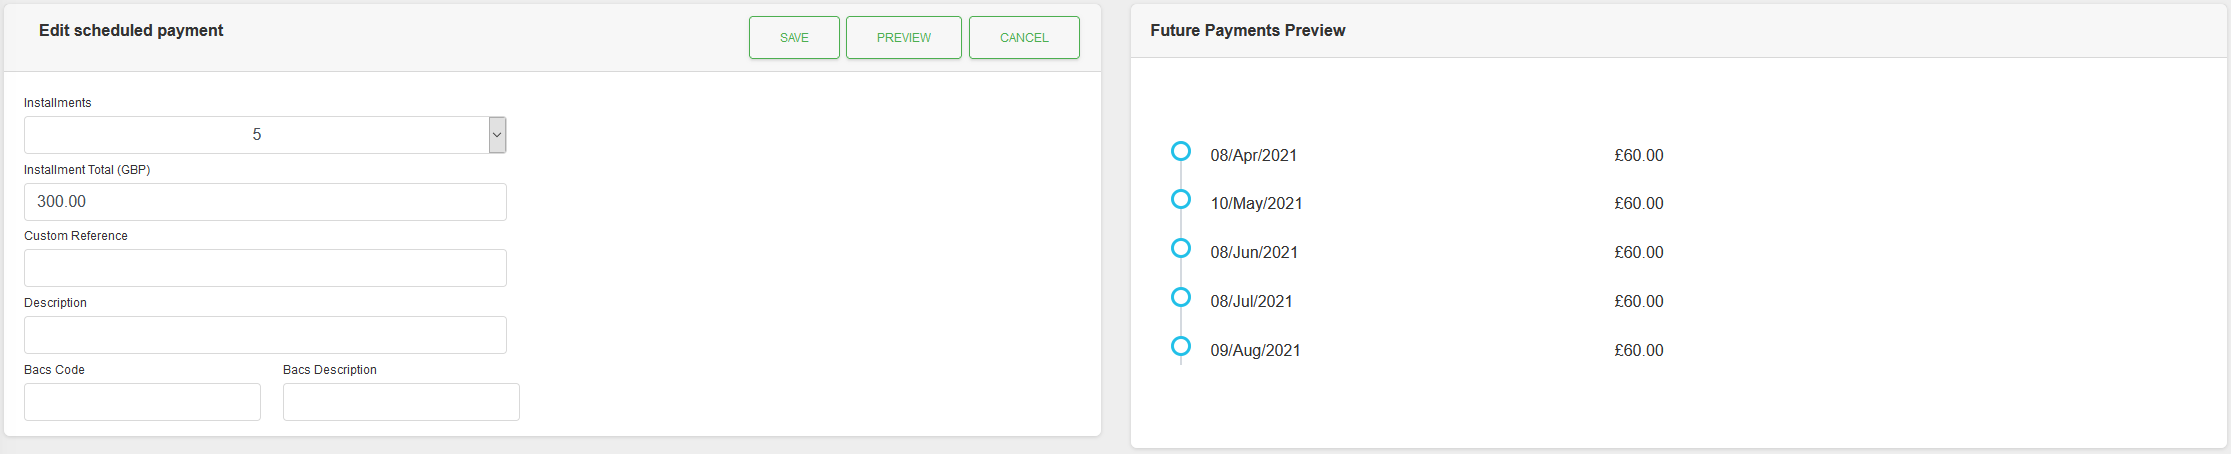
The “Future Payments Preview” panel is populated based on the updated information. Click the “SAVE” button to save the changed Schedule.
Step 2 can be repeated if the future payments are not as expected.
Step 4
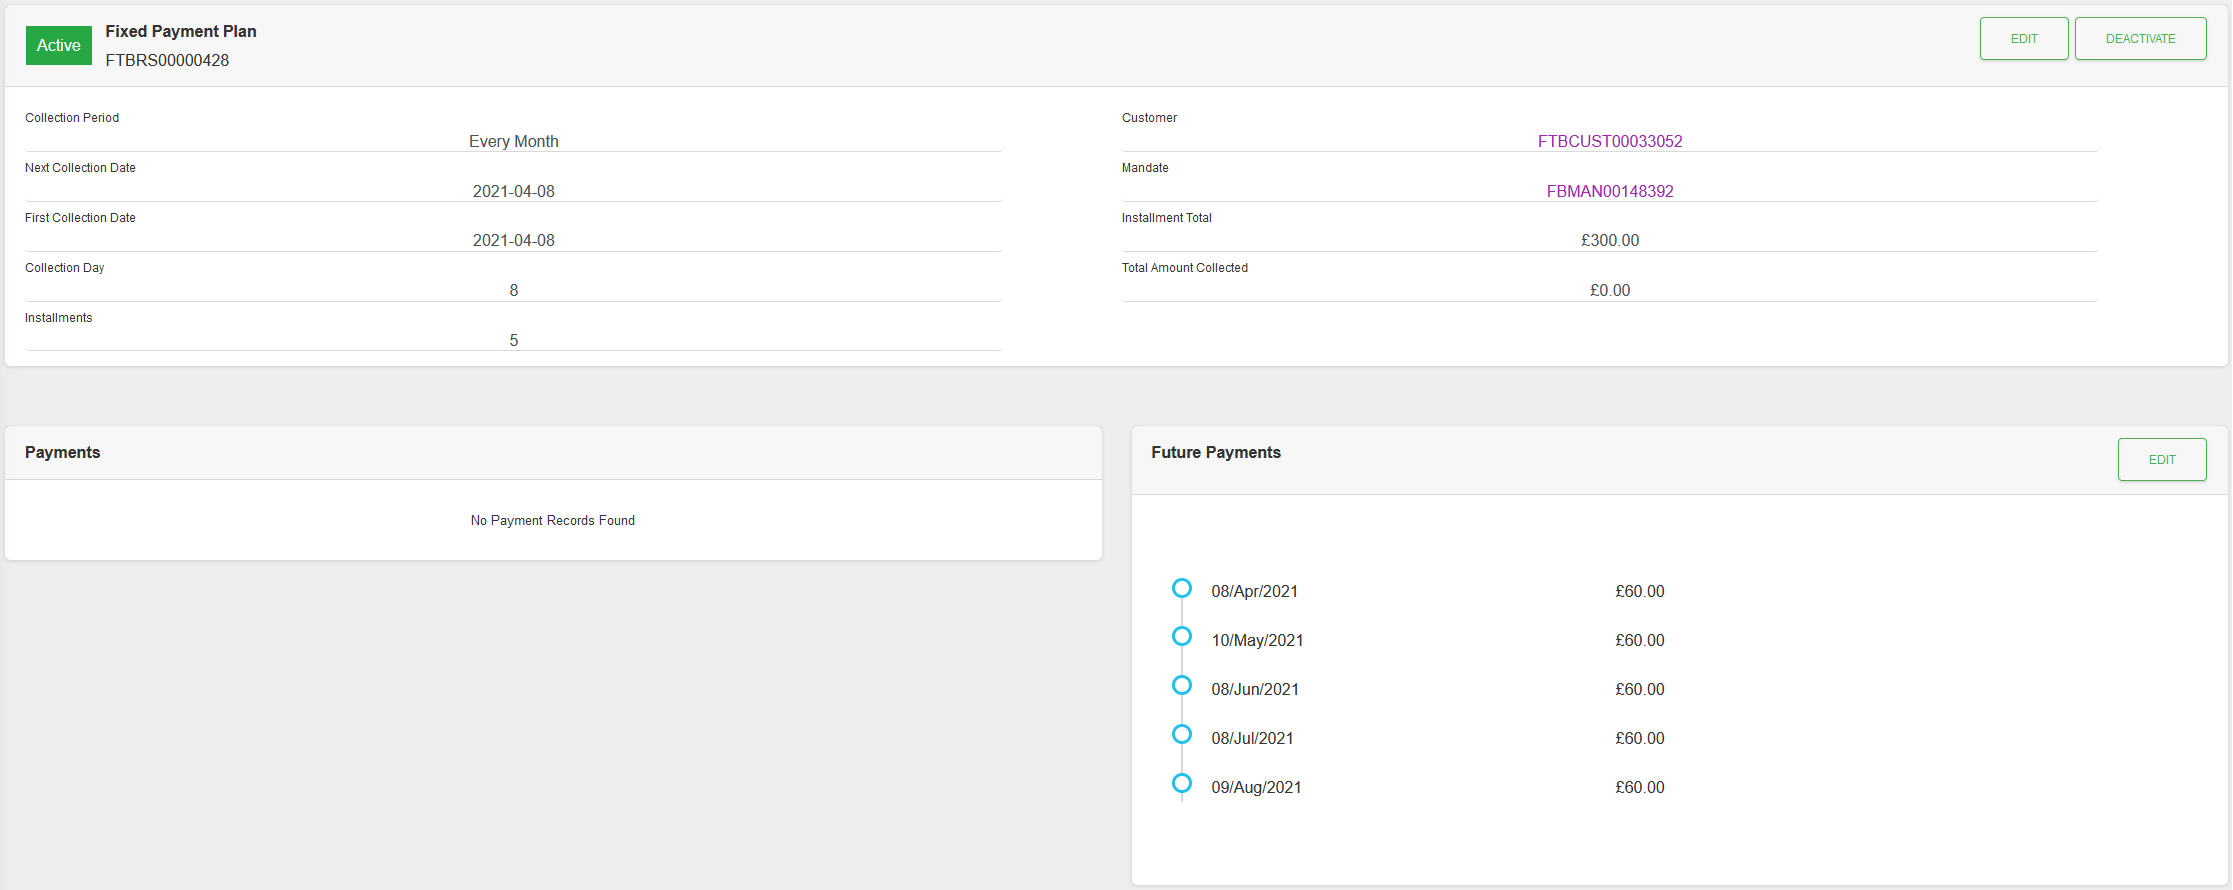
Future Payments
Step 1

From the Payment schedule click the “EDIT” button on the “Future Payments” section.
Step 2
The Future Payments section is opened in edit mode.
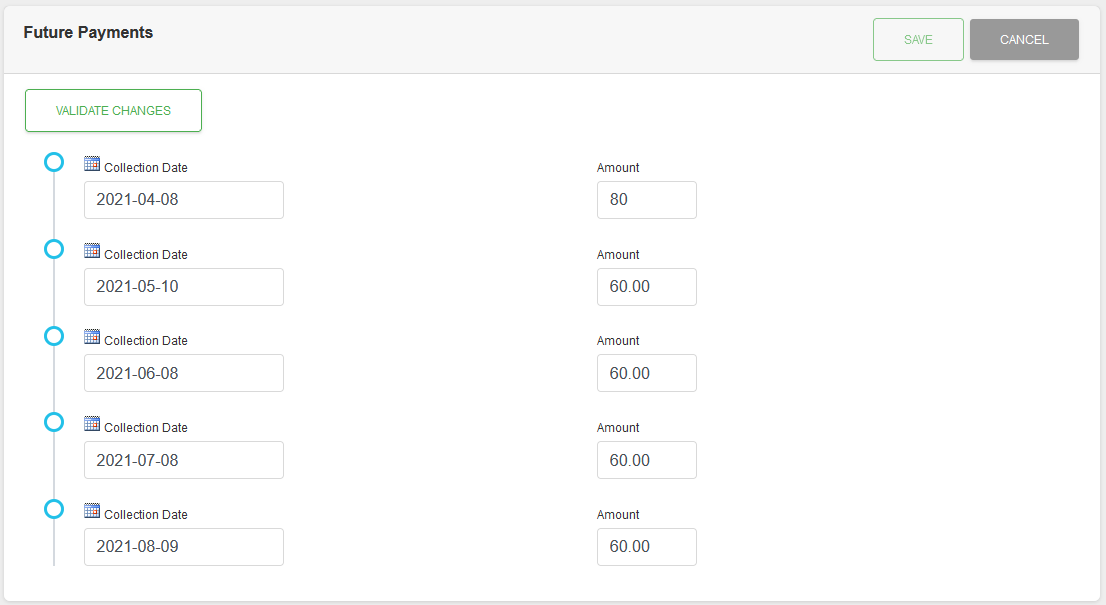
At this point the “SAVE” button is disabled and the “VALIDATE CHANGES” button is visible.
Modify one, or more, of the payments by changing the Collection Date and/or Amount, and then click the “VALIDATE CHANGES” button to continue.
0 Amount values are allowed in future payments, which can be used to visually see a “payment break”, if just moving the payment month is not sufficient.
Step 3
SmarterPay Cloud will now validate the Future Payments, based on the Schedule type and it's settings.
Step 3a - Successful validation
If the validation is sucessful the “VALIDATE CHANGES” button is removed and the “SAVE” button is enabled.
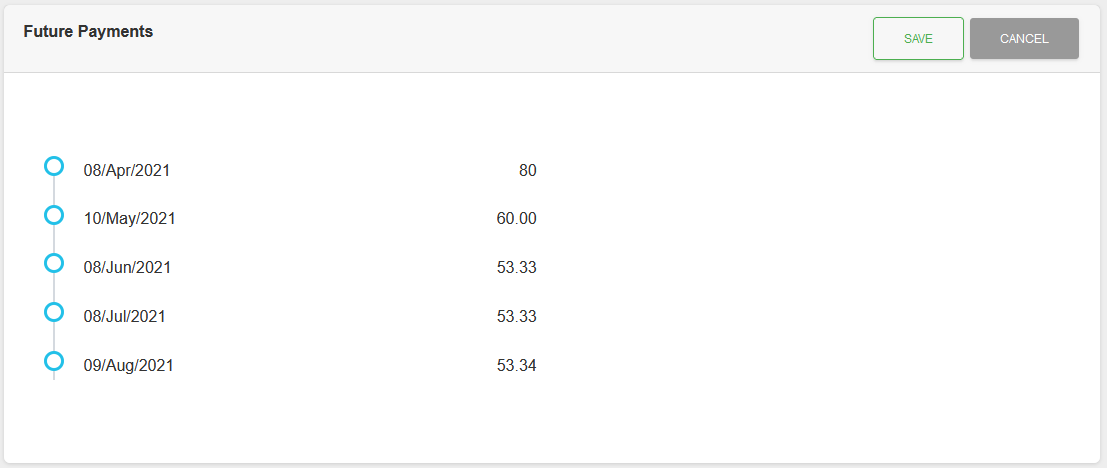
Click the “SAVE” button to apply the changes.
Alternatively, click “CANCEL” to discard the changes.
Step 3b - Unsuccessful validation
If the validation is unsuccessful, then you will be presented with a message, and an opportunity to fix the problem.
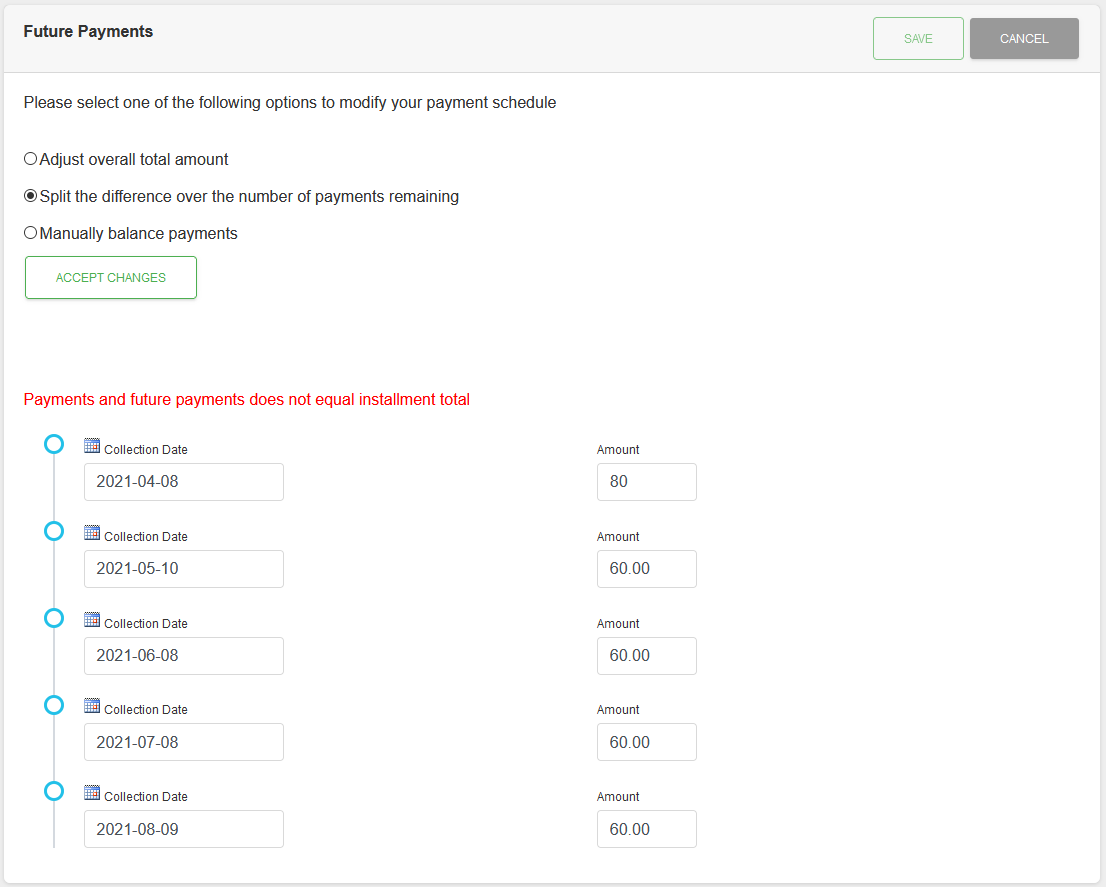
In the example shown above, for a Payment Plan, the first payment Amount has been altered, from “60” to “80”, and therefore the payments no longer add up to the Payment Plan total amount.
The options given to rectify this issue are:
- “Adjust overall total amount” - This option will change the Instalment total to match the existing and future payment values added together.
- “Split the difference over the number of payments remaining” - This option allows the difference to be manually split across the remaining payments.
- “Manually balance payments” - Validation will only pass once the existing and future payment values match the Installment total. The changes need to be calculated and enetered manually.
For this example the “Split the difference over the number of payments remaining” option has been selected and the “ACCEPT CHANGES” button clicked.
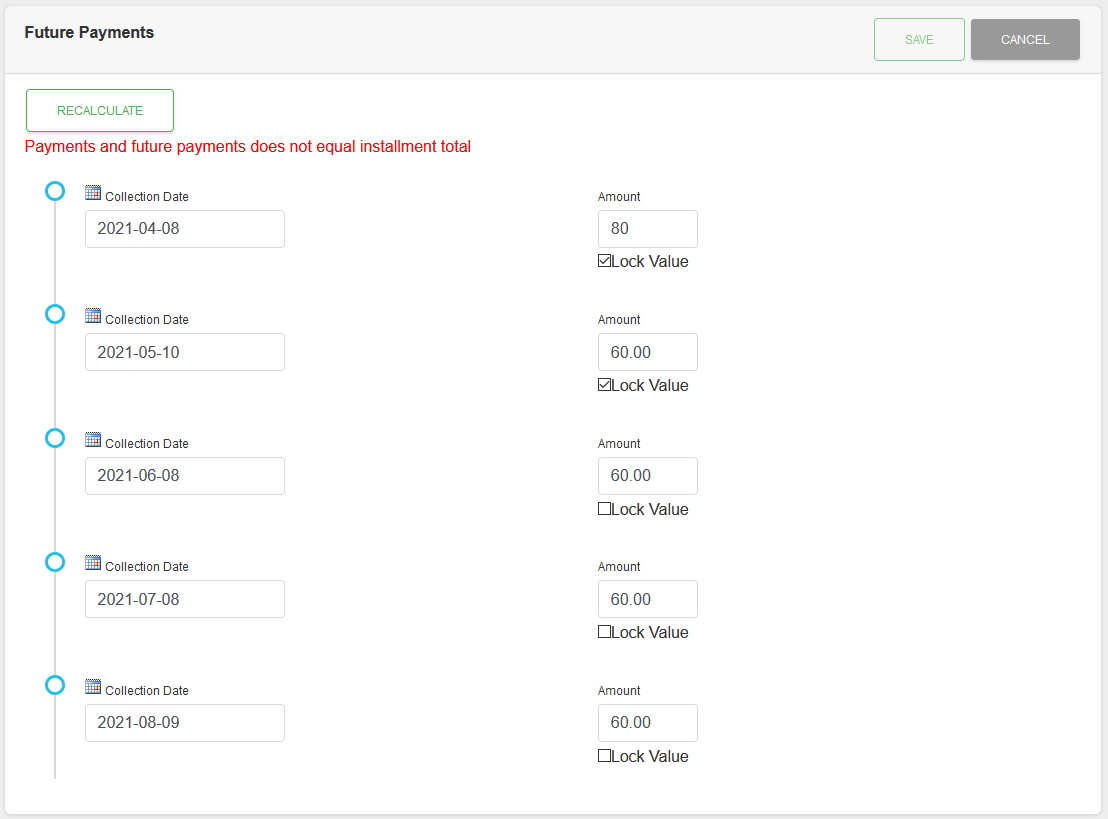
A “Lock Value” check box is given under each payment item. Checking these boxes will prevent the recalculation from adjusting these values.
In this example the first two payments have been “locked” to prevent these values being changed. The other payments will be recalculated to get to the desired Installment total.
Once you have locked any relevant payment values, click the “RECALCULATE” button. This should result in a succesful validation.