Direct Debit Payment Plan
Step 1

The mandatory fields fields will need to be populated in order to proceed. Please see the list of fields and the requirments below.
Payment Details Fields
| Field | Mandatory | Type | Description |
|---|---|---|---|
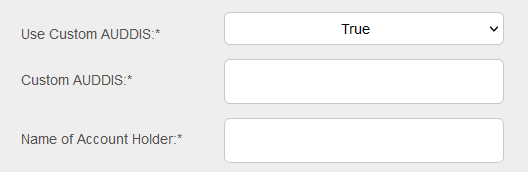
| Use Custom AUDDIS | Yes | Dropdown | Options are “True” or “False” (default). When set to “True” allow the use of a custom Auddis reference. |
| Custom AUDDIS | Yes | Text Box | Shown when “Use Custom AUDDIS” value set to “True”. Mandatory, when displayed. Custom AUDDIS reference for the Mandate. Valid characters A-Z, 0-9, “/”, “-”, “.”, “&”, “ ”. See note below. |
| Name of Account Holder | Yes | Text Box | Customer Name for the Bank Account. |
| Sort Code | Yes | Text Box | Sort Code for the Customer Bank Account. Must be 6 numbers with leading zeros, no spaces or hyphens |
| Account Number | Yes | Text Box | Account number for the Customer Bank Account. Must be 8 numbers with leading zeros, no spaces or hyphens. |
AUDDIS reference validation when core reference is enabled
- A core reference must be a minimum of 6 characters long, and can be up to 18 characters in length. For SmarterPay Cloud this is set to a maximum of 14 to allow for up to 4 characters for related payment references.
- Although any of the allowed Bacs characters may be included in the core reference (A-Z, 0-9, “/”, “-”, “.”, “&”, “ ”), only upper case alpha and numeric characters will be considered in checking for the minimum length.
- The first character in the reference must be an alpha or numeric character (A-Z, 0-9).
- It must not consist of all the same characters, for example “000000”.
- Use of “DDIC” in the first four characters is prohibited.
- The core reference must be lodged with the paying banks exactly as it appears on a signed DD.
- It must be unique for the sort code, account number and SUN. It must not be possible to match the core reference wholly or in part to an existing core reference for the same sort code, account number and SUN.
NOTE: If the Wizard has been called from the Bank Account detail page or Mandate detail page, the Name, Account number and Sort Code fields will be pre-populated and uneditable.
Payment Schedule Fields
| Field | Mandatory | Type | Description |
|---|---|---|---|
| Payment Types | Yes | Dropdown | Specifies the type Direct Debit to setup. For a Direct Debit - Payment Plan will show “Payment Plan” |
| Total Amount | Yes | Text Box | Amount format is a decimal value for ££.pp (10.99). This is the total amount to be paid. This is used in conjunction with “installments” to calculate the payment amounts. |
| Installments | Yes | Text Box | Number of installments for the Installment total to be paid over. Options are: “1” - “12”. |
| First Collection | Yes | Text Box | Date format is YYYY-MM-DD. You can use the Calendar icon to pick a valid date in the future. This is the date the first collection will be taken on. |
| Collection Day | Yes | Dropdown | This is a dropdown box used to define the day of the Month to use for the schedule. For a Collection Period set to Weekly this field is ignored, as the next run will be 7 days after the last run. Collection days are altered to the next banking day when they fall on a non-banking day. Options are: “1” - “28” & “Last Day”. |
| Collection Period | No | Dropdown | This is used to define the period to use for the schedule. This field is used in conjuction with the “To Collect Over” field for the frequency of the Schedule. Options are: “Monthly” & “Yearly”. |
| To Collect Over | No | Dropdown | This is used in conjuction with the “Collection Period” field for the frequency of the Schedule. Options are: “Every” - “Every 12” of whatever the “Collection Period” field is set to, for example “Every 2 Months”. |
| Schedule Custom Reference | No | Text Box | This is a text field (Maximum 50 characters) which can be used, optionally, to give a Custom Reference to the schedule. This value, if populated, will be passed to the Payments that get created from the Schedule. |
| Client Bank Account | Yes | Dropdown | Specifies the Client (Originating) Bank Account to use for the Mandate. Available Client Bank Accounts will show in the list. |
Actions
| Action | Description |
|---|---|
| “BACK” Button | Goes back to the previous step of the process. |
| “SAVE AND CONTINUE” Button | Moves to the next step of the process. |
Step 2
Once the Sort Code and Account Number fields have been populated SmarterPay Cloud will automatically Modulus Check the account details.
Success
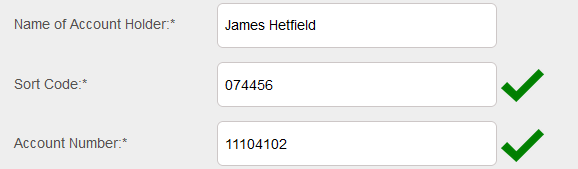
If all the details are correct then green ticks are shown against the fields and you can proceed to the next step.
Failure
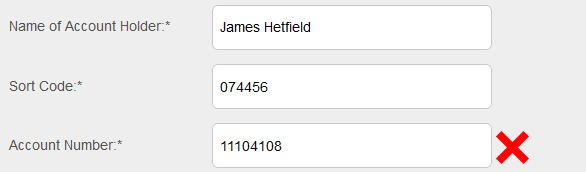
If there is an issue with the details then a red cross is shown against the problem field.
In this example the account number fails the check and therefore it will prevent the Wizard from moving on.
Step 3

The Thank you page shows a summary of what has been setup by the Wizard.
Actions
| Action | Description |
|---|---|
| “RETURN TO PORTAL” Button | Returns to the Main Page of the Portal. |
| “DOWNLOAD PDF” Button | Allows the Mandate to be viewed and/or downloaded as a PDF file. |