Configuring Zuora for SmarterPay Integration
This page, gives details on how to configure Zuora for the SmarterPay integration.
If you have issues with this integration please contact support, either by telephone on +44 (0)1482 240886, or by email at support@smarterpay.com
Configuring Zuora Payment Gateway
Configure API User
1. Create a Dedicated API User Role
Zuora recommends using a dedicated user account with “API Write Access” for all API interactions.
- Navigate to Role Management:
- Click on your initial in the top-right corner of the Zuora UI.
- Go to Settings > Administration > Manage User Roles.
- Add New Role:
- Click the Add New Role button.
- Role Name: Enter a descriptive name, e.g., “SmarterPay API Access”.
- Permissions: Select the API Write Access checkbox.
- Click Save.
2. Create a Dedicated User Account
This user account will be associated with the API Write Access role and will be used by SmarterPay for API calls.
- Navigate to User Management:
- Go back to the Administration Settings page.
- Select Manage Users.
- Click Add Single User.
- User Details:
- First Name, Last Name, Work Email: Enter relevant information. Ensure the work email is accurate, as the password setting email will be sent here.
- Login Name: Choose a descriptive and relevant login name (e.g., smarterpay.api@yourcompany.com). This must be unique and cannot be an existing login.
- Zuora Platform Role: Select the API Write Access role you created in Step 1 (e.g., “SmarterPay API Access”).
- Leave most other fields at their default values.
- Activate User Account:
- An email will be sent to the specified work email address to set the password for this new user account. Setting the password is crucial for activating the account.
3. Create an OAuth Client and Capture Credentials
Once the dedicated user account is active, you can create the OAuth client.
- Access User Details:
- After the password has been successfully set for the new user, return to the Manage Users page (you or your administrator may need to do this).
- Click on the user account you created in Step 2. The user account details page will be displayed.
- Create New OAuth Client:
- Scroll to the bottom of the page to the New OAuth Client section.
- Name: Provide a meaningful name for the client (e.g., “SmarterPay Integration Client”).
- Description: Add a brief description (e.g., “OAuth client for SmarterPay API integration”).
- Click Create.
- Capture Client ID and Secret:
- Upon creation, the Client ID and Client Secret will be displayed.
- Important: The Client Secret is displayed only once. Immediately note down both the Client ID and Client Secret. You will need these for configuring SmarterPay's integration with Zuora.
Setting up Zuora Payment Gateway
Follow these steps to configure the SmarterPay payment gateway in Zuora:
- Enable UPC Token Gateway
- Go to Settings > Payments > Setup Payment Gateway > Enable Gateway.
- Click Checkbox for UPC Token Gateway
- Click Save
- Navigate to Gateway Setup:
- Go to Settings > Payments > Setup Payment Gateway.
- Select Gateway Type:
- From the Gateway Type dropdown menu, select UPC Token Gateway.
- Create Gateway Instance:
- Click Create Gateway.
- Gateway Naming:
- Name: Provide a suitable name for the gateway, for example, “SmarterPay”.
- Endpoint Configuration:
- Sandbox Endpoint: https://zuorauat.smarterpaycloud.com/zuora
- Production Endpoint: https://zuora.smarterpaycloud.com/zuora
- Authentication Details:
- Authentication Type: Keep this as Basic Auth.
- Username: Enter any suitable username, e.g., “SmarterPay”. Immediately note down. You will need these for configuring SmarterPay's integration with Zuora.
- Password: Set a strong, secure password. It is highly recommended to use a randomly generated password from a reliable source like 1Password's password generator. Immediately note down. You will need these for configuring SmarterPay's integration with Zuora.
- Click Save
Adding custom Payment Method Type
Create a draft custom payment method type
URL: https://developer.zuora.com/v1-api-reference/api/operation/POST_CreateDraftOpenPaymentMethodType/ - tag/Custom-Payment-Method-Types/operation/POST_CreateDraftOpenPaymentMethodType
POST https://rest.sandbox.eu.zuora.com/open-payment-method-types
JSON payload:
{
  "internalName": "SmarterPay",
  "label": "SmarterPay",
  "tenantId": "2001429",
  "entityId": "",
  "methodReferenceIdField": "SMPCID",
  "userReferenceIdField": "SMPCID",
  "subTypeField": "",
  "fields": [
    {
      "name": "SMPCID",
      "type": "string",
      "description": "Smarterpay Cloud ID",
      "defaultValue": null,
      "label": "Smarterpay Cloud ID",
      "index": 1,
      "minLength": 19,
      "maxLength": 20,
      "checksum": false,
      "required": true,
      "visible": true,
      "representer": true,
      "editable": false
    }
  ]
}
Response:
{
    "status": "Draft",
    "paymentMethodTypeName": "SmarterPay__c_2001429",
    "revision": 1,
    "publishDate": ""
}
Publish a custom payment method type
URL: https://developer.zuora.com/v1-api-reference/api/operation/PUT_PublishOpenPaymentMethodType/ - tag/Custom-Payment-Method-Types/operation/PUT_PublishOpenPaymentMethodType
PUT https://rest.sandbox.eu.zuora.com/open-payment-method-types/publish/{paymentMethodTypeName}
(no payload is required)
Response:
{
    "internalName": "SmarterPay",
    "label": "SmarterPay",
    "revision": 1,
    "version": "2025-07-07",
    "status": "Published",
    "tenantId": "2001429",
    "entityId": "",
    "methodReferenceIdField": "SMPCID",
    "userReferenceIdField": "SMPCID",
    "subTypeField": "",
    "fields": [
        {
            "name": "SMPCID",
            "type": "string",
            "description": "Smarterpay Cloud ID",
            "defaultValue": null,
            "label": "Smarterpay Cloud ID",
            "index": 1,
            "maxLength": 20,
            "minLength": 19,
            "checksum": false,
            "required": true,
            "visible": true,
            "representer": true,
            "editable": false,
            "encrypted": false
        }
    ],
    "isSupportAsyncPayment": null
}
Activate custom payment method type
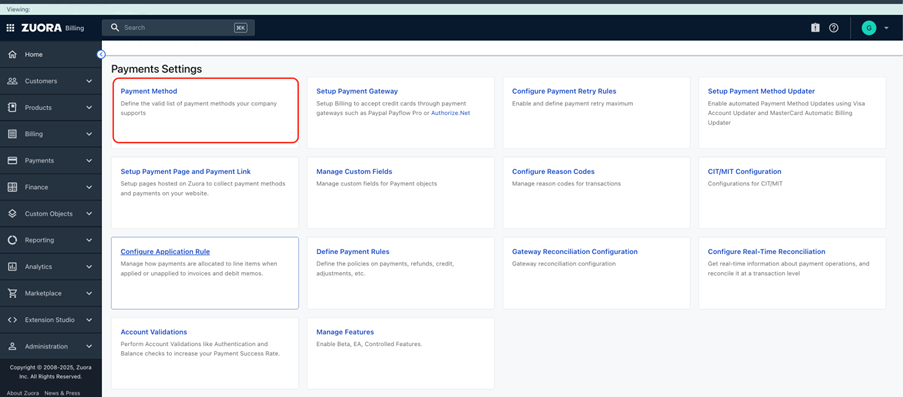
Go to Settings → Payments – Select Payment Method
Select “edit” button in the bottom left-hand corner.
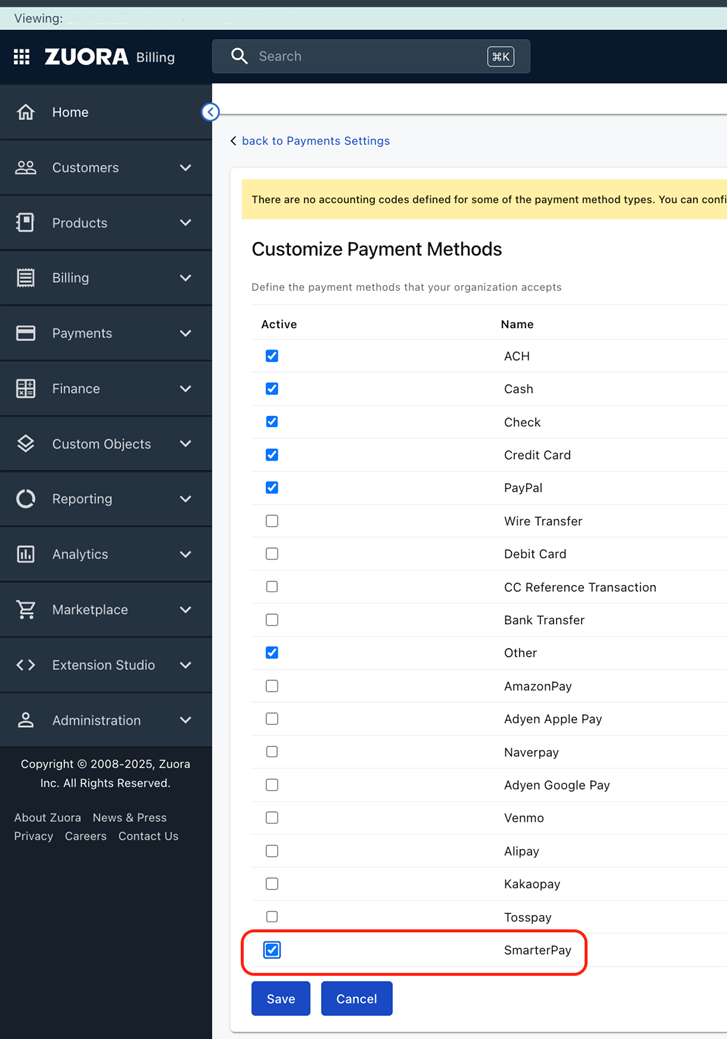
Hit Save and we have a new payment Method Type.
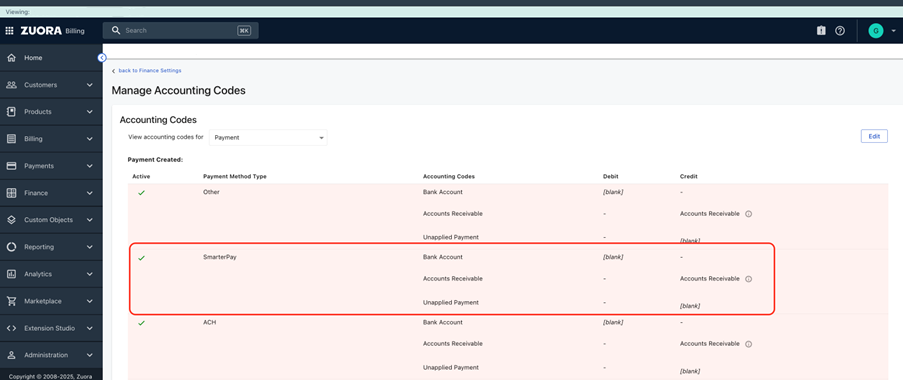
Note we also have new accounting codes to populate. Go to settings → Finance → Configure Accounting Codes