Creating & Editing File Formats
File Format - File Layout
The first page that is displayed is the “File Format - File Layout” page.
This page is where you tell SmarterPay Cloud the name of the File Format and how each record, and field, is delimited.
Example - Delimited

Example - Fixed Length

Fields
| Field | Mandatory | Type | Description |
|---|---|---|---|
| Name | Yes | Text Box | Unique name given to the File Format for ease of identification. |
| Delimited Records | Radio Button | File Format Type can either be “Delimited Records”, or “Fixed Length Records”. Only one can be chosen. Select when the records, and fields, have delimiters. | |
| Record Delimiter | Yes | Dropdown | “Delimited Records” File Format Type only. Delimiter between records. Options are: “Carriage Return, Line Feed”, “Line Feed”, “Tab”. |
| Field Delimiter | Yes | Dropdown | “Delimited Records” File Format Type only. Delimiter between fields. Options are: “Comma”, “Fixed Length”, “Line Feed”, “Semicolon”, “Tab”, “Vertical Bar”. |
| Remove Non Standard Characters | No | Checkbox | When checked, an uploaded file will have invalid Bacs characters replaced with spaces (“ ”). Valid Bacs characters: A-Z, 0-9, “/”, “-”, “.”, “&”, “ ”. |
| Fixed Length Records | Radio Button | File Format Type can either be “Delimited Records”, or “Fixed Length Records”. Only one can be chosen. Select when the records, and fields, do not have delimiters. | |
| Record Length | Yes | Number Box | “Fixed Length Records” File Format Type only. Length of the individual records in the undelimited text file. |
Actions
Available actions, subject to permissions, are:
| Action | Description |
|---|---|
| “SAVE CHANGES” Button | Will save any changes made to the File Format record and return you to the list of File Formats. Please Note: Updating an existing File Format may require a re-save of any Import Profiles it is used in, for it to function correctly. |
| “NEXT” Button | Will take you to the File Format - Data Fields page. |
| “CANCEL” Button | Will ignore any changes made to the File Format record and return you to the list of File Formats. |
File Format - Data Fields
The File Format - Data Fields page is made up of the following sections:
File Format - Data Fields - Fields - Where the file mapping is defined.
File Format - Data Fields - Conditions - Where conditions can be defined to check the incoming data for acceptance into SmarterPay Cloud.
File Format - Data Fields - Test Upload - Where a test file can be uploaded to check the file mapping, and any conditions, defined.
File Format - Data Fields - Fields
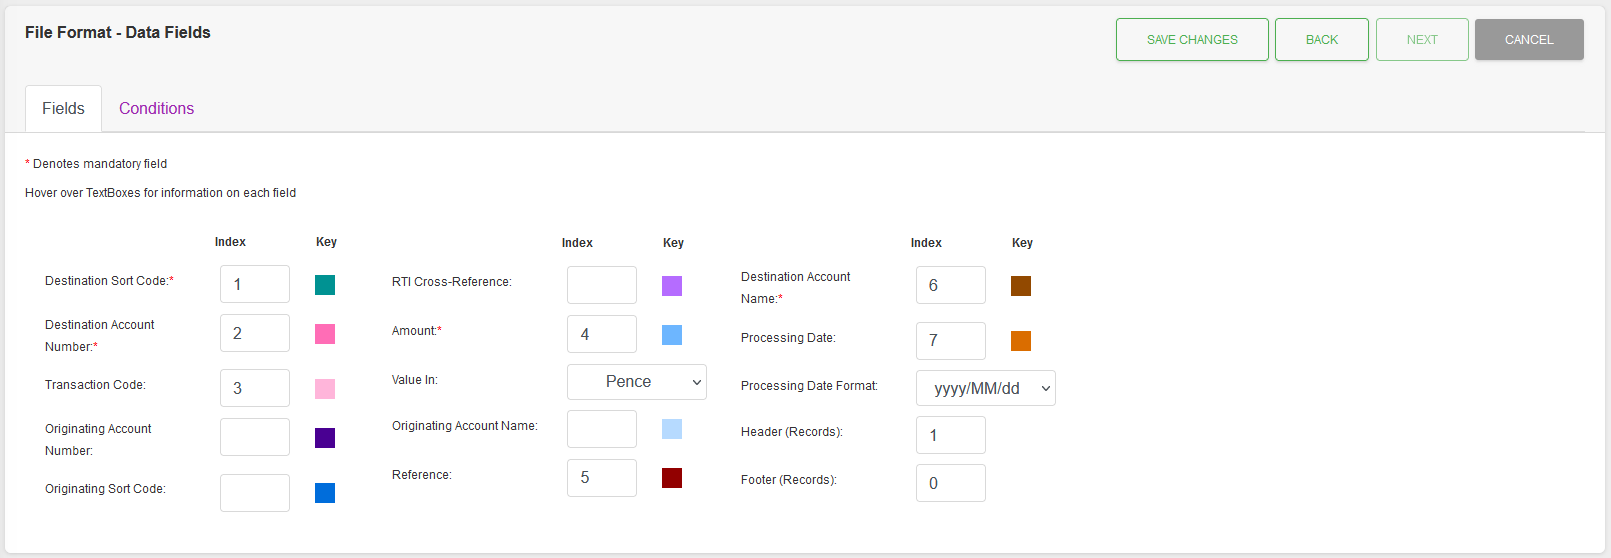
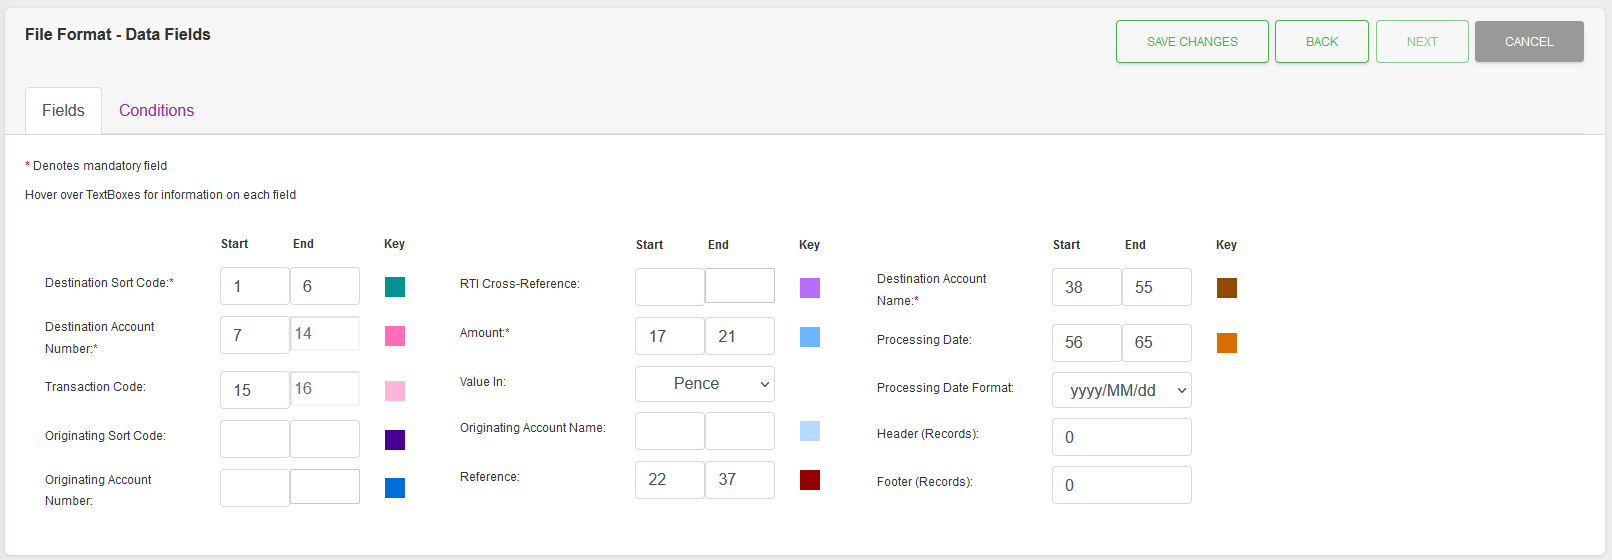
This page is where you tell SmarterPay Cloud how each record in the file should be mapped to match the system fields.
Example - Delimited
Example - Fixed Length
Fields
| Field | Mandatory | Type | Description |
|---|---|---|---|
| Destination Sort Code | Yes | Number | Either “Index”, for Delimited records, or “Start” and “End”, for Fixed Length records. |
| Destination Account Number | Yes | Number | Either “Index”, for Delimited records, or “Start” and “End”, for Fixed Length records. |
| Transaction Code | No | Number | Either “Index”, for Delimited records, or “Start” and “End”, for Fixed Length records. |
| Originating Account Number | No | Number | Either “Index”, for Delimited records, or “Start” and “End”, for Fixed Length records. |
| Originating Sort Code | No | Number | Either “Index”, for Delimited records, or “Start” and “End”, for Fixed Length records. |
| RTI Cross-Reference | No | Number | Either “Index”, for Delimited records, or “Start” and “End”, for Fixed Length records. |
| Amount | Yes | Number | Either “Index”, for Delimited records, or “Start” and “End”, for Fixed Length records. |
| Value In | Yes | Dropdown | Format for the Amount value. Options are: “Pounds”, “Pence”, “Tab”. |
| Originating Account Name | No | Number | Either “Index”, for Delimited records, or “Start” and “End”, for Fixed Length records. |
| Reference | No | Number | Either “Index”, for Delimited records, or “Start” and “End”, for Fixed Length records. |
| Destination Account Name | Yes | Number | Either “Index”, for Delimited records, or “Start” and “End”, for Fixed Length records. |
| Processing Date | No | Number | Either “Index”, for Delimited records, or “Start” and “End”, for Fixed Length records. |
| Processing Date Format | No | Dropdown | Format for the Processing Date. Options are: “dd/MM/yyy”, “MM/dd/yyyy”, “MM/dd/yy”, “ddMMyyyy”, “MMddyyyy”, “yyyyMMdd”, “yyyy/MM/dd”. |
| Header (Records) | No | Number | Number of Header records to ignore. |
| Footer (Records) | No | Number | Number of Footer records to ignore. |
Actions
Available actions, subject to permissions, are:
| Action | Description |
|---|---|
| “Conditions” Tab | Switches to the File Conditions Tab. |
| “SAVE CHANGES” Button | Will save any changes made to the File Format record and return you to the list of File Formats. Please Note: Updating an existing File Format may require a re-save of any Import Profiles it is used in, for it to function correctly. |
| “BACK” Button | Will take you to the File Format - File Layout page. |
| “CANCEL” Button | Will ignore any changes made to the File Format record and return you to the list of File Formats. |
File Format - Data Fields - Conditions
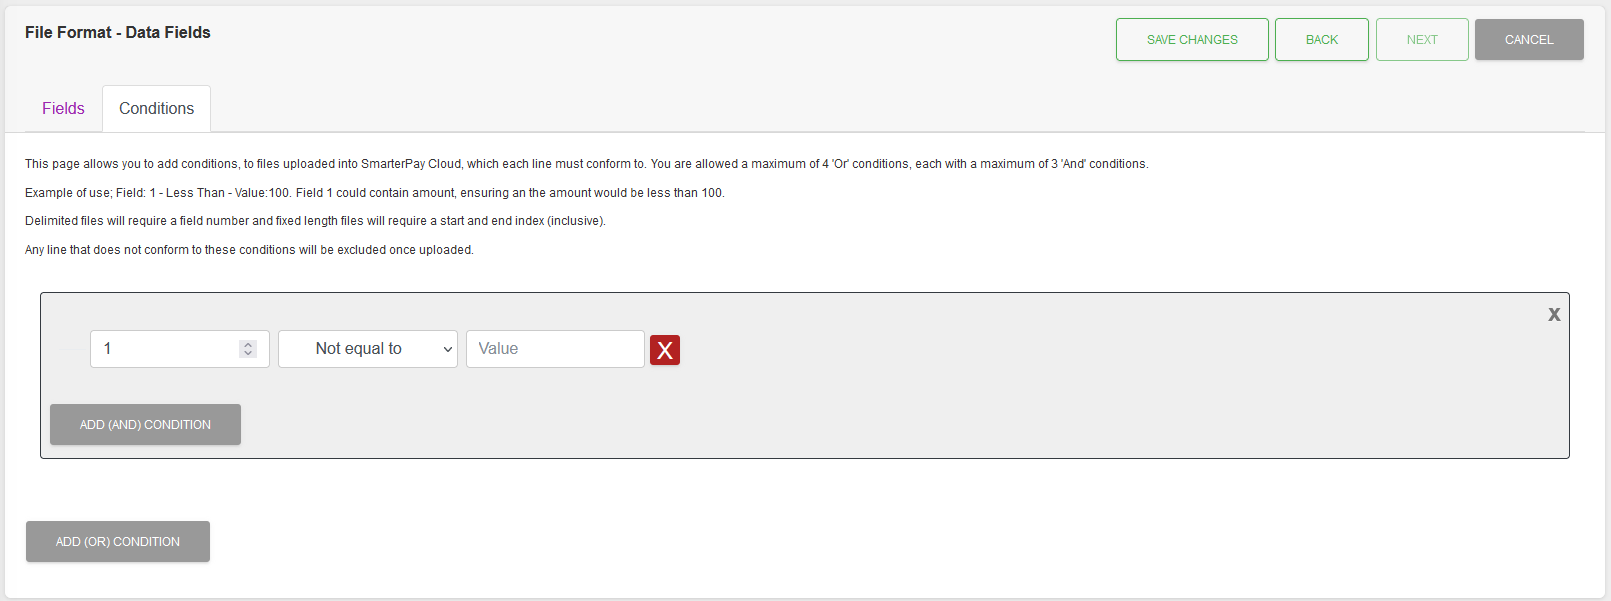
This page is where you tell the system what conditions need to match in order for a record to be inserted into SmarterPay Cloud. No conditions set (default) will try and insert all records.
Example - Delimited
Example - Fixed Length
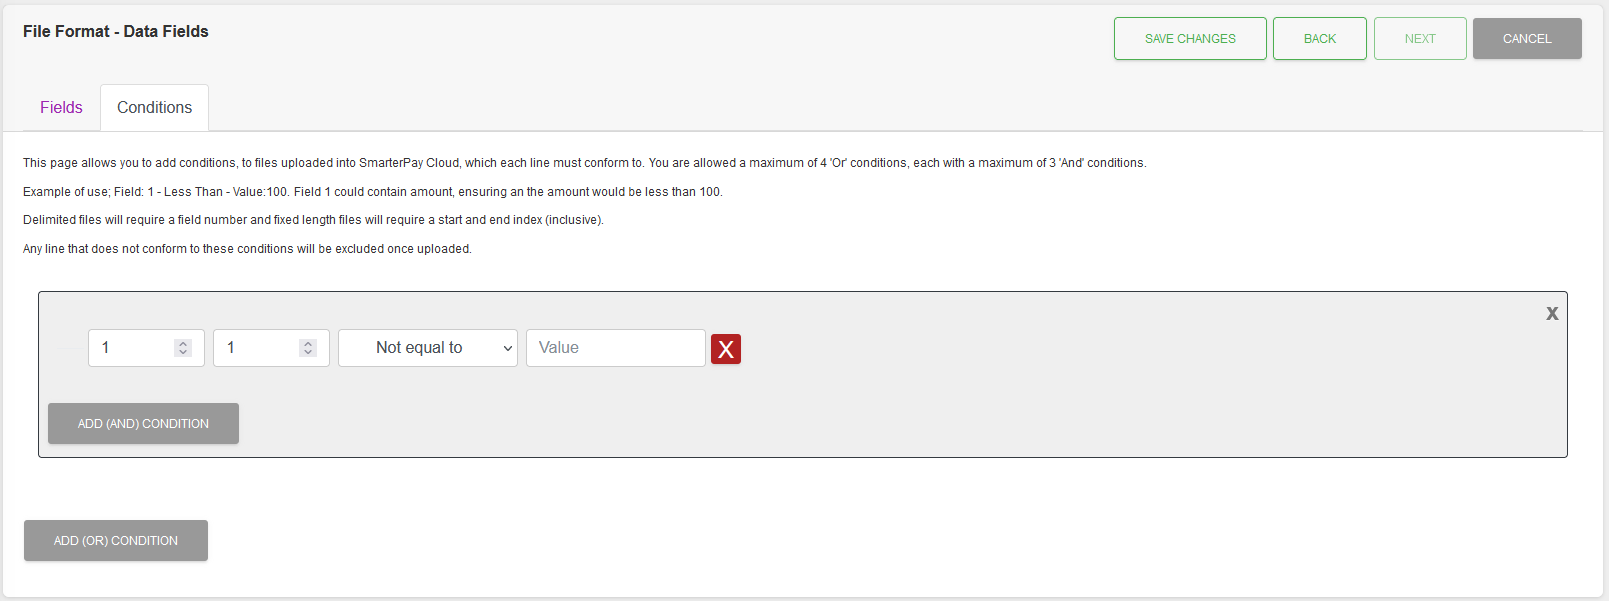
Examples show a condition that will only insert data if the first part of the record is not empty/blank.
Please Note: Records not meeting conditions are not displayed in SmarterPay Cloud, however, a count of these ignored records is displayed, as “Excluded Rows”, during the File Upload process.
Fields
| Field | Mandatory | Type | Description |
|---|---|---|---|
| “Field”/“Start” & “End” | Yes | Number | Which part of the record to check. Either “Field”, for Delimited records, or “Start” and “End”, for Fixed Length records. |
| Operator | Yes | Dropdown | How to check the data. Options are: “Equal to”, “Not equal to”, “Greater than”, “Less than”. |
| Value | No | Text Box | Value, or empty, to check against. Maximum 30 characters. |
Actions
Available actions, subject to permissions, are:
| Action | Description |
|---|---|
| “Fields” Tab | Switches to the File Fields Tab. |
| “SAVE CHANGES” Button | Will save any changes made to the File Format record and return you to the list of File Formats. Please Note: Updating an existing File Format may require a re-save of any Import Profiles it is used in, for it to function correctly. |
| “BACK” Button | Will take you to the File Format - File Layout page. |
| “CANCEL” Button | Will ignore any changes made to the File Format record and return you to the list of File Formats. |
| Black “X” Button | Deletes the entire “OR” condition section. |
| White “X”, on Red, Button | Deleted the “AND” condition. |
| “Add (AND) CONDITION” Button | Add an “AND” condition to the “OR” section. Maximum of 3 “AND” conditions per section. All of the “AND” conditions in a section must be a match for the record to be inserted. |
| “Add (OR) CONDITION” Button | Add an “OR” condition section. Maximum of 4 “OR” conditions. One of the “OR” conditions must be a match for the record to be inserted. |
File Format - Data Fields - Test Upload

The “SELECT FILE” button allows you to, temporarily, upload a test file into the system to “see” what the map, and any conditions, looks like against your data.
To upload a test file:
- Click on the “SELECT FILE” button
- Select the appropriate file
- Click the “UPLOAD FILE” button.
Once the file has been uploaded the File Format - Test Data and File Format - Test Data Table sections are added to the page.
Example - File Format - Test Data
This uses the “Key” colour in the Data Fields section of the page to highlight, in the uploaded test file, which parts of the data will be used for each field.
Example - Delimited

Example - Fixed Length

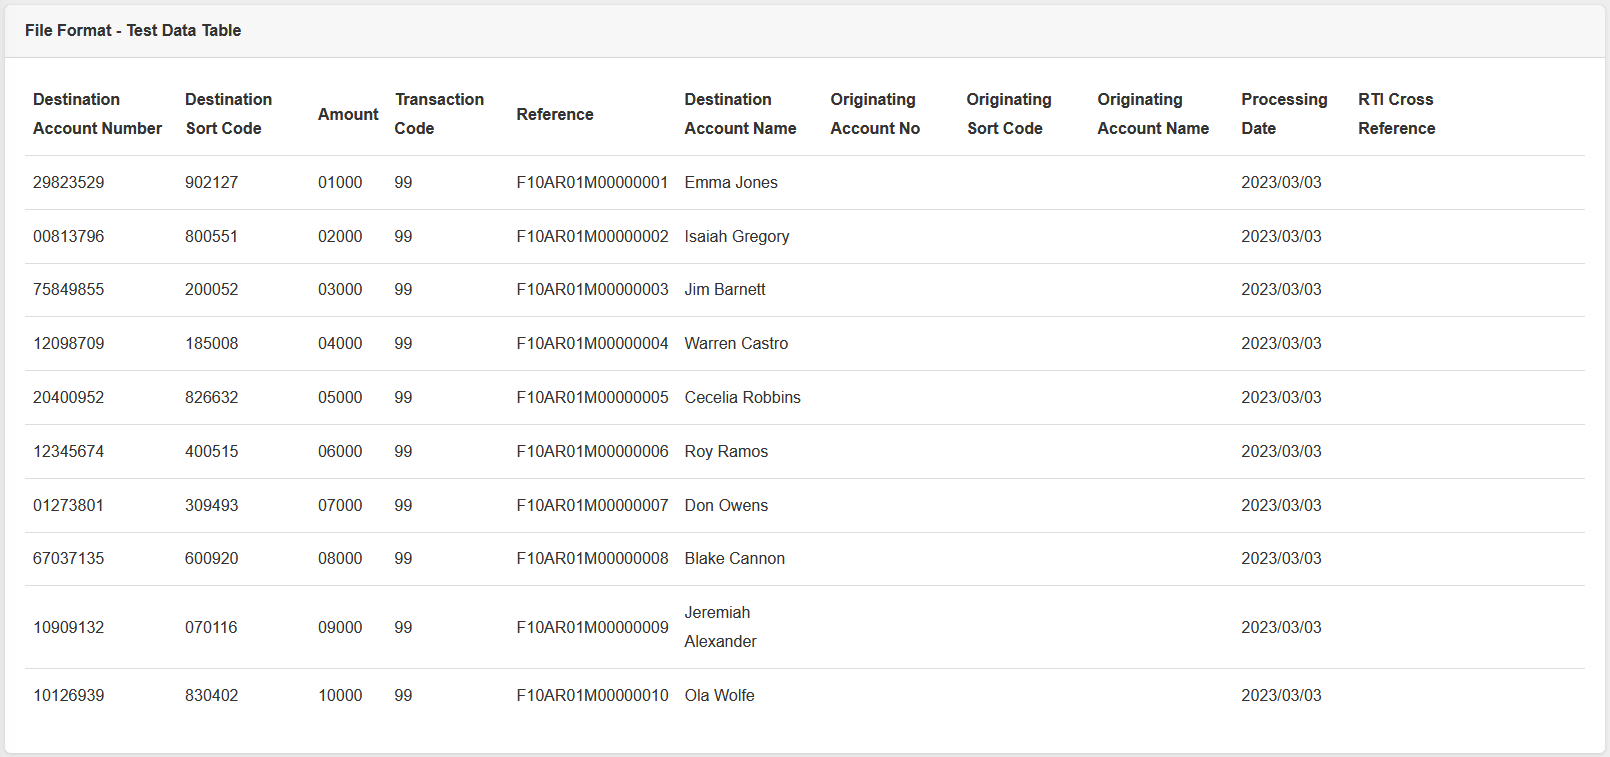
Example - File Format - Test Data Table
This uses the mapping in the Data Fields to represent the mapping in the form of a table.
