Client Options
An Options dialog is accessible from each of the SmarterPay client applications. The settings shown in the Options dialog are only applicable to the application in which you are viewing them. Likewise, any changes you make will only affect the particular application in which you make those changes.
When you click on the Tools » Options menu item, you will be presented with the options dialog.
There are two tab pages to this dialog, Logging and Advanced. The Logging page allows you to turn on client-side logging, while the Advanced page allows you to specify client side connection details.
Logging page
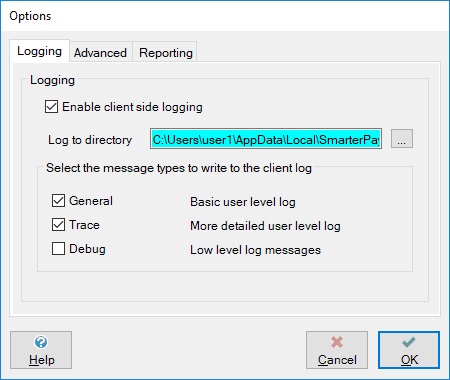
The Logging page is shown below:
You can choose whether to use client side logging or not by selecting the ‘Enable client side logging’ tickbox. With this option checked, you will be able to specify a directory to which the log messages for this application will be written. You may type in a directory of your choice, but the default directory is as follows:
- C:\Users\user1\AppData\Local\SmarterPay\SmarterPay\Log
Where Installation Directory indicates the current build you have installed e.g. 2.0.0.488
The files in each of these log directories will be named according to the following naming convention:
The first 3 characters will determine the log for the application where:
- LOG represents the server logging
- ADM represents the administrator client logging
- BAX represents the submissions client logging
The next 8 digits will be the date of the log in DDMMYYYY format (in the example below, the date is 06102003 i.e. October 6th 2003)
The next 6 digits will be the time of the log in HHMMSS format (in the example below, the time is 101741 i.e. 10:17a.m. and 41 seconds.
Each file ends with .log
Example – LOG06102003101741.log
Using the Logging page you can also choose how much information, and of what kind, is written to the client log. This is done in the section headed “Select the message types to write to the client log”. There are three message types to choose from, General, Trace and Debug.
By default, only General and Trace messages are selected. If our Support department requires more detailed information, they may suggest that you select Trace logging as well.
Advanced Page
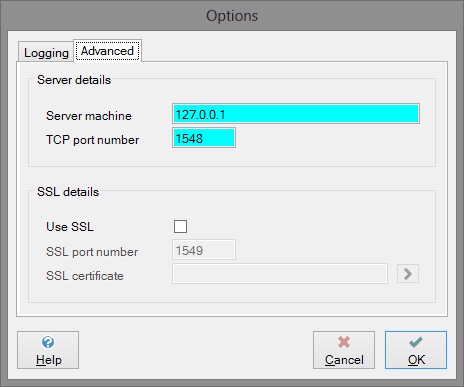
The advanced tab page will display the following dialog:
This allows you to specify the connection settings used on the client. In order to connect successfully to the SmarterPay server, these settings must match the connection settings on the server.
Server details
Server machine
This must be set to the IP address of the machine on which the SmarterPay Server is installed. The default value in this field will be the IP address of your local machine. You may change it to the address of another machine if necessary
TCP Port Number
This must be set to the port number that the SmarterPay Server is currently listening on.
Connection details
SSL certificate
Select the button next to this field to select a certificate that will be used for authentication. For more details on certificates see the section entitled ‘Select certificate dialog’.
Client authentication
Select this check box if you additionally require the client to authenticate with the server.

