SmarterPay Server Overview
Introduction
In this section we will show you what the SmarterPay Server (Graphical User Interface) GUI looks like and how to use it. Please remember that the SmarterPay Server is the control centre of SmarterPay and as such should not be made accessible to unauthorised personnel.
The SmarterPay Server GUI
When the SmarterPay Server is up and running, you will see the Server icon in the system tray (this is usually at the right hand side of the task bar, which in turn is usually at the bottom of your screen). It looks like this: ![]()
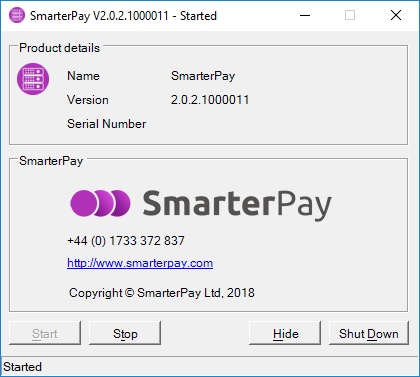
To show the SmarterPay Server GUI, right click on the server icon in the system tray. This will bring up a pop-up menu with the options: Start, Stop, About SmarterPay and Shut Down. Choose the About SmarterPay option to see the GUI, as shown below.
The GUI is split into two sections: Product Details and SmarterPay Ltd. Below these are the options available to you in the form of buttons. At the very bottom is the status bar, which shows the current status of the SmarterPay Server. In the example above, the status of the server is “Started”.
More:
Product Details
This section tells you the Server Name and the Product Version. These details are important and should be quoted if you ever need to contact SmarterPay Ltd for support purposes.
Registration Details
This section shows the registered User Name, your Company name and the product Serial Number. These details should also be quoted if you ever need to contact SmarterPay Ltd for support purposes.
SmarterPay Ltd
This section gives the contact details for SmarterPay Ltd. You will need these if you ever have to contact SmarterPay Ltd for support purposes.
Action Buttons
These buttons cover all the actions you can perform on the SmarterPay Server GUI.
Start – On the example above, this button is disabled because SmarterPay is already started.
Stop – This button stops the SmarterPay Server. This means that the Server stops working until the Restart button is used. If the SmarterPay Server is stopped, none of the clients can continue working. Any users logged on will be disconnected.
Hide – This button minimises the SmarterPay Server GUI, so that it can only be seen as an icon in the system tray.
Shut Down – This button stops the SmarterPay Server and closes the application down. Any users logged on will be disconnected.
Obviously, the Stop and Shut Down buttons should only be used by authorised personnel and only with good reason.
Failure to connect to server warning dialog
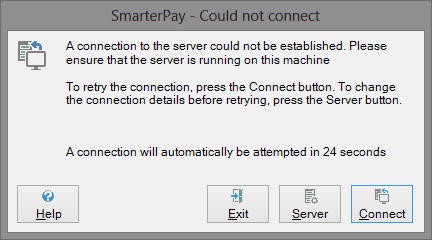
If you try to start a client when the server is not running, you will see a message box telling you that the client has failed to connect to the server.
The message box will show a countdown from 30 seconds, at which point the client will attempt to connect to the server again. If you want to try and connect to the server before the countdown ends, press the Connect button. If the connection still cannot be made, the message box will appear again.
If you do not press the Connect button, the client will try to connect to the server every 30 seconds until it is successful.
There are several possible reasons why you might be unable to connect to the server, such as:
- the server has been shut down
- the server's cable has become unplugged
- the server machine reference was mistyped when installing the client
- the server has been renamed
- the server has been moved from one machine to another
- the server and client SSL settings do not match
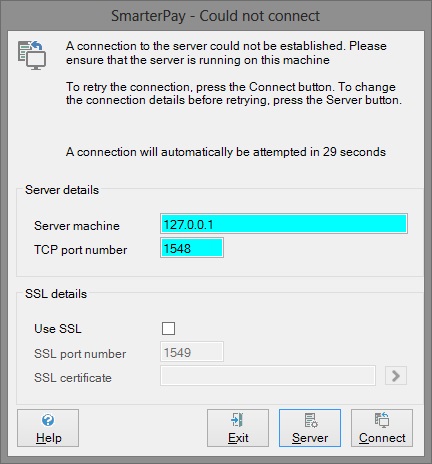
If you have reason to believe that the server has been renamed, or that the location of the server has changed, press the Server button. This will expand the dialog to show you the current information about the name and location of the server.
If you know the new location or new server name, click the Server button. You will be presented with the following:
Type in the server details into the corresponding fields. If the server requires SSL authentication, then you should enter the appropriate details after ticking the Use SSL box. Now click the Connect button again. If you are still unable to gain a connection to the server after this, please refer to your IT Manager.
If you want to stop trying to connect, press the Exit button.
Server connection lost warning dialog
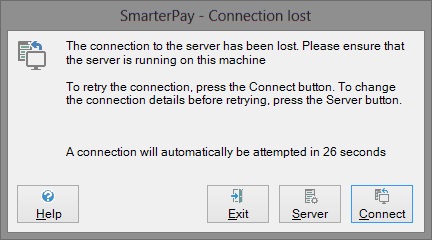
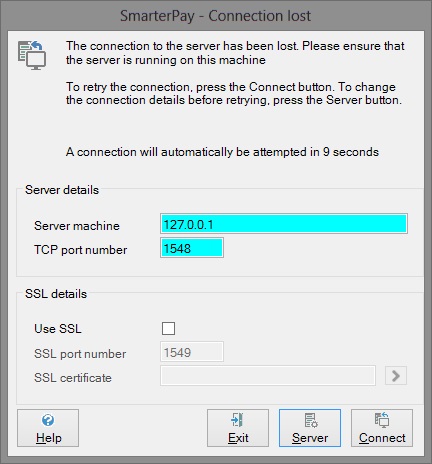
If, for whatever reason, your connection to the server is lost while you are using a client, you will see a message box telling you that the connection to the server has been lost.
The message box will show a countdown from 30 seconds, at which point the client will attempt to connect to the server again. If you want to try and connect to the server before the countdown ends, press the Connect button. If the connection still cannot be made, the message box will appear again.
If you do not press the Connect button, the client will try to connect to the server every 30 seconds until it is successful.
There are several possible reasons why you might be unable to connect to the server, such as:
- the server has been shut down
- the server's cable has become unplugged
- your local area connection has been disabled
- the server machine reference was mistyped when installing the client
- the server has been renamed
- the server has been moved from one machine to another
- the server and client SSL settings do not match
If you have reason to believe that the server has been renamed, or that the location of the server has changed, press the Server button. This will expand the dialog to show you the current information about the name and location of the server.
If you know the new location or new server name, type it into the Server machine field. If necessary, type the new port number into the Port field too. If the server requires SSL authentication, then you should enter the appropriate details after ticking the Use SSL box. Now click the Connect button again. If you are still unable to gain a connection to the server after this, please refer to your IT Manager.
If you want to stop trying to connect, press the Exit button.
