Adding An Import Profile
To add an import profile, click the Add button on this screen.
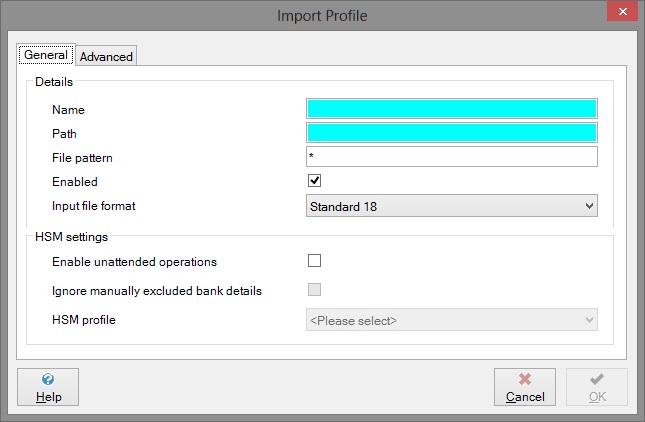
This will bring up the Import Profile dialog, shown below.
Fields on this dialog are as follows.
General Tab
Details
Name
Type the name you wish to give to this Import Profile. This name will allow you to easily identify the Import Profile.
Path
Type in this field the full directory path to be monitored. If you are using a letter to denote a root directory, please follow the letter with a colon.
File pattern
You may use this field to specify the type of files to be imported from this directory. For example, type *.txt to import all files with a file extension of txt.
If you leave the asterisk in this field, all files in the directory will be imported. In this case, you will notice that, on return to the Back Office configuration dialog, there is an asterisk in the Pattern column, indicating that all file types will be imported.
Enabled
Select this tickbox in order to enable the directory for monitoring. If this tickbox is left unchecked, the directory will not be monitored for files. Obviously, under normal circumstances you would want the directory to be monitored, but this checkbox allows you to turn off monitoring temporarily for that directory.
This option is particularly useful when dealing with a complicated bureau file structure setup.
Poll directory
Select this tickbox in order to poll the specified directory every 30 seconds.
There is usually no need to select this tickbox unless you have specified a network directory or a non-Windows drive, since BACS will carry out polling automatically. However, if you are having any problems picking files up from the specified directory, we recommend that you do select it.
Source file format
This field allows you to specify the format of the file to be imported. Use the dropdown list to select the appropriate file format for all files held in this directory. If the file format you need is not in the list, you will have to add it in the File Formats section. For full details of how to do this, please refer to the section entitled File Formats Configuration.
Depending on which source file format you choose, you may see the dialog change to show you an extra set of fields (Field Defaults) that you must fill in before you can return to the Back Office configuration page. The only format that will not ask you for this extra field information is Standard 18, whose file details are already known to the system.
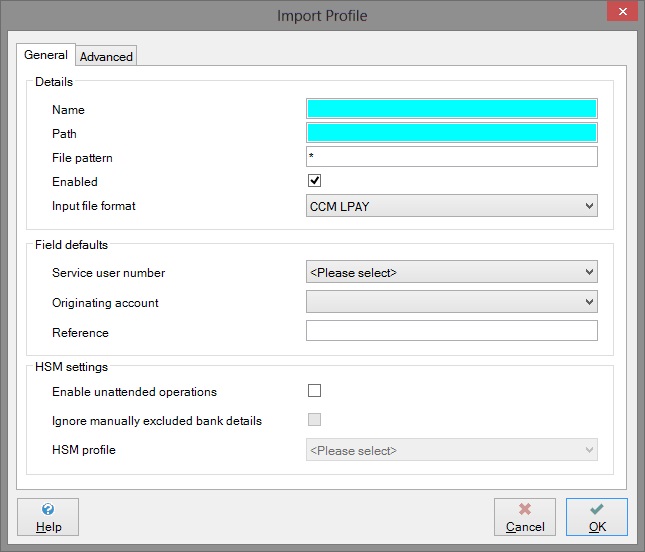
An example is given below, showing all the extra fields that might appear when you select your source file format. If any of these fields are not present, it means you have already supplied the required information in the File Formats section.
Field Defaults
IMPORTANT NOTE: These settings are only applied when the relevant data was not found in the file defined in the File Formats section of the Administrator.
Service User Number
Use the dropdown arrow to select the service user number to associate with all files of this format in this directory path.
Originating Account
Once you have selected a service user number above, you will be able to select an originating account to associate with all files of this format in this directory path. If the dropdown list is empty, you must return to the Service Users section and add Originating Bank Account details for this service user before you can save the details in this dialog.
Transaction Code
Use the dropdown arrow to select the appropriate transaction code for all files of this format in this directory path.
Reference
Type in this field the default reference number for any files of this format and in this directory path.
Any records in these files that don’t have a reference specified will use this default value.
You can enter as part of the reference a counter, so each record is given a unique reference. The counter is in the form %CNTn% where n is the length of the counter. For example, if you set the reference to be REF - %CNT5%, the first record without a reference will be given the reference REF – 00001. Following records will have REF – 00002, REF – 00003 etc.
Currency
Use the dropdown arrow to select the appropriate currency to be used for all files of this format in this directory path.
HSM settings
NOTE: This section of the back office profile will only be displayed if the DIPHSM00 component has been licensed within SmarterPay.
Enable unattended operations
This option allows you to enable any available HSMs in your SmarterPay installation for unattended processing. For a payment file to be processed in a completely unattended manner, it must be received via a back office profile that has this option enabled.
Payment files that encounter issues during processing, such as account validation errors, will have their unattended operations halted. The file will need to be manually examined and processed from this point.
IMPORTANT NOTE: If you wish to leverage SmarterPay's unattended HSM capabilities, we strongly recommend setting up Alerting Profiles to notify you of any failures.
Ignore manually excluded bank details
Text.
HSM profile
This option allows you to specify an already set up HSM profile to be used for unattended operations.
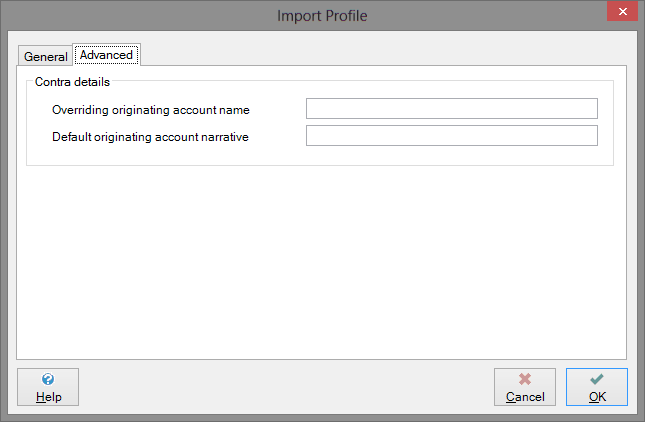
Advanced Tab
This section of the dialog allows to you specify some more advanced options in relation to back office profiles.
Contra details
Overriding originating account name
If set, this value will always override the account name in the contra record of the submission that will be sent to the Bacs service. This setting will take precedence (override) over the account details against a Service User.
Default originating account narrative
If set, this value will only ever be used if both of the following conditions are met:
1. It's not already set in the Standard18 file (Field I of the contra record).
2. It's not set against the Service User's account details.
In other words, this value will only be used if the field hasn't already been set by anything else.


