Adding A System User
Before you can use the Submissions application, you must add at least one system user.
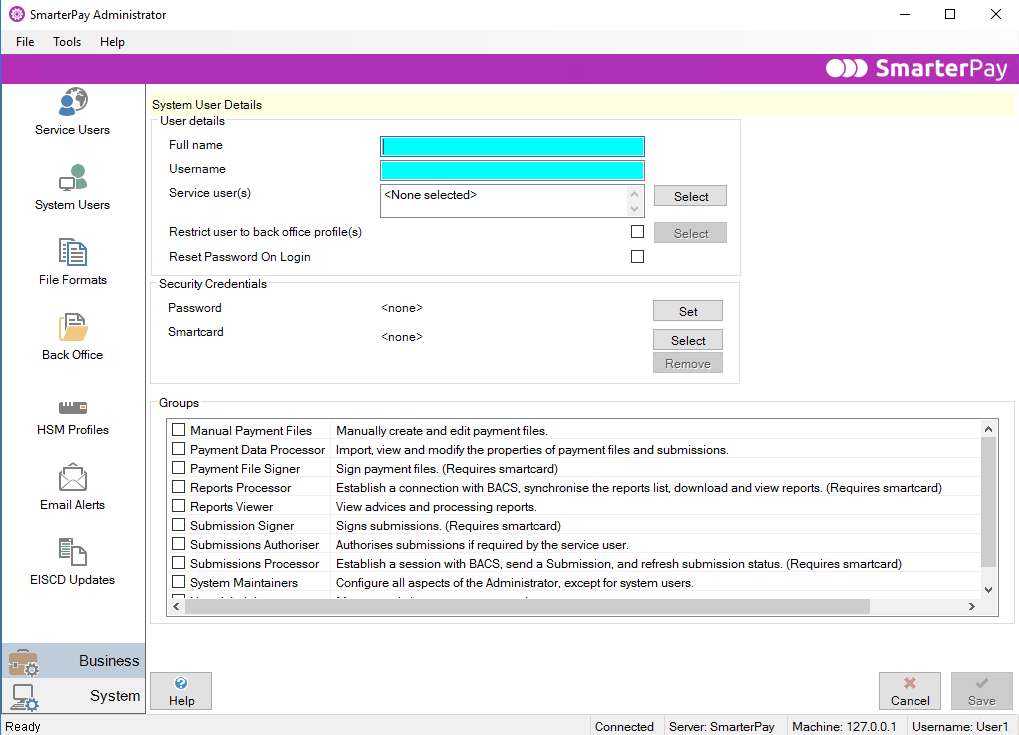
From the System Users screen, click the Add button. This will bring up the System user details screen, shown below.
This screen requires you to provide system user details. The fields and their required contents are described below.
More:
User details
Full name
Type in here the name of the contact you want to add. This should be the name of a person who is going to use the software. The contact name must contain at least 5 characters, up to a maximum of 25 characters.
Username
Type in here the username of the contact. This name will be used to log onto the software and must therefore be unique.
There are a few rules about the characters that may be used in the username:
The username must contain at least 5 characters, up to a maximum of 25 characters.
The username must be alphanumeric i.e. it may only include numbers and letters and the underscore character (no punctuation and no spaces are permitted).
The username is not case sensitive i.e. you may use lower case or upper case letters whenever you type the name.
Service user(s)
For a new system user, this field will display the text “<None selected>”. You will need to select a service user if this system user is going to perform any function that requires use of a smart card in the Submissions application.
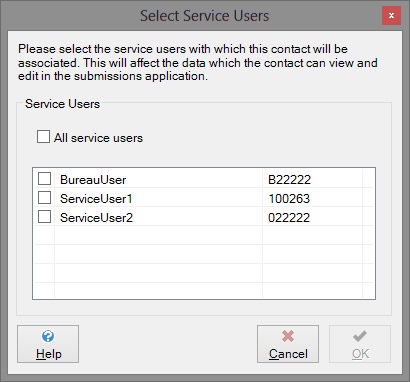
Use the Select button in the User details section to bring up the Select Service Users dialog.
Tick the checkbox of the service user(s) with which you want this system user to be associated. Click OK to save your changes and return to the System user details screen, or click Cancel to return without saving the changes.
NOTE: If you select “All service users”, then this setting will be applied to any new service users that are added after configuring this system user.
If you clicked OK, this will associate the system user with the selected service user(s), allowing him to perform permitted actions on their behalf.
Returning to the System user details screen, you will see the selected service user(s) are now displayed in a list.
You can add or remove service users from the list if you wish. To do this, click the Select button in the User details section to bring up the Select Service Users dialog, remove the tick from the checkbox of the service user you no longer want to associate with this system user, and click OK.
Restrict user to back office profile(s)
It is possible to restrict a system user so they can only see data that has been imported from specific back office profiles. This might be the case if you run two payrolls under the same service user / Bacs number and do not wish the system users to see the details of the payroll they are not running.
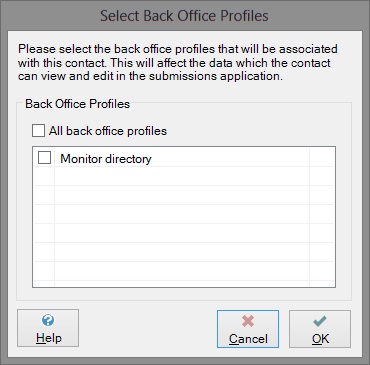
By default this option is set to false, but ticking the box enables the Select button. You will be presented with the following dialog if you click this button:
The list is populated with all the back office profiles in the system and you restrict the system user by ticking the check boxes next to the back office profile(s) you wish this user to have access to.
Click OK to save your changes and return to the system user details screen, or click Cancel to return without saving the changes
You can add or remove back office profiles from the list if you wish. To do this, click the Select button in the User details section to bring up the Select Back Office Profiles dialog, add or remove the tick from the checkboxes of the profiles you wish to change and click OK.
If you wish your system user to have access to all the back office profiles in the system, then ensure the ‘Restrict user to back office profile(s)’ checkbox is not ticked.
Reset Password On Login
If checked will force the user to change their password the next time they login to SmarterPay On-Premise. By default this option is set to false.
Security credentials
This section of the page allows a User administrator to set or reset a contact's password, to select a smart card to be associated with this contact, or to remove the smart card association from the user.
All system users are required to have a password. System users who connect to the Bacstel-IP system are also required to be associated with a smart card.
Reset
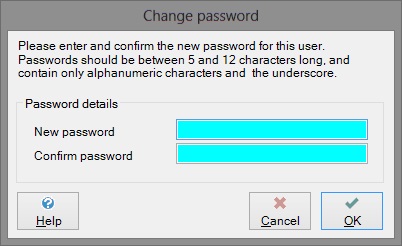
Click the Reset button to set or reset the password for this user. You will be presented with the following dialog:
On this dialog you must type in the new password in the New password field, then type it again in the Confirm password field.
There are a few rules about the characters that may be used in the password:
The password must contain at least 5 characters, up to a maximum of 12 characters
The password must be alphanumeric i.e. it may only include numbers and letters and the underscore character (no punctuation and no spaces are permitted)
The password is case sensitive.
Click OK to save the password and return to the System User details screen, or click Cancel to return to the System User details screen without saving the password.
Select
The Select button is only to be used for those users who, because of the functions they will perform, need to be able to logon to Bacstel-IP.
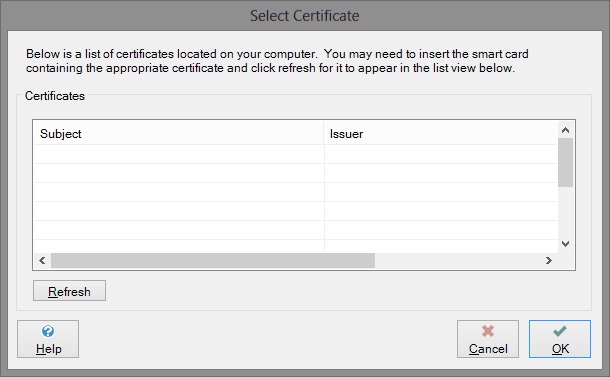
Click the Select button in order to associate this user with a particular smart card. This will bring up the Select Certificate dialog, as shown below.
This dialog displays a list of all certificates located on your computer. If the certificate you are looking for cannot be found in the list, or if the list is empty, you may need to insert the smart card containing the certificate and click the Refresh button before it will appear.
To select a certificate, highlight the appropriate line in the list and press the OK button. This will return you to the System user details screen, where you will now see the name of the selected certificate in the Security Credentials section.
Remove
Click the Remove button in order to remove the associated certificate from this user. This will mean that the user is no longer able to carry out functions which require the use of a smart card, such as logging onto Bacstel-IP and signing payment files and/or submissions.
Groups
You must now choose one or more Groups for the system user to belong to. This will determine the level of privileges assigned to the user.
There are currently ten Groups to choose from. They are listed in the table below, together with the actions they are allowed to perform and whether they require a smart card to perform their tasks. The table also shows which application the group has access to, and whether a service user association is required:
| Group Name | Description | Smart card required? | Service User association? | Application access |
|---|---|---|---|---|
| Manual Payment Files | Manually create and edit payment files | No | Yes | SmarterPay |
| Payment data processor | Import, view and modify the properties of payment files and submissions | No | No | SmarterPay |
| Payment file signer | Sign payment files | Yes | Yes | SmarterPay |
| Reports processor | Establish a connection with Bacs, synchronise the reports list, download and view reports | Yes | Yes | SmarterPay |
| Reports viewer | View advices and processing reports | No | No | SmarterPay |
| Submission signer | Sign submissions | Yes | Yes | SmarterPay |
| Submissions Authoriser | Authorises submissions if required by the service user. | No | Yes | SmarterPay |
| Submissions processor | Establish a session with Bacs, send a submission and refresh submission status | Yes | Yes | SmarterPay |
| System maintainer | Configure all aspects of the Administrator, except for system users | No | No | Administrator |
| User administrator | Manage existing system users and create new system users | No | No | Administrator |
As the table shows, some of the groups require the use of a smart card. If you select any of these groups for a user, you must select a smart card to associate with the user before clicking the Save button. Otherwise you will see the following message box:
Either select a smart card to associate with the user or uncheck any Group tickboxes that require the use of a smart card.
In addition, some of the groups require the system user to be associated with a service user. If you select any of these groups for a user, you must select at least one of the available service users to associate him with before clicking the Save button. Otherwise you will see the following message box:
Either select a service user to associate with the user or uncheck any Group tickboxes that require him to be associated with a service user.
When you have finished assigning the user to one or more groups, press Save to save your changes, or Cancel to leave this screen without saving your changes.
This will return you to the System users Overview section, where, if you saved your changes, you will now see the new user in the list.
