Actions/Context Menu
Let's take a closer look at some of the actions you can perform on the payment files.
More:
Edit processing date
Select this option to edit the processing date of a selected payment file. If this is a valid action to perform on the selected file, the dialog below will be displayed.
The software will automatically display the next valid processing date. You may choose to use this date by pressing the OK button, or you may choose a different date by using the dropdown arrow to select from the calendar presented to you.
Since Bacs processing rules state that the processing date cannot be any earlier than the day following the current day, the software will not allow you to choose a date that contravenes this rule.
Similarly, if the date you choose is not a valid Bacs processing date (e.g. a Saturday), when you click OK to return to the Payment Files page you will see a message box telling you that this is not valid and advising you of the next valid date you may use.
However, if the file is a multi-processing date file, you will not be allowed to edit the processing date at all. Instead you will see the message box below.
This is because the processing date of a multi-processing date file is implicit in the processing dates specified against each instruction.
Manually Create or Edit a Payment File
Select this option if you wish to create or edit a payment file manually. This feature requires the system user to have the necessary security privileges selected in the SmarterPay Administrator.
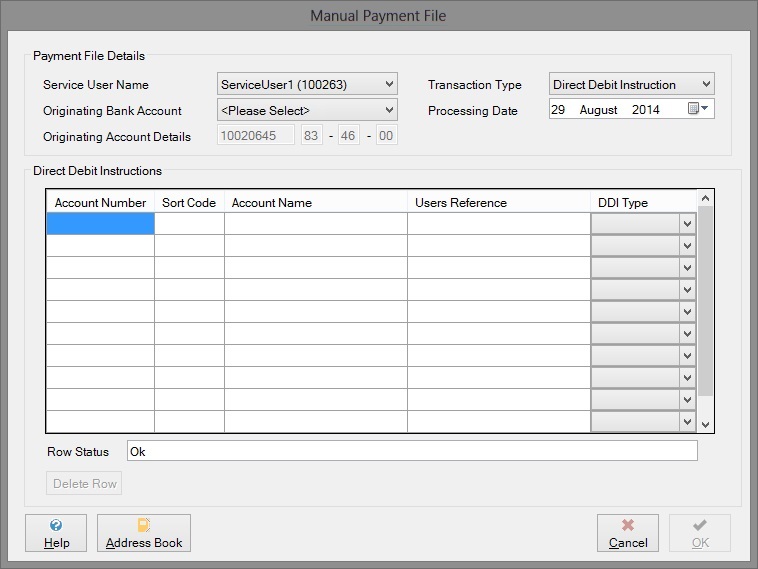
If the current user has these privileges, the dialog below will be displayed when either of the menu options are clicked. If you are creating a new payment file, then the Payment Instructions table will be blank. Whereas if you are editing an existing payment file, the payment instructions section will be populated with all the transactions relating to that payment file. It is possible to edit payment files that have been created manually using this dialog, or edit payment files that have been imported so long as they meet the necessary criteria.
It is possible to create or edit Direct Debits, Direct Credits and Direct Debit Instructions. There are two possible layouts for this dialog depending on the type of transaction you have selected.
Layout 1: For Direct Debits and Direct Credits:
Layout 2: For Direct Debit Instructions:
There are two sections to this dialog, the Payment File Details section defines the type of transaction that will take place and the originating bank account details, while the Instructions section defines each payment transaction that is to be processed, use one row per payment instruction or direct debit instruction.
The values in the Instructions table can be edited by mouse click, pressing F2 or typing the value in directly. You can move from cell to cell by using the arrow keys, tab or return.
The details of each section are as follows:
Payment File Details
Service User Name
This is a list of all the service users that are linked to the currently logged in system user. You can choose which service user you wish the transactions to take place for. When creating a new payment file, this list will default to the first Service User available. If you are editing an existing payment file, it will default to the Service User that it relates to.
Originating Bank Account
This list is populated with all the bank accounts relating to the currently selected service user, allowing you to specify which bank account the transactions are to originate from. By default, this will select the main bank account for the service user, unless you are editing an existing payment file, in which case the associated bank account will be selected.
Account Details
The details of the selected originating bank account are displayed here. The account number is displayed in the first box and the sort code is displayed in the three corresponding boxes that follow. You cannot change these values from the Submissions client, they are only displayed to confirm the bank account for the payment instructions.
Transaction Type
Use this drop down list to select between Direct Debit, Direct Credit or Direct Debit Instructions. You can only have one type of transaction for each payment file created manually and all transactions in the instructions section will be of this type.
Processing Date
Use this calendar to select the earliest processing date for the transactions.
Instructions Section
Account Number
This is the destination account number for the particular payment instruction.
Sort Code
This is the destination sort code for the particular payment instruction.
Account Name
This is the account name of the destination payment instruction.
Users Reference
Depending on the Bank, the reference will appear on the bank statement of the destination account. For payments to Building Societies accounts, the Users Reference should be the Roll Number for the account.
Amount
The monetary amount to be transferred. Use a decimal point to indicate pence. This column will not be available for direct debit instructions because they do not contain a monetary amount.
DDI Type
There are three options which can be selected here, New DDI, Cancellation and Conversion.
Use New DDI to set up new direct debit instructions and Cancellation to cancel a direct debit. Conversion DDI's are used whenever an existing Direct Debit Originator is converting from a paper based system to the Automated Direct Debit Instruction Service (AUDDIS).
In order to convert the DDI’s to the AUDDIS system, the Originator is required to submit a list of all current instructions being collected with the DDI type set to ‘Conversion’. This list must be sent to Bacs while in Test status and the file should mirror the ‘live’ file that will be submitted once testing has been completed.
Once the Originator is satisfied that all paper instructions have been converted successfully, they will request that the status is set to 'Live'. Once in this live state, only New and Cancellation DDI’s may be submitted.
This option is not available when creating or editing Direct Debits or Direct Credits.
Row Status
This displays the current status of the row. Any errors relating to the payment instructions sort code and account number will be displayed here.
Total
This simply displays the total amount that will be transferred for all payment instructions. This is not displayed for Direct Debit Instructions since there is no value associated with DDIs.
Delete Row
Use this button to remove a payment instruction completely. As an alternative, the delete key can be used to clear the contents of the currently selected cell.
Address Book
The address book can be used to store account details that are used frequently in manual submissions. To show or hide the address book press the ‘Address Book’ button. The following dialog should then be shown.
View Summary
This option allows you to view a summary report of one or more selected payment files. You can then print the report from the preview screen. The summary report is produced by the SmarterPay software, not by Bacs.
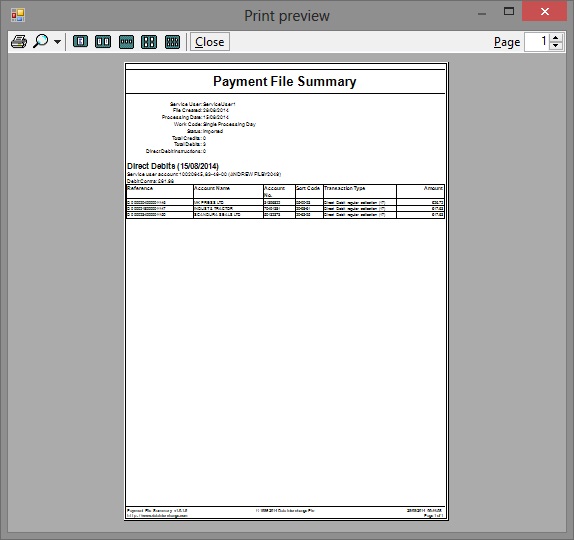
Select one or more payment file lines in the data area, then select this option in order to view a summary report containing the details of the selected payment files. A sample summary report is shown below.
It shows, at the top, a summary of the file details, including:
- the service user associated with the payment file
- the date the file was created
- the processing date
- the work code i.e. whether the file covers a single processing day or a multi-processing day
- the current status of the file e.g. Processed
- the total number of credits
- the total number of debits
- the number of direct debit instructions
This is followed by a list of all the credits and debits in the payment file, broken down by service user account.
Create Submission
Select one or more payment files in the data area, then select this option in order to create a submission containing the selected payment files. If you have more than one service user defined in the Administrator, you will now see the Select Service User dialog, shown below.
You must select a service user with which to associate the submission you are creating. Highlight the service user to select it, then click the OK button.
If there is only one service user in your system, the submission will automatically be associated with that user.
The payment file status will change to “Part of Submission” and the payment file (s) will be given a value in the Sub. Serial No column. If you look on the Active Submissions page, you will see that a new entry has been added, with the status of “Prepared” and linked to the payment file(s) by the submission number.
A bureau may create a submission containing one or more payment files, but a non-bureau may only create a submission containing a single payment file.
Jump To Submission
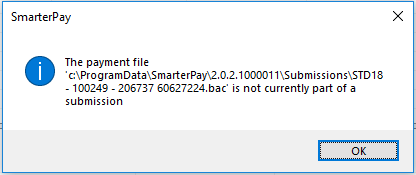
This option allows you to identify the submission that is associated with the currently selected payment file. Selecting it will change the view to the Submissions tab, and highlight the associated submission. If it is not associated with any submissions, you will see the following message:
Open with...
This option allows you to open your payment file using either a text editor, or any other program of your choosing. This provides an easy way for you to view your payment file's raw data on disk, which cannot be done using Windows File Explorer due to SmarterPay's usage of secure file encryption.


